yala control acces hotelier pni ch2000r / ch2000l...
TRANSCRIPT
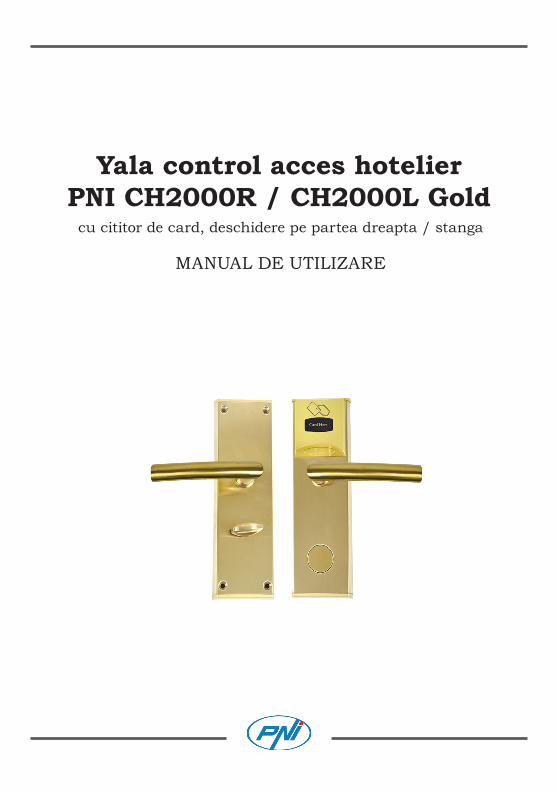
Yala control acces hotelierPNI CH2000R / CH2000L Gold
cu cititor de card, deschidere pe partea dreapta / stanga
MANUAL DE UTILIZARE


3
CARACTERISTICI PRINCIPALE:• Yala PNI CH2000 este usor de folosit si configurat cu ajutorul unui PC cu
sistem Windows si port USB. • Pentru a evita erorile, ora yalei trebuie sincronizata cu ora computerului• Yala are o serie de functii cum ar fi: alarma, atentionare pentru inchidere
usa, functia nu-deranjati etc.• Rapoartele pot fi exportate ca fisiere Excel.• Doua metode de deschidere: cu card si cu cheie mecanica• Protectie antiefractie, alarma inchidere falsa, alarma tensiune joasa
CARACTERISTICI TEHNICE:• Tip card: MF1 • Timp actionare: <1 secunda• Alimentare: 6V (4 x AA baterii alcaline. Bateriile nu sunt incluse.) • Consum maxim: 200 mA• Temperatura de lucru: -20 ~ +50°C• Umiditate de lucru: ≤ 80%• Grosime usa: 30 ~ 50mm• Inregistrare evenimente: salveaza ultimele 1000 de actiuni de deschidere
(inclusiv deschiderea cu cheie)• Distanta actionare card: 0 - 5cm fata de senzor • Greutate yala: 3.4 kg• Dimensiuni exterioare: 244 x 77 x 26mm
ATENTIE: Pentru a putea folosi yala CH2000 aveti nevoie de programatorul de card PNI FLH60 (include CD software si card de proximitate) si de carduri de proximitate PNI EMC-05 13.56 MHz MF1.
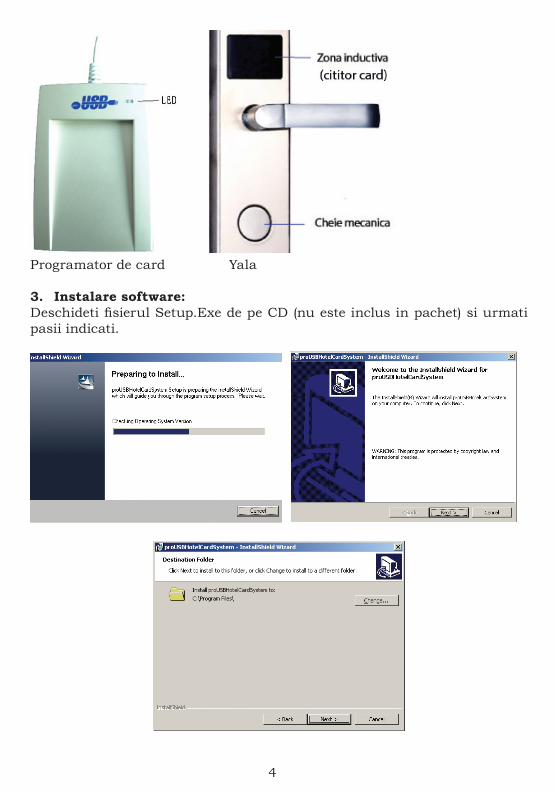
INSTRUCTIUNI DE INSTALARE:1. Cerinte hardware si software:PC cu sistem de operare Widows (XP, VISTA, WIN7 sau Win2000) cu cel putin un port USB si rezolutie de cel putin 1024 x 768 px.2. Instalare programator de card:Conectati programatorul de card la computer prin portul USB. Daca ledul verde se aprinde urmat de doua beep-uri scurte, inseamna ca instalarea s-a facut cu succes.
Nota: Programatorul de card nu este inclus. Se achizitioneaza separat.
4
Programator de card Yala
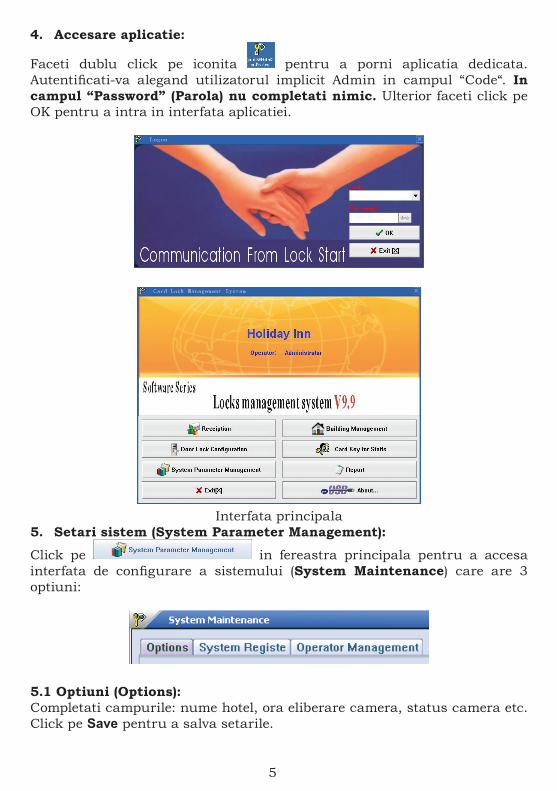
3. Instalare software:Deschideti fisierul Setup.Exe de pe CD (nu este inclus in pachet) si urmati pasii indicati.
5
4. Accesare aplicatie:
Faceti dublu click pe iconita pentru a porni aplicatia dedicata. Autentificati-va alegand utilizatorul implicit Admin in campul “Code“. In campul “Password” (Parola) nu completati nimic. Ulterior faceti click pe OK pentru a intra in interfata aplicatiei.
Interfata principala5. Setari sistem (System Parameter Management):
Click pe in fereastra principala pentru a accesa interfata de configurare a sistemului (System Maintenance) care are 3 optiuni:
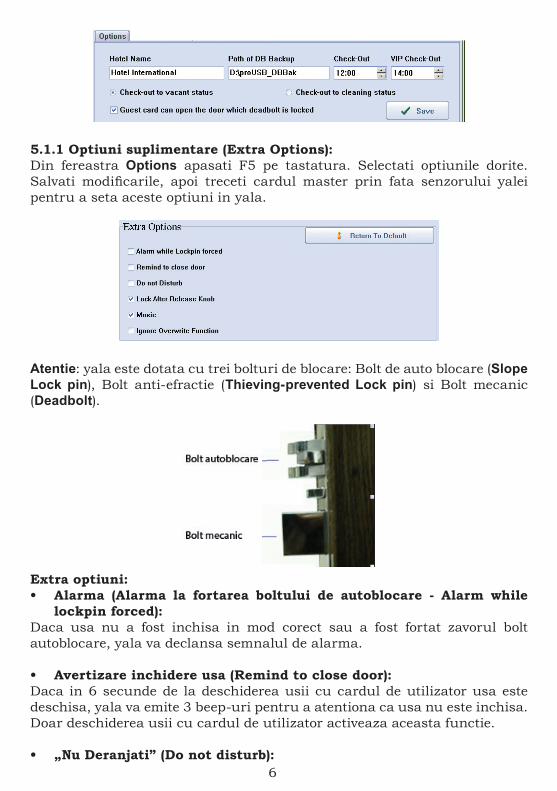
5.1 Optiuni (Options): Completati campurile: nume hotel, ora eliberare camera, status camera etc. Click pe Save pentru a salva setarile.
6
5.1.1 Optiuni suplimentare (Extra Options):Din fereastra Options apasati F5 pe tastatura. Selectati optiunile dorite. Salvati modificarile, apoi treceti cardul master prin fata senzorului yalei pentru a seta aceste optiuni in yala.
Atentie: yala este dotata cu trei bolturi de blocare: Bolt de auto blocare (Slope Lock pin), Bolt anti-efractie (Thieving-prevented Lock pin) si Bolt mecanic (Deadbolt).
Extra optiuni:• Alarma (Alarma la fortarea boltului de autoblocare - Alarm while
lockpin forced):Daca usa nu a fost inchisa in mod corect sau a fost fortat zavorul bolt autoblocare, yala va declansa semnalul de alarma.
• Avertizare inchidere usa (Remind to close door):Daca in 6 secunde de la deschiderea usii cu cardul de utilizator usa este deschisa, yala va emite 3 beep-uri pentru a atentiona ca usa nu este inchisa. Doar deschiderea usii cu cardul de utilizator activeaza aceasta functie.
• „Nu Deranjati” (Do not disturb):
7
Indicatorul luminos se va aprinde slab la fiecare 3 secunde pentru a indica optiunea Nu Deranjati.
• Inchidere yala dupa eliberare maner (Lock after release knob):Dupa trecerea cardului prin fata senzorului, motorasul se va roti in sensul acelor de ceasornic. Apasati pe manerul yalei pentru a deschide usa. Dupa eliberarea manerului, motorasul se va roti in sens invers acelor de ceasornic in timp ce yala se va inchide.Daca aceasta functie nu este activata, motorasul se va roti imediat in sens invers acelor de ceasornic, iar usa nu va mai putea fi deschisa cand se apasa pe maner.
• Muzica (Music):Dupa trecerea cardului, yala va emite o melodie pentru a indica utilizatorului ca poate deschide usa. Daca aceasta functie nu a fost activata, se va auzi doar un beep scurt.
• Ignora suprascriere (Ignore overwrite function):Informatiile de pe toate cardurile, cu exceptia cardului de utilizator, pot suprascrie informatiile de pe alt card, cu conditia ca cele doua carduri sa fie de acelasi tip.
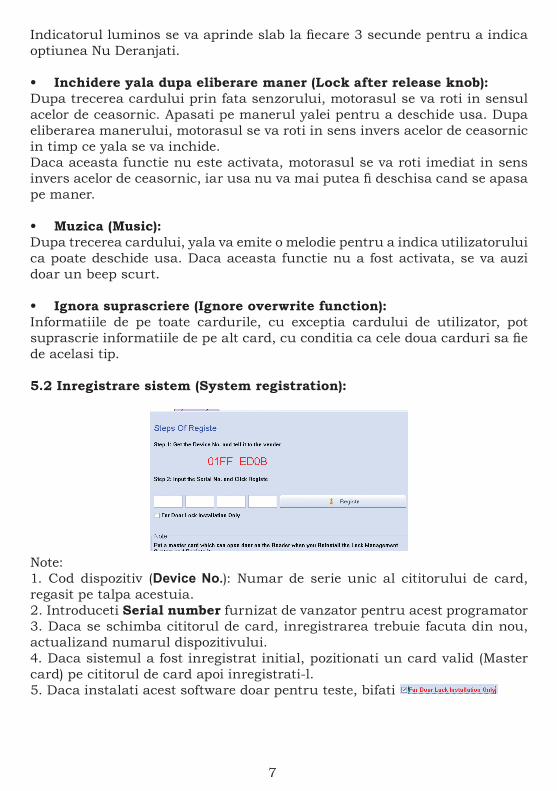
5.2 Inregistrare sistem (System registration):
Note:1. Cod dispozitiv (Device No.): Numar de serie unic al cititorului de card, regasit pe talpa acestuia.2. Introduceti Serial number furnizat de vanzator pentru acest programator3. Daca se schimba cititorul de card, inregistrarea trebuie facuta din nou, actualizand numarul dispozitivului. 4. Daca sistemul a fost inregistrat initial, pozitionati un card valid (Master card) pe cititorul de card apoi inregistrati-l.5. Daca instalati acest software doar pentru teste, bifati
8
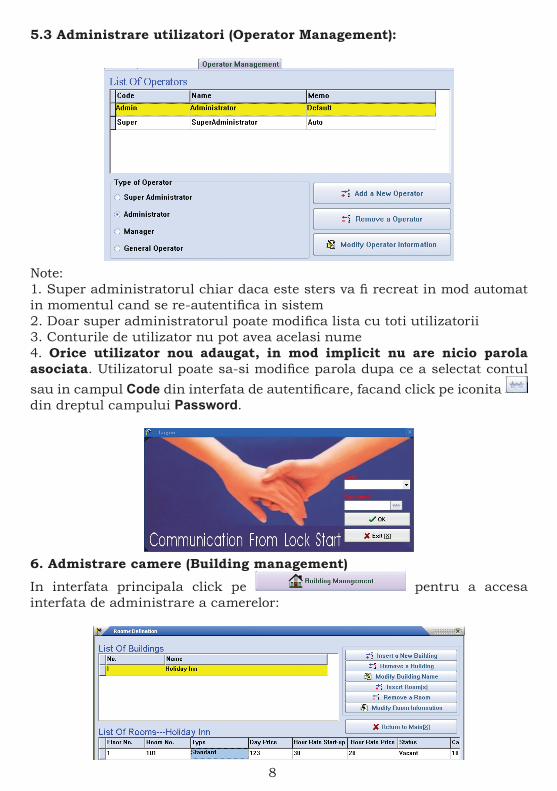
5.3 Administrare utilizatori (Operator Management):
Note:1. Super administratorul chiar daca este sters va fi recreat in mod automat in momentul cand se re-autentifica in sistem2. Doar super administratorul poate modifica lista cu toti utilizatorii3. Conturile de utilizator nu pot avea acelasi nume4. Orice utilizator nou adaugat, in mod implicit nu are nicio parola asociata. Utilizatorul poate sa-si modifice parola dupa ce a selectat contul sau in campul Code din interfata de autentificare, facand click pe iconita din dreptul campului Password.
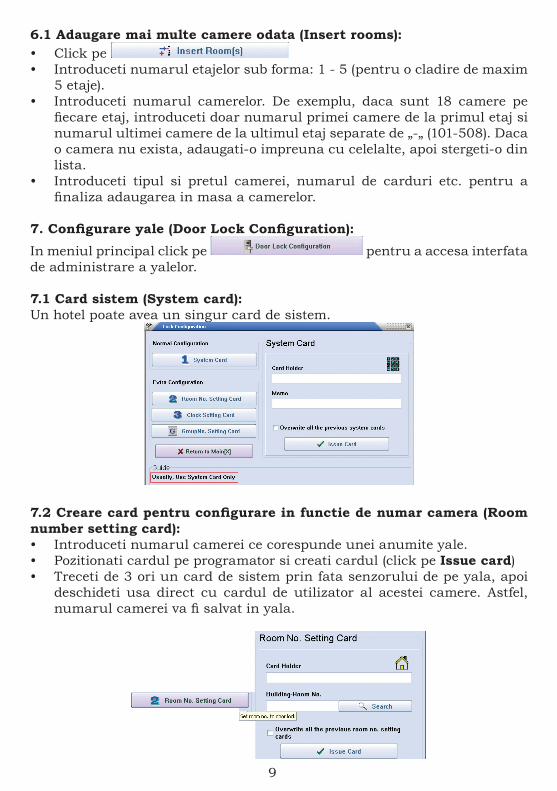
6. Admistrare camere (Building management)
In interfata principala click pe pentru a accesa interfata de administrare a camerelor:
9
6.1 Adaugare mai multe camere odata (Insert rooms):• Click pe • Introduceti numarul etajelor sub forma: 1 - 5 (pentru o cladire de maxim
5 etaje).• Introduceti numarul camerelor. De exemplu, daca sunt 18 camere pe
fiecare etaj, introduceti doar numarul primei camere de la primul etaj si numarul ultimei camere de la ultimul etaj separate de „-„ (101-508). Daca o camera nu exista, adaugati-o impreuna cu celelalte, apoi stergeti-o din lista.
• Introduceti tipul si pretul camerei, numarul de carduri etc. pentru a finaliza adaugarea in masa a camerelor.
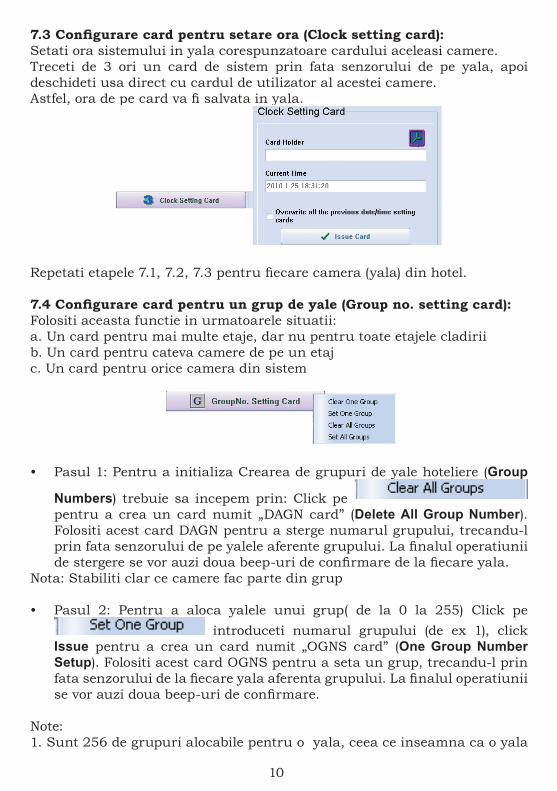
7. Configurare yale (Door Lock Configuration):In meniul principal click pe pentru a accesa interfata de administrare a yalelor.
7.1 Card sistem (System card):Un hotel poate avea un singur card de sistem.
7.2 Creare card pentru configurare in functie de numar camera (Room number setting card):• Introduceti numarul camerei ce corespunde unei anumite yale. • Pozitionati cardul pe programator si creati cardul (click pe Issue card)• Treceti de 3 ori un card de sistem prin fata senzorului de pe yala, apoi
deschideti usa direct cu cardul de utilizator al acestei camere. Astfel, numarul camerei va fi salvat in yala.
10
7.3 Configurare card pentru setare ora (Clock setting card):Setati ora sistemului in yala corespunzatoare cardului aceleasi camere.Treceti de 3 ori un card de sistem prin fata senzorului de pe yala, apoi deschideti usa direct cu cardul de utilizator al acestei camere. Astfel, ora de pe card va fi salvata in yala.
Repetati etapele 7.1, 7.2, 7.3 pentru fiecare camera (yala) din hotel.
7.4 Configurare card pentru un grup de yale (Group no. setting card):Folositi aceasta functie in urmatoarele situatii:a. Un card pentru mai multe etaje, dar nu pentru toate etajele cladiriib. Un card pentru cateva camere de pe un etajc. Un card pentru orice camera din sistem
• Pasul 1: Pentru a initializa Crearea de grupuri de yale hoteliere (Group
Numbers) trebuie sa incepem prin: Click pe pentru a crea un card numit „DAGN card” (Delete All Group Number). Folositi acest card DAGN pentru a sterge numarul grupului, trecandu-l prin fata senzorului de pe yalele aferente grupului. La finalul operatiunii de stergere se vor auzi doua beep-uri de confirmare de la fiecare yala.
Nota: Stabiliti clar ce camere fac parte din grup
• Pasul 2: Pentru a aloca yalele unui grup( de la 0 la 255) Click pe introduceti numarul grupului (de ex 1), click
Issue pentru a crea un card numit „OGNS card” (One Group Number Setup). Folositi acest card OGNS pentru a seta un grup, trecandu-l prin fata senzorului de la fiecare yala aferenta grupului. La finalul operatiunii se vor auzi doua beep-uri de confirmare.
Note:1. Sunt 256 de grupuri alocabile pentru o yala, ceea ce inseamna ca o yala
11
poate face parte in acelasi timp din mai multe grupuri. 2. Pentru a sterge un anumit Group Number, mai intai creati un card DOGN (Delete One Group Number). Treceti cardul prin fata senzorului. La finalul operatiunii se vor auzi doua beep-uri de confirmare.3. Pentru a adauga o anumita yala in toate Group Numbers, mai intai creati un card SAGN (Setup All Group Numbers). Treceti cardul prin fata senzorului. La finalul operatiunii se vor auzi doua beep-uri de confirmare.
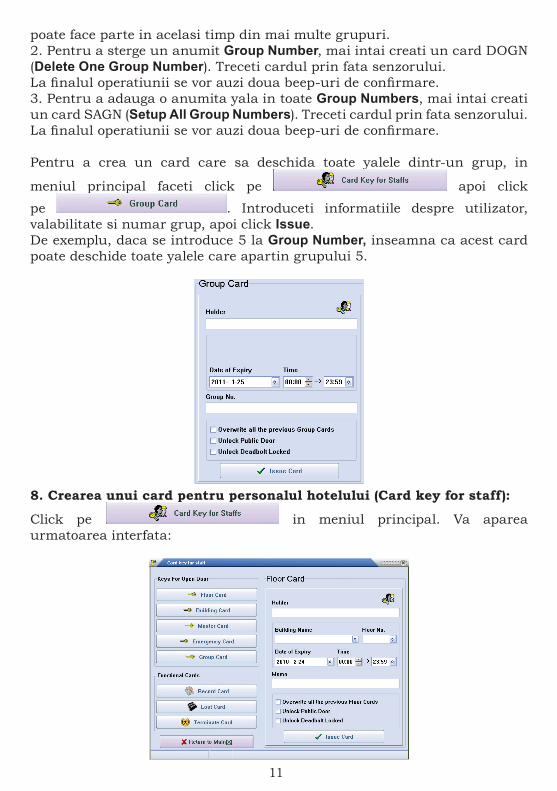
Pentru a crea un card care sa deschida toate yalele dintr-un grup, in
meniul principal faceti click pe apoi click
pe . Introduceti informatiile despre utilizator, valabilitate si numar grup, apoi click Issue.De exemplu, daca se introduce 5 la Group Number, inseamna ca acest card poate deschide toate yalele care apartin grupului 5.
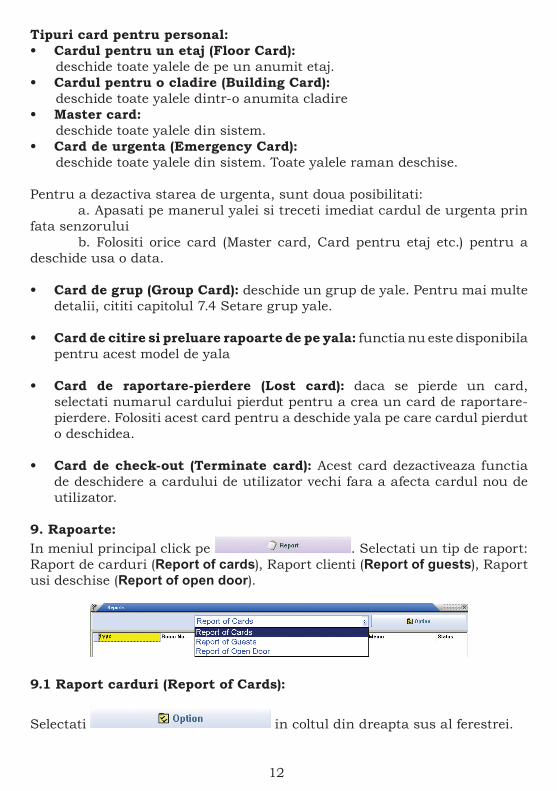
8. Crearea unui card pentru personalul hotelului (Card key for staff):
Click pe in meniul principal. Va aparea urmatoarea interfata:
12
Tipuri card pentru personal:• Cardul pentru un etaj (Floor Card): deschide toate yalele de pe un anumit etaj.• Cardul pentru o cladire (Building Card): deschide toate yalele dintr-o anumita cladire• Master card: deschide toate yalele din sistem.• Card de urgenta (Emergency Card): deschide toate yalele din sistem. Toate yalele raman deschise.
Pentru a dezactiva starea de urgenta, sunt doua posibilitati: a. Apasati pe manerul yalei si treceti imediat cardul de urgenta prin fata senzorului b. Folositi orice card (Master card, Card pentru etaj etc.) pentru a deschide usa o data.
• Card de grup (Group Card): deschide un grup de yale. Pentru mai multe detalii, cititi capitolul 7.4 Setare grup yale.
• Card de citire si preluare rapoarte de pe yala: functia nu este disponibila pentru acest model de yala
• Card de raportare-pierdere (Lost card): daca se pierde un card, selectati numarul cardului pierdut pentru a crea un card de raportare-pierdere. Folositi acest card pentru a deschide yala pe care cardul pierdut o deschidea.
• Card de check-out (Terminate card): Acest card dezactiveaza functia de deschidere a cardului de utilizator vechi fara a afecta cardul nou de utilizator.
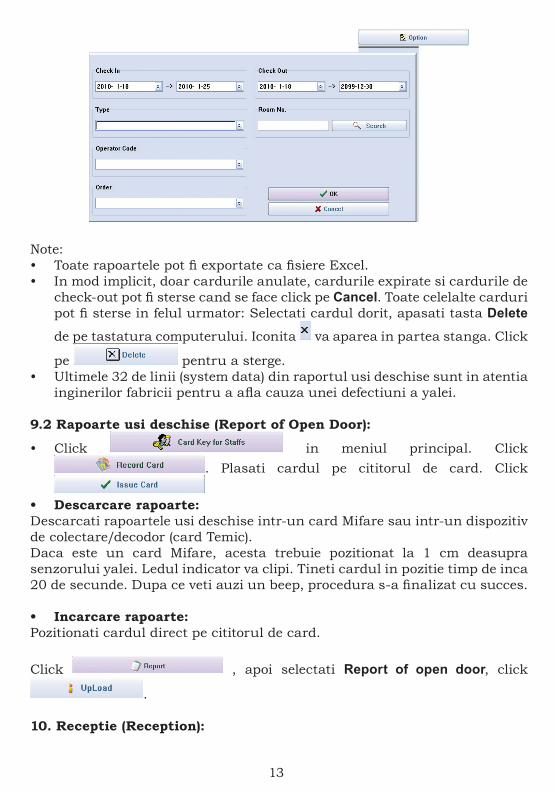
9. Rapoarte:In meniul principal click pe . Selectati un tip de raport: Raport de carduri (Report of cards), Raport clienti (Report of guests), Raport usi deschise (Report of open door).
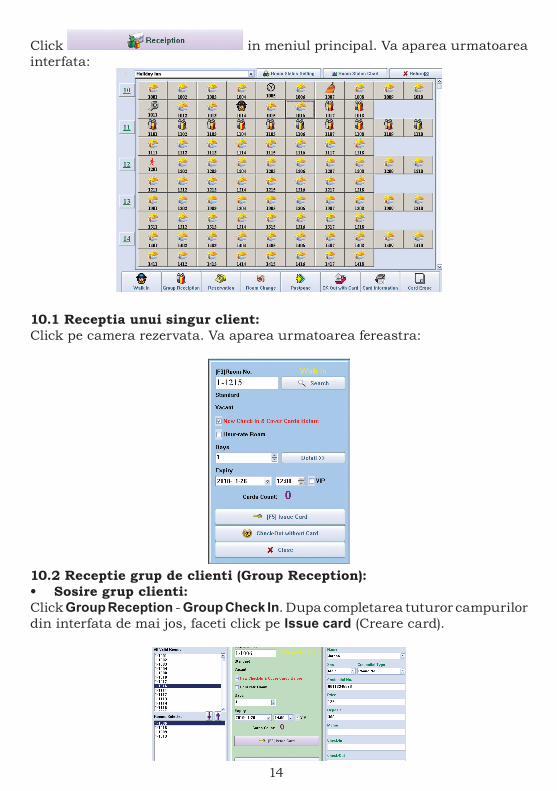
9.1 Raport carduri (Report of Cards):
Selectati in coltul din dreapta sus al ferestrei.
13
Note:• Toate rapoartele pot fi exportate ca fisiere Excel. • In mod implicit, doar cardurile anulate, cardurile expirate si cardurile de
check-out pot fi sterse cand se face click pe Cancel. Toate celelalte carduri pot fi sterse in felul urmator: Selectati cardul dorit, apasati tasta Delete
de pe tastatura computerului. Iconita va aparea in partea stanga. Click
pe pentru a sterge.• Ultimele 32 de linii (system data) din raportul usi deschise sunt in atentia
inginerilor fabricii pentru a afla cauza unei defectiuni a yalei.
9.2 Rapoarte usi deschise (Report of Open Door):
• Click in meniul principal. Click . Plasati cardul pe cititorul de card. Click
• Descarcare rapoarte:Descarcati rapoartele usi deschise intr-un card Mifare sau intr-un dispozitiv de colectare/decodor (card Temic).Daca este un card Mifare, acesta trebuie pozitionat la 1 cm deasupra senzorului yalei. Ledul indicator va clipi. Tineti cardul in pozitie timp de inca 20 de secunde. Dupa ce veti auzi un beep, procedura s-a finalizat cu succes.
• Incarcare rapoarte:Pozitionati cardul direct pe cititorul de card.
Click , apoi selectati Report of open door, click
.
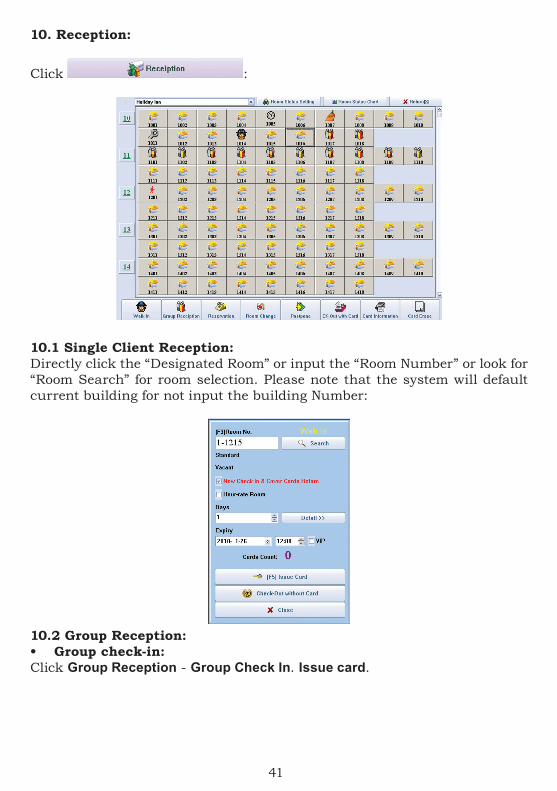
10. Receptie (Reception):
14
Click in meniul principal. Va aparea urmatoarea interfata:
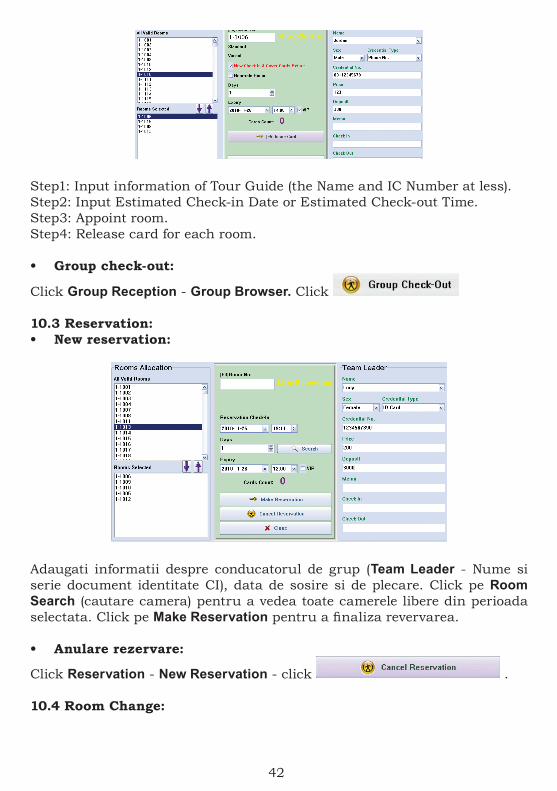
10.1 Receptia unui singur client:Click pe camera rezervata. Va aparea urmatoarea fereastra:
10.2 Receptie grup de clienti (Group Reception):• Sosire grup clienti:Click Group Reception - Group Check In. Dupa completarea tuturor campurilor din interfata de mai jos, faceti click pe Issue card (Creare card).
15
• Introduceti informatiile referitoare la liderul grupului• Introduceti data de sosire si de plecare• Asociati o camera• Eliberati cate un card pentru fiecare camera.
• Plecare grup clienti:Click Group Reception - Group Browser - Completati Nume ghid turistic, apoi
Click
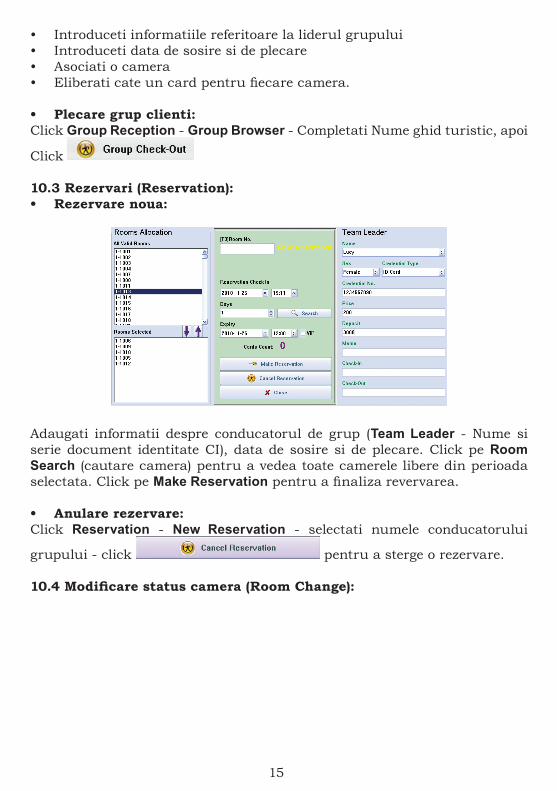
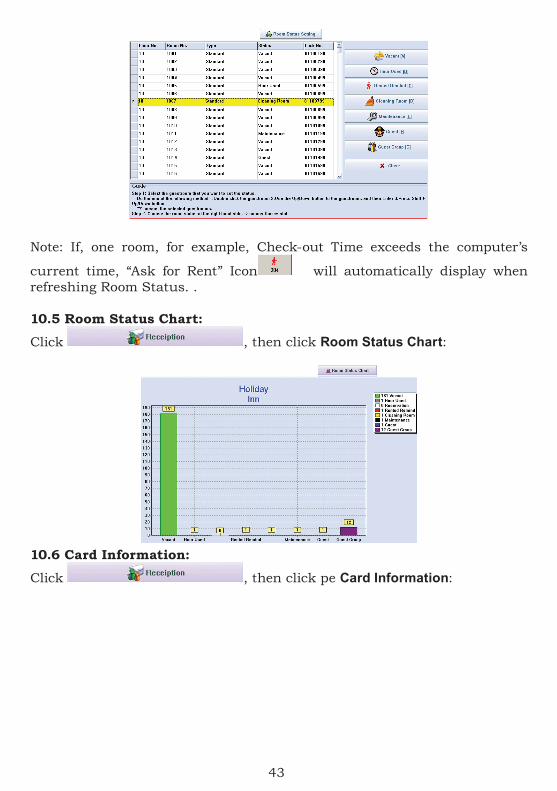
10.3 Rezervari (Reservation):• Rezervare noua:
Adaugati informatii despre conducatorul de grup (Team Leader - Nume si serie document identitate CI), data de sosire si de plecare. Click pe Room Search (cautare camera) pentru a vedea toate camerele libere din perioada selectata. Click pe Make Reservation pentru a finaliza revervarea.
• Anulare rezervare:Click Reservation - New Reservation - selectati numele conducatorului
grupului - click pentru a sterge o rezervare.
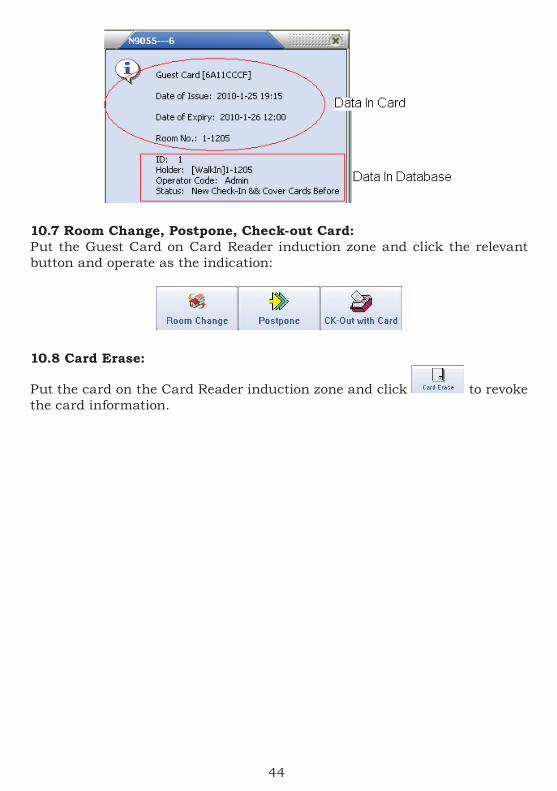
10.4 Modificare status camera (Room Change):
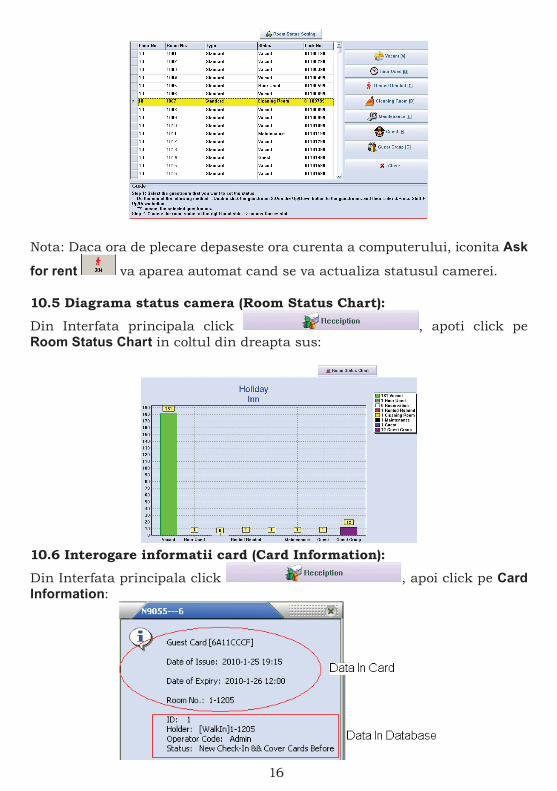
16
Nota: Daca ora de plecare depaseste ora curenta a computerului, iconita Ask
for rent va aparea automat cand se va actualiza statusul camerei.
10.5 Diagrama status camera (Room Status Chart):
Din Interfata principala click , apoti click pe Room Status Chart in coltul din dreapta sus:
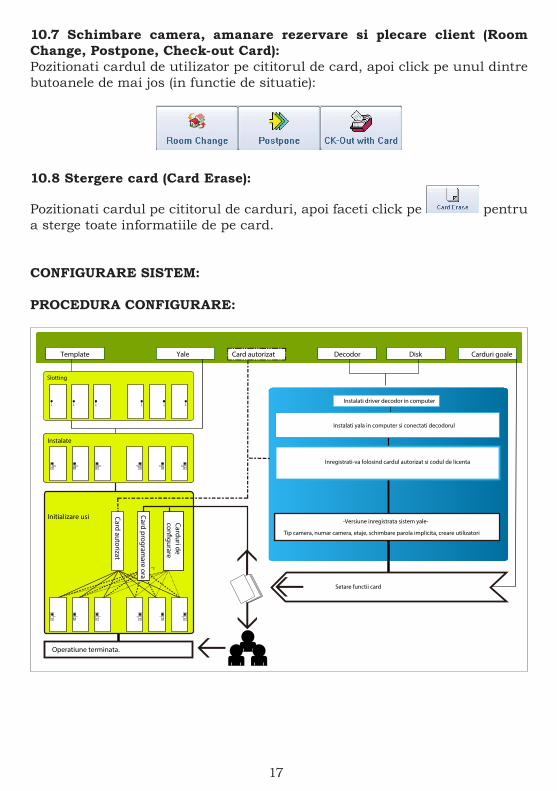
10.6 Interogare informatii card (Card Information):
Din Interfata principala click , apoi click pe Card Information:
17
10.7 Schimbare camera, amanare rezervare si plecare client (Room Change, Postpone, Check-out Card):Pozitionati cardul de utilizator pe cititorul de card, apoi click pe unul dintre butoanele de mai jos (in functie de situatie):
10.8 Stergere card (Card Erase):
Pozitionati cardul pe cititorul de carduri, apoi faceti click pe pentru a sterge toate informatiile de pe card.
CONFIGURARE SISTEM:
PROCEDURA CONFIGURARE:
Template Card autorizat
Inregistrati-va folosind cardul autorizat si codul de licenta
Slotting
Operatiune terminata.
Initializare usi
Yale
Instalate
Decodor Disk
-Versiune inregistrata sistem yale-
Tip camera, numar camera, etaje, schimbare parola implicita, creare utilizatori
Card autorizat
Carduri decon�gurare
Card programare ora
Carduri goale
Setare functii card
Instalati driver decodor in computer
Instalati yala in computer si conectati decodorul
*2
18
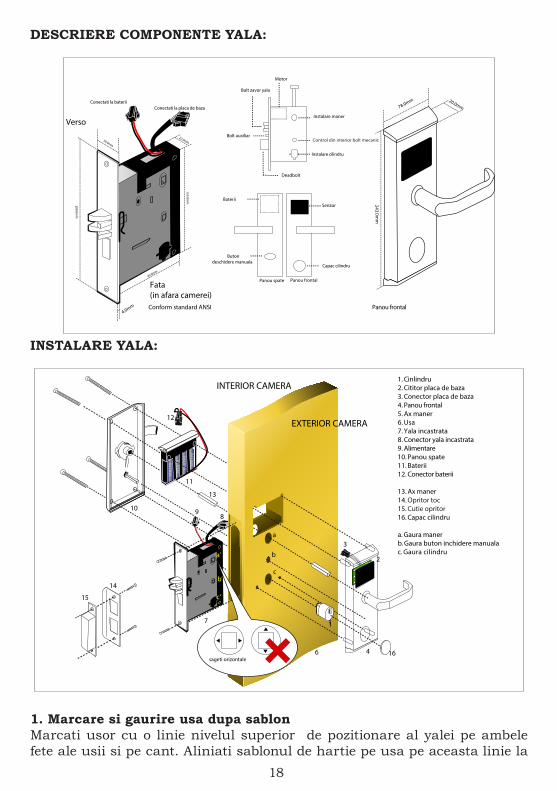
DESCRIERE COMPONENTE YALA:
78.0mm 20.0mm
mm0
.342
Conectati la placa de bazaConectati la baterii
22.0mm
90.0mm
4.0mm
30.0mm
155.0mm
200.0mm
Instalare maner
Motor
Bolt zavor yala
Bolt auxiliarControl din interior bolt mecanic
Fata
Verso
Instalare cilindru
Senzor Baterii
Panou frontalPanou spate
Capac cilindru
Buton deschidere manuala
Deadbolt
(in afara camerei)Conform standard ANSI Panou frontal
INSTALARE YALA:
2
4 16
3
5
11
12
13
14
15
BATTERY
BATTERY
BATTERY
BATTERY
10 98
7
b
c
a
a’
b’
c’
11
6
1. Cinlindru2. Cititor placa de baza3. 4.
Conector placa de bazaPanou frontal
5. Ax maner6. Usa7. Yala incastrata8. 9.
Conector yala incastrata
10. Panou spate11.
Alimentare
12. Baterii
13. Ax maner14.
Conector baterii
Opritor toc15. 16.
Cutie opritor
Gaura manera.
Capac cilindru
b. Gaura buton inchidere manualaGaura cilindruc.
INTERIOR CAMERA
EXTERIOR CAMERA
sageti orizontale
1. Marcare si gaurire usa dupa sablonMarcati usor cu o linie nivelul superior de pozitionare al yalei pe ambele fete ale usii si pe cant. Aliniati sablonul de hartie pe usa pe aceasta linie la
19
partea superioara. Indoiti partea ingusta pe cantul usii dupa linia verticala si verificati pozitia marcajelor / yalei pe usa. Centrati desenul aferent cantului usii pe centrul acestuia (zero).
Dupa ce ati finalizat asezarea sablonului fixati-l pe pozitie si desenati marcajele de tip gaura de 4x14mm 22 mm 2x30 mm si de tip patrat 200x30mm,160x24mm.
Mutati sablonul pe partea cealalta a usii si repetati procedura de fixare si de marcare a gaurilor. Dupa marcaj procedati la exacutarea gaurilor dupa marcaj.Este recomandat sa le executati de pe ambele fete si sa le intalniti la mijlocul usii. Ulterior executati gaurile aferete Cantului si placii de toc, pentru Yala/ Bolturi, si pentru a iesi la nivel cu usa / respectiv tocul (grosime in toc 5.0mm - 200x30mm si locatia de yala 96.0mm (160x24mm slot).
2. Instalare YalaIntroduceti yala in locasul aferent din cantul usii, perpendicular pe acesta, si marcati cu un creion limitele exterioare ale placii pe cantul usii. Scoatei yala si scobiti usor (cu atentie pentru a nu deteriora excesiv usa) cu o dalta, pana obtineti un locas ce permite ingroparea placii pana la nivelul cantului. Introduceti yala, verificati Alinierea cu cantul usii si fixati-o cu suruburi de acesta.
20
3. Fixarea cilindruluiIntroduceti cilindrul pe partea frontala si fixati-l prin strangerea celor 2 suruburi negre de tip imbus pe partea cealalta a yalei/usii, folosind o cheie de tip imbus.
4. Instalare parte frontala si dorsala a corpului yalei:Extrageti cele 2 cabluri din interiorul usii si conectati cele 2 fete cu ajutorul conectorilor dedicati. Asigurati-va ca sunt conectate corect. Instalati bolturile dreptunghiulare aferente manerelor si butonului interior de blocare. Asigurati-va la montarea fetei exterioare ca cele 2 sageti de pe yala de pe conectorul rotativ de pe yala sunt aliniate.Fixati cele doua parti pe pozitie cu atentie, si aplicati si strangeti cele 4 suruburi disponibile in colet.
5. Instalati bateriile in suportul dedicat respectand polaritatea si montati suportul in locasul dedicat.
21
6. Dupa finalizarea instalarii, verificati daca functiile de baza: Maner interior, Buton de blocare interior si cheie din exterior.
Testare Cilindru si AlimentareIntroduceti cheia de urgenta in yala si rotiti pentru a retrage boltul autoblocabil. Daca yala arata un led albastru intermitend si un beep, inseamna ca clilindrul si alimentarea functioneaza corect.
Beep B
Testare cilindrul si alimentarea
Testare Buton blocare interiorVerificati daca Butonul de blocare din interior actioneaza Boltul mecanic dreptunghiular de pe yala si daca manerul interior al yalei deblocheaza acest bolt. Daca aceasta operatiune intampina rezistenta slabiti suruburile de
22
strangere si verificati din nou.
Testere Buton blocare interior
Atentie: Pentru siguranta, este recomandat sa faceti aceste verificari ale cheii de urgenta si inchiderii/deschiderii din interior doar cu usa deschisa.
Unelte necesare: • Cheie tip imbus pentru instalarea cilindrului interior• Surubelnita cu cap cruce obisnuita• Set de freze de lemn (30 mm) + Masina de gaurit• Ventuza pentru capacul cilindrului (cheie deschidere de urgenta)
23
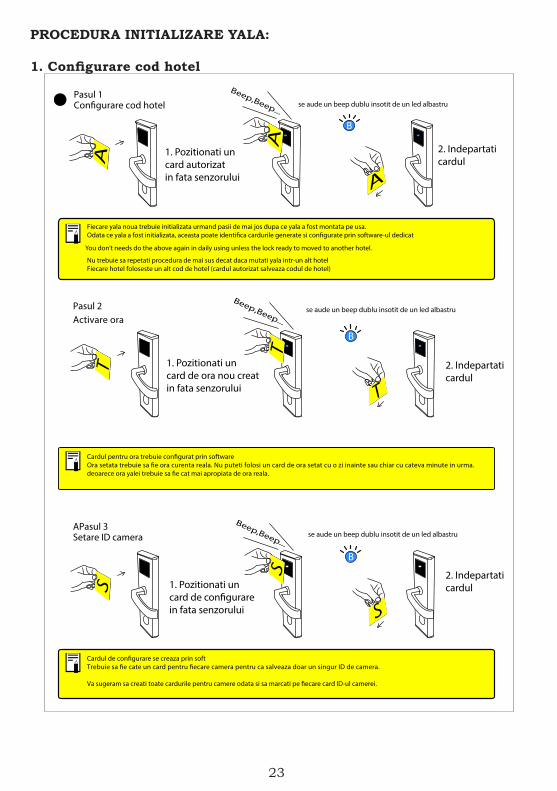
PROCEDURA INITIALIZARE YALA:
1. Configurare cod hotel
Beep,Beep...
Beep,Beep...
Fiecare yala noua trebuie initializata urmand pasii de mai jos dupa ce yala a fost montata pe usa.Odata ce yala a fost initializata, aceasta poate identi�ca cardurile generate si con�gurate prin software-ul dedicat
Nu trebuie sa repetati procedura de mai sus decat daca mutati yala intr-un alt hotel
You don’t needs do the above again in daily using unless the lock ready to moved to another hotel.
Fiecare hotel foloseste un alt cod de hotel (cardul autorizat salveaza codul de hotel)
se aude un beep dublu insotit de un led albastru
se aude un beep dublu insotit de un led albastru
se aude un beep dublu insotit de un led albastru
Beep,Beep...
B
Pasul 2Activare ora
B
APasul 3
Pasul 1
Setare ID camera
Con�gurare cod hotel
Cardul pentru ora trebuie con�gurat prin softwareOra setata trebuie sa �e ora curenta reala. Nu puteti folosi un card de ora setat cu o zi inainte sau chiar cu cateva minute in urma.deoarece ora yalei trebuie sa �e cat mai apropiata de ora reala.
Va sugeram sa creati toate cardurile pentru camere odata si sa marcati pe �ecare card ID-ul camerei.
Cardul de con�gurare se creaza prin softTrebuie sa �e cate un card pentru �ecare camera pentru ca salveaza doar un singur ID de camera.
B
1. Pozitionati uncard autorizatin fata senzorului
1. Pozitionati uncard de ora nou creatin fata senzorului
1. Pozitionati uncard de con�gurarein fata senzorului
2. Indepartaticardul
2. Indepartaticardul
2. Indepartaticardul
24
Ora yaleiPerioada valabilitate
expirat
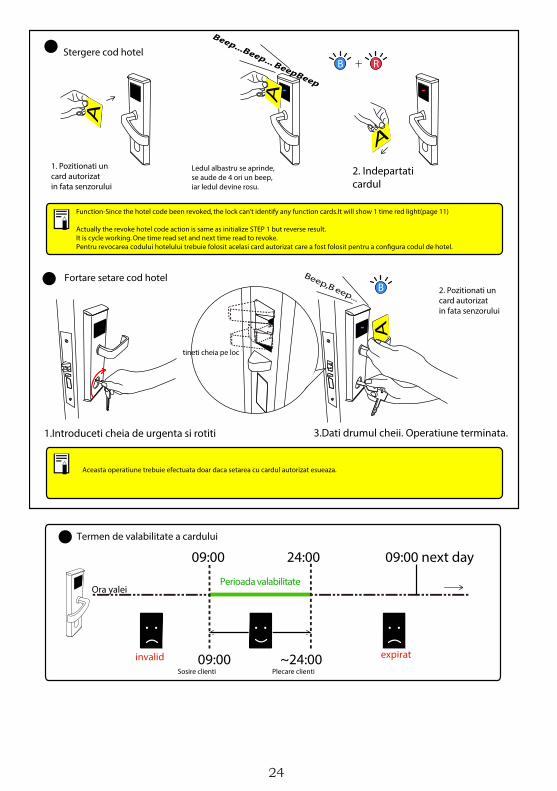
Stergere cod hotel
Sosire clienti ~24:00
Plecare clienti
Fortare setare cod hotel
1.
Beep,Beep...
3.Introduceti cheia de urgenta si rotiti Dati drumul cheii. Operatiune terminata.
tineti cheia pe loc
B
B R
Aceasta operatiune trebuie efectuata doar daca setarea cu cardul autorizat esueaza.
+
invalid 09:00
09:00 next day
Termen de valabilitate a cardului
09:00 24:00
Function-Since the hotel code been revoked, the lock can’t identify any function cards.It will show 1 time red light(page 11)
Actually the revoke hotel code action is same as initialize STEP 1 but reverse result. It is cycle working. One time read set and next time read to revoke.Pentru revocarea codului hotelului trebuie folosit acelasi card autorizat care a fost folosit pentru a con�gura codul de hotel.
1. Pozitionati uncard autorizatin fata senzorului
2. Pozitionati uncard autorizatin fata senzorului
Ledul albastru se aprinde,se aude de 4 ori un beep,iar ledul devine rosu.
2. Indepartaticardul

25
TIPURI DE CARDURI:
Folositi cardul in mod corect.
V
V
B
Card nouCard nou RFID (Mifare 1/IC)
Card golCard care poate � con�gurat.
B F
Card functiiToate tipurile de carduri cu diferite functii.
Un card nou poate deveni card gol prin criptare
FFF
Nu expuneti latemperaturi ridicate
Nu tineti mult timp in apa
Poate cauza pierderea de date
Nu indoiti cardul
26
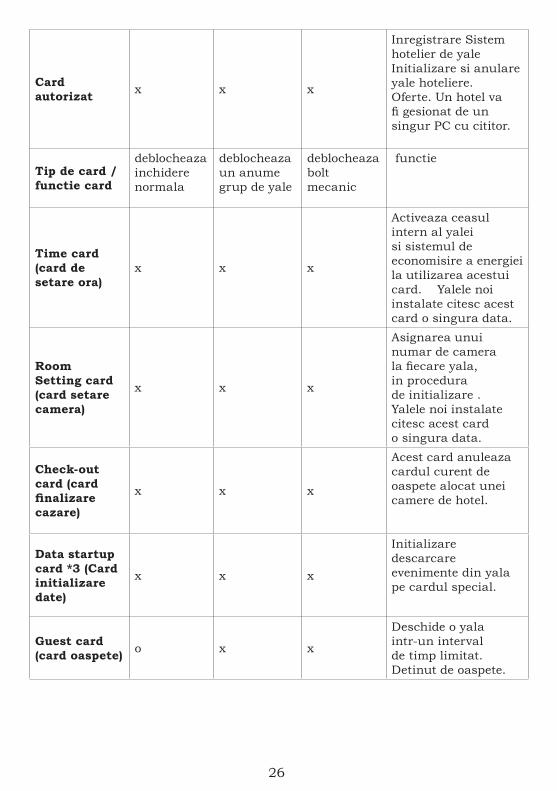
Card autorizat x x x
Inregistrare Sistem hotelier de yale Initializare si anulare yale hoteliere. Oferte. Un hotel va fi gesionat de un singur PC cu cititor.
Tip de card / functie card
deblocheaza inchidere normala
deblocheaza un anume grup de yale
deblocheaza bolt mecanic
functie
Time card (card de setare ora)
x x x
Activeaza ceasul intern al yalei si sistemul de economisire a energiei la utilizarea acestui card. Yalele noi instalate citesc acest card o singura data.
Room Setting card (card setare camera)
x x x
Asignarea unui numar de camera la fiecare yala, in procedura de initializare . Yalele noi instalate citesc acest card o singura data.
Check-out card (card finalizare cazare)
x x x
Acest card anuleaza cardul curent de oaspete alocat unei camere de hotel.
Data startup card *3 (Card initializare date)
x x x
Initializare descarcare evenimente din yala pe cardul special.
Guest card (card oaspete) o x x
Deschide o yala intr-un interval de timp limitat. Detinut de oaspete.
27
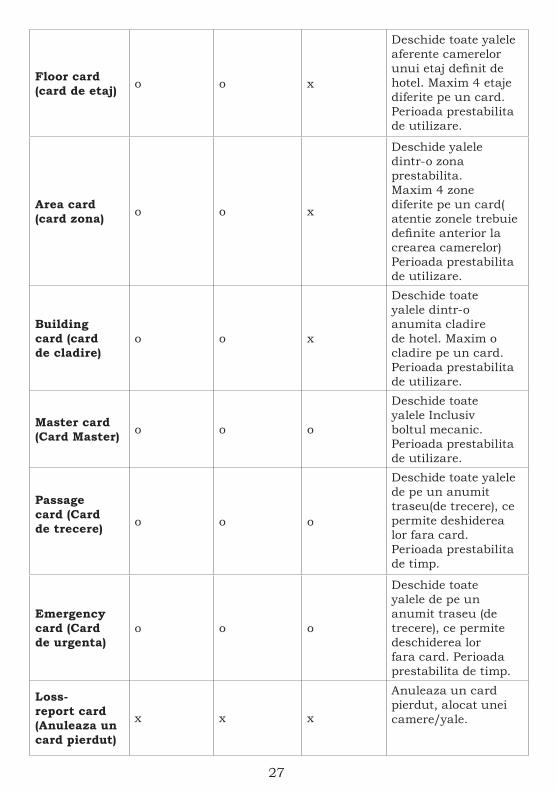
Floor card (card de etaj) o o x
Deschide toate yalele aferente camerelor unui etaj definit de hotel. Maxim 4 etaje diferite pe un card. Perioada prestabilita de utilizare.
Area card (card zona) o o x
Deschide yalele dintr-o zona prestabilita. Maxim 4 zone diferite pe un card( atentie zonele trebuie definite anterior la crearea camerelor) Perioada prestabilita de utilizare.
Building card (card de cladire)
o o x
Deschide toate yalele dintr-o anumita cladire de hotel. Maxim o cladire pe un card. Perioada prestabilita de utilizare.
Master card (Card Master) o o o
Deschide toate yalele Inclusiv boltul mecanic. Perioada prestabilita de utilizare.
Passage card (Card de trecere) o o o
Deschide toate yalele de pe un anumit traseu(de trecere), ce permite deshiderea lor fara card. Perioada prestabilita de timp.
Emergency card (Card de urgenta)
o o o
Deschide toate yalele de pe un anumit traseu (de trecere), ce permite deschiderea lor fara card. Perioada prestabilita de timp.
Loss- report card (Anuleaza un card pierdut)
x x x
Anuleaza un card pierdut, alocat unei camere/yale.
28
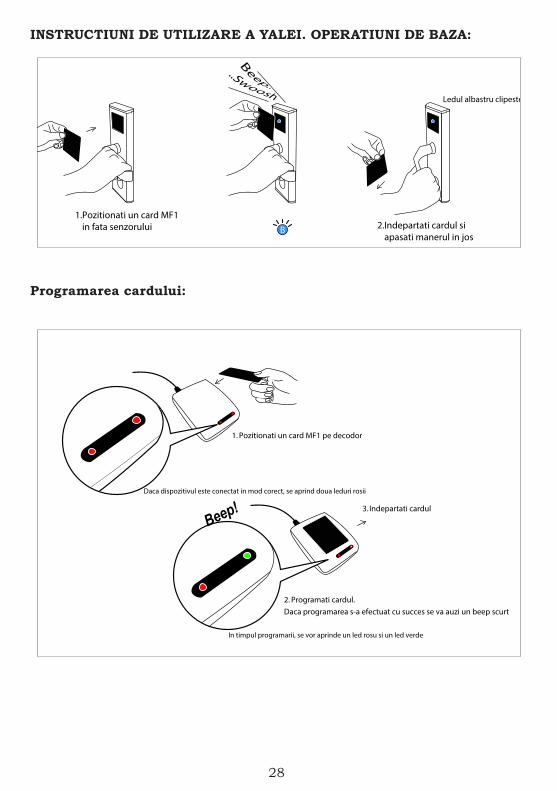
INSTRUCTIUNI DE UTILIZARE A YALEI. OPERATIUNI DE BAZA:
1.Pozitionati un card MF1in fata senzorului
Ledul albastru clipeste
2.Indepartati cardul si apasati manerul in jos
B
Programarea cardului:
1. Pozitionati un card MF1 pe decodor
2. Programati cardul.
3. Indepartati cardul
Daca programarea s-a efectuat cu succes se va auzi un beep scurt
In timpul programarii, se vor aprinde un led rosu si un led verde
Beep!Daca dispozitivul este conectat in mod corect, se aprind doua leduri rosii
Hotel door lock systemPNI CH2000R / CH2000L Gold
right handle / left handle
USER MANUAL

30
MAIN FETURES:• PNI CH2000 is easy to use and configure with a Windows PC and USB
port. • To avoid errors, lock time must be synchronized with PC’s time• Main functions: alarm, close door prompt, Do not disturb etc.• Reports exports as Excel files.• Two independent unlocking methods: card and mechanical key• Jimmying resistance, fake closing alarm and low voltage alarm
CARACTERISTICI TEHNICE:• Card type: MF1 • Starting time : <1 secunda• Working Voltage: 6V (4 x AA alkaline battery) • Maximum power consumption: 200 mA• Working temperature: -20 ~ 50°C• Working humidity: ≤ 80%• Door thickness: 30 ~ 50mm• Unlock recording: save the newest 1000 piece of unclocking record
(including mechanical key unlocking)• Sensor distance: 0 - 5cm• Weight: 3.4 kg• Outdoor panel dimensions: 244 x 77 x 26mm
WARNING: In order to use CH2000 lock you need the card programmer PNI FLH60 (CD software and RFID card included) and proximity cards PNI EMC-05 13.56 MHz.
INSTALATION INSTRUCTIONS:1. Hardware and software requirements:PC with Widows OS (XP, VISTA, WIN7 or Win2000) with at least one USB port and at least 1024 x 768 px resolution.
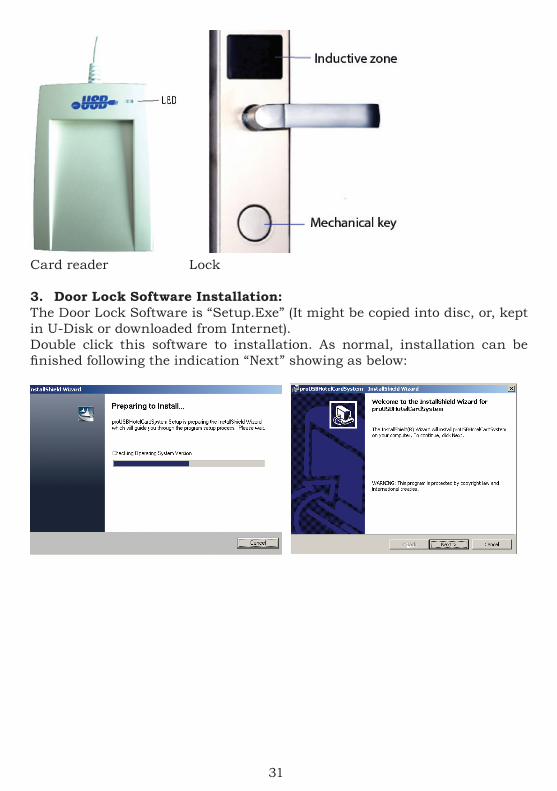
2. Card Reader installation:Connect the Card Reader wire with computer’s USB port, when Green LED lights after two beeps, installation succeed.
Note: the card reader is not included.
31
Card reader Lock
3. Door Lock Software Installation:The Door Lock Software is “Setup.Exe” (It might be copied into disc, or, kept in U-Disk or downloaded from Internet). Double click this software to installation. As normal, installation can be finished following the indication “Next” showing as below:
32
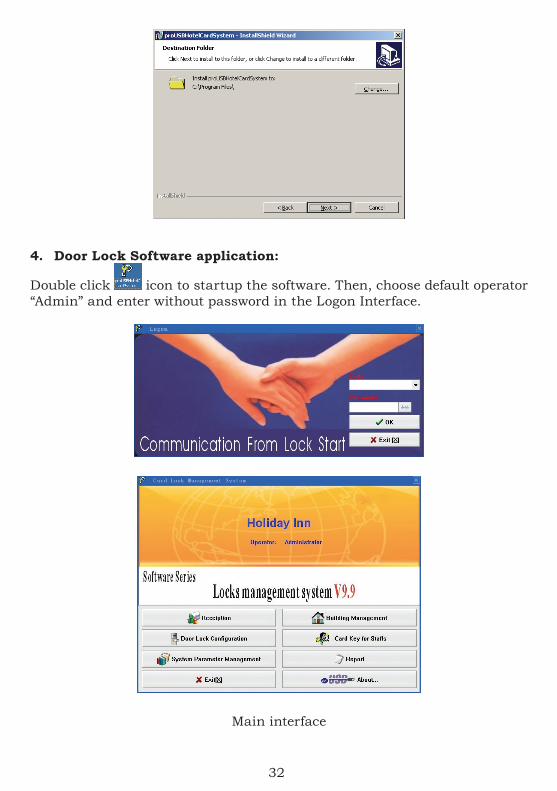
4. Door Lock Software application:
Double click icon to startup the software. Then, choose default operator “Admin” and enter without password in the Logon Interface.
Main interface
33
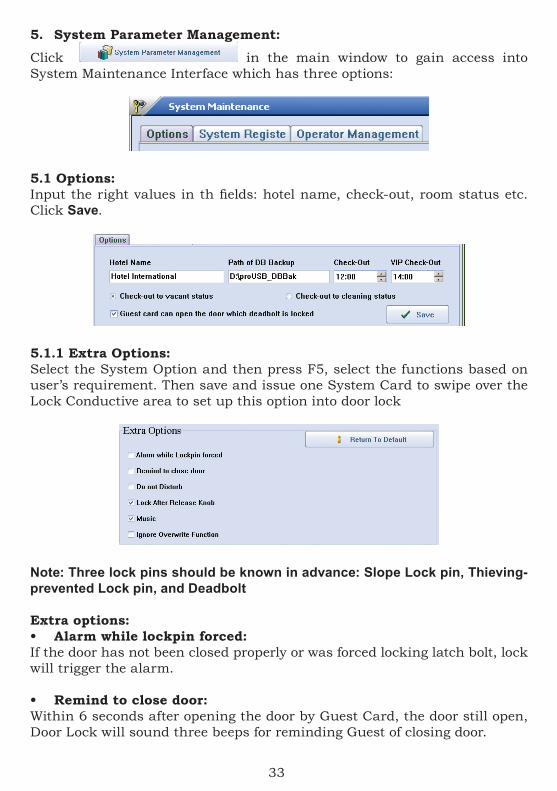
5. System Parameter Management:
Click in the main window to gain access into System Maintenance Interface which has three options:
5.1 Options: Input the right values in th fields: hotel name, check-out, room status etc. Click Save.
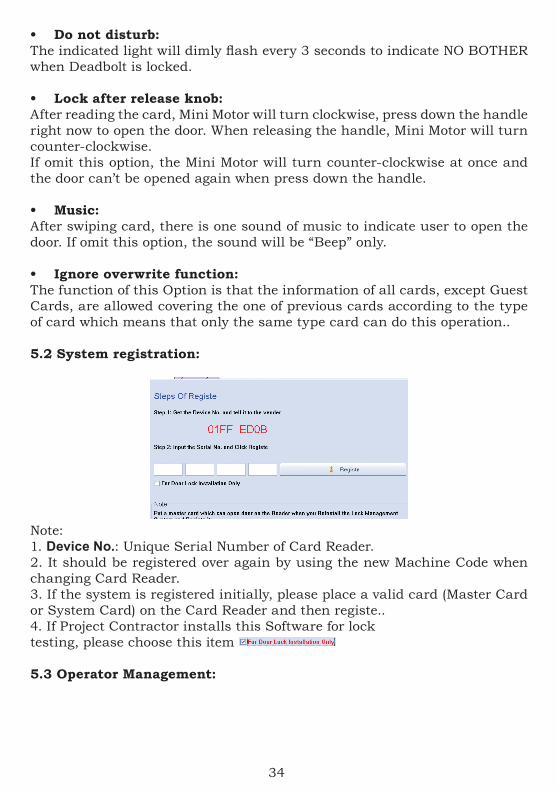
5.1.1 Extra Options:Select the System Option and then press F5, select the functions based on user’s requirement. Then save and issue one System Card to swipe over the Lock Conductive area to set up this option into door lock
Note: Three lock pins should be known in advance: Slope Lock pin, Thieving-prevented Lock pin, and Deadbolt
Extra options:• Alarm while lockpin forced:If the door has not been closed properly or was forced locking latch bolt, lock will trigger the alarm.
• Remind to close door:Within 6 seconds after opening the door by Guest Card, the door still open, Door Lock will sound three beeps for reminding Guest of closing door.
34
• Do not disturb:The indicated light will dimly flash every 3 seconds to indicate NO BOTHER when Deadbolt is locked.
• Lock after release knob:After reading the card, Mini Motor will turn clockwise, press down the handle right now to open the door. When releasing the handle, Mini Motor will turn counter-clockwise. If omit this option, the Mini Motor will turn counter-clockwise at once and the door can’t be opened again when press down the handle.
• Music:After swiping card, there is one sound of music to indicate user to open the door. If omit this option, the sound will be “Beep” only.
• Ignore overwrite function:The function of this Option is that the information of all cards, except Guest Cards, are allowed covering the one of previous cards according to the type of card which means that only the same type card can do this operation..
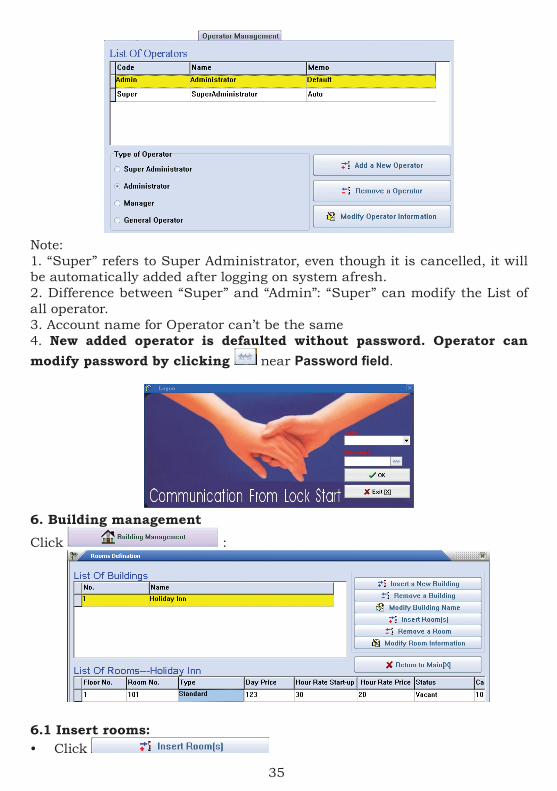
5.2 System registration:
Note:1. Device No.: Unique Serial Number of Card Reader.2. It should be registered over again by using the new Machine Code when changing Card Reader. 3. If the system is registered initially, please place a valid card (Master Card or System Card) on the Card Reader and then registe..4. If Project Contractor installs this Software for lock testing, please choose this item
5.3 Operator Management:
35
Note:1. “Super” refers to Super Administrator, even though it is cancelled, it will be automatically added after logging on system afresh.2. Difference between “Super” and “Admin”: “Super” can modify the List of all operator.3. Account name for Operator can’t be the same4. New added operator is defaulted without password. Operator can modify password by clicking near Password field.
6. Building management
Click :
6.1 Insert rooms:• Click
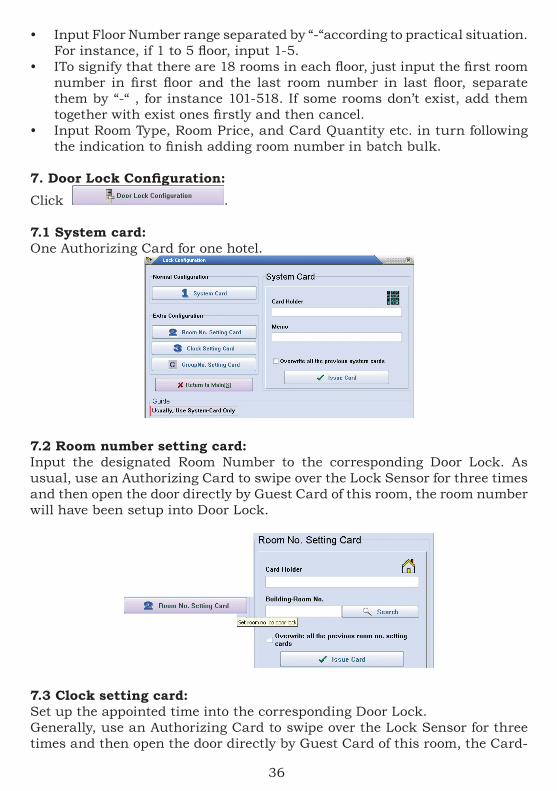
36
• Input Floor Number range separated by “-“according to practical situation. For instance, if 1 to 5 floor, input 1-5.
• ITo signify that there are 18 rooms in each floor, just input the first room number in first floor and the last room number in last floor, separate them by “-“ , for instance 101-518. If some rooms don’t exist, add them together with exist ones firstly and then cancel.
• Input Room Type, Room Price, and Card Quantity etc. in turn following the indication to finish adding room number in batch bulk.
7. Door Lock Configuration:Click .
7.1 System card:One Authorizing Card for one hotel.
7.2 Room number setting card:Input the designated Room Number to the corresponding Door Lock. As usual, use an Authorizing Card to swipe over the Lock Sensor for three times and then open the door directly by Guest Card of this room, the room number will have been setup into Door Lock.
7.3 Clock setting card:Set up the appointed time into the corresponding Door Lock.Generally, use an Authorizing Card to swipe over the Lock Sensor for three times and then open the door directly by Guest Card of this room, the Card-
37
issuing Time for this Guest Card will have been setup into Door Lock.
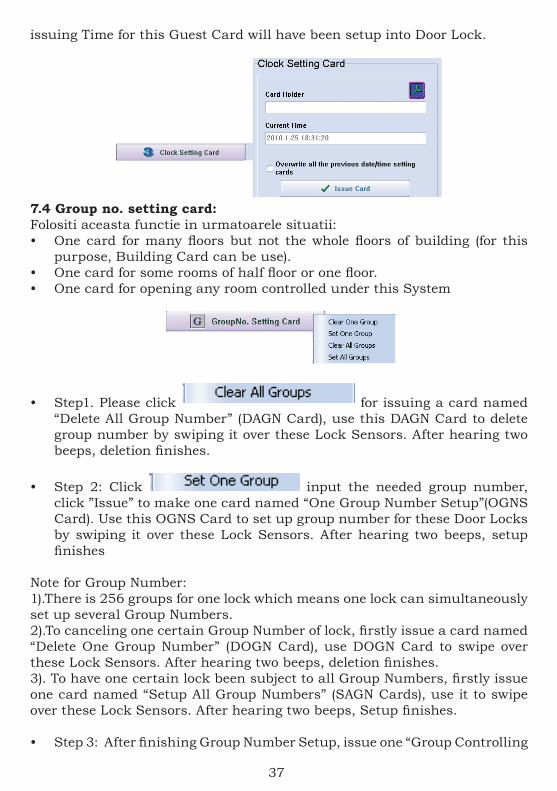
7.4 Group no. setting card:Folositi aceasta functie in urmatoarele situatii:• One card for many floors but not the whole floors of building (for this
purpose, Building Card can be use).• One card for some rooms of half floor or one floor.• One card for opening any room controlled under this System
• Step1. Please click for issuing a card named “Delete All Group Number” (DAGN Card), use this DAGN Card to delete group number by swiping it over these Lock Sensors. After hearing two beeps, deletion finishes.
• Step 2: Click input the needed group number, click ”Issue” to make one card named “One Group Number Setup”(OGNS Card). Use this OGNS Card to set up group number for these Door Locks by swiping it over these Lock Sensors. After hearing two beeps, setup finishes
Note for Group Number:1).There is 256 groups for one lock which means one lock can simultaneously set up several Group Numbers.2).To canceling one certain Group Number of lock, firstly issue a card named “Delete One Group Number” (DOGN Card), use DOGN Card to swipe over these Lock Sensors. After hearing two beeps, deletion finishes.3). To have one certain lock been subject to all Group Numbers, firstly issue one card named “Setup All Group Numbers” (SAGN Cards), use it to swipe over these Lock Sensors. After hearing two beeps, Setup finishes.
• Step 3: After finishing Group Number Setup, issue one “Group Controlling
38
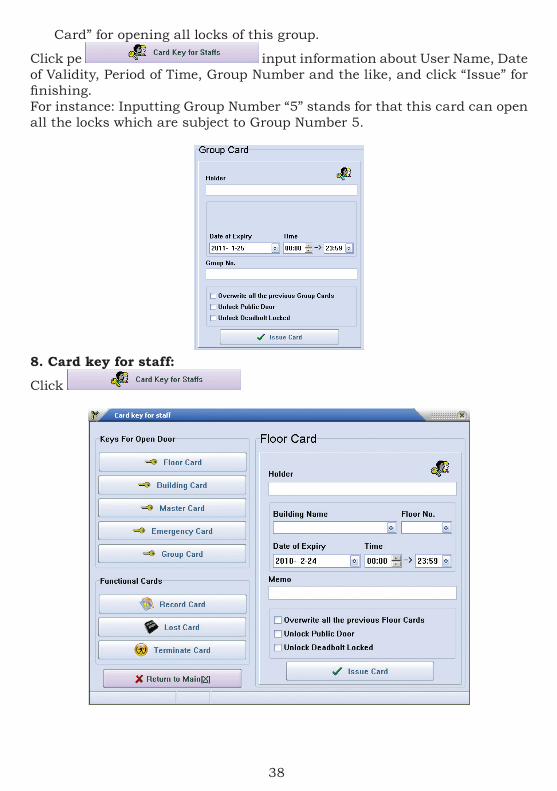
Card” for opening all locks of this group.
Click pe input information about User Name, Date of Validity, Period of Time, Group Number and the like, and click “Issue” for finishing.For instance: Inputting Group Number “5” stands for that this card can open all the locks which are subject to Group Number 5.
8. Card key for staff:
Click
39
Card for hotel staff:• Floor Card Use for opening all locks in a certain floor in a certain building.• Building Card Use for opening all locks in a certain building• Master card Use for opening all locks of Lock System• Emergency Card Use for opening all locks of Lock System and all the locks will remain unlock state. To disable the opening state, here are two solutions: A). Press down the handle and swipe the Emergency Card immediately; B). Use ordinary Cards (Master Card or Floor Card etc.) to open the door one time, the lock will be free from opening state.
• Group Card: Use for opening the group locks. For details, please refer to “Group Number Setup” in “Door Lock Setup”
• Record Card: For MIFARE 1 Lock, its Record Card is S70 Card using for picking up the door-opening record; For TEMIC Lock, its Record Card is T5557 or T5567 Card using as Directing Card which swipe over the Lock Sensor before using Collector to pick up the door-opening record.
• Lost card: If the card lose, please input or select Card Number of the lost
card to issue the Loss-Report Card. Use it to swipe the Door Lock that the lost card can open.
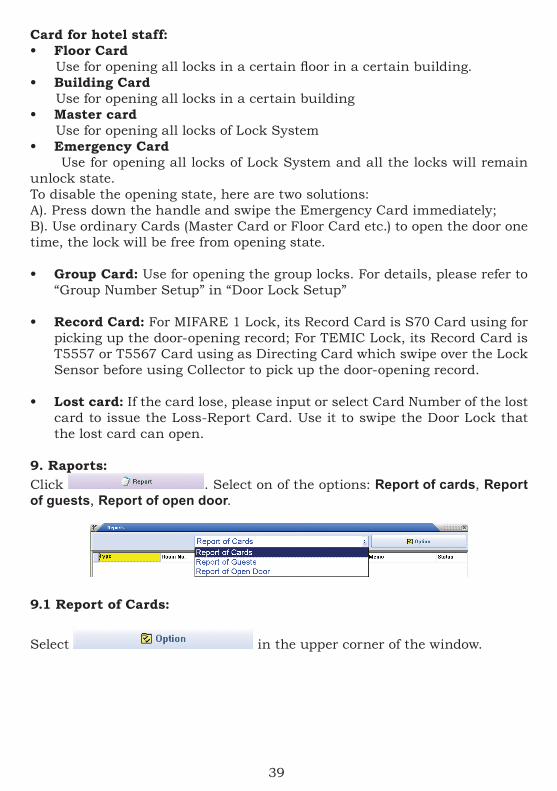
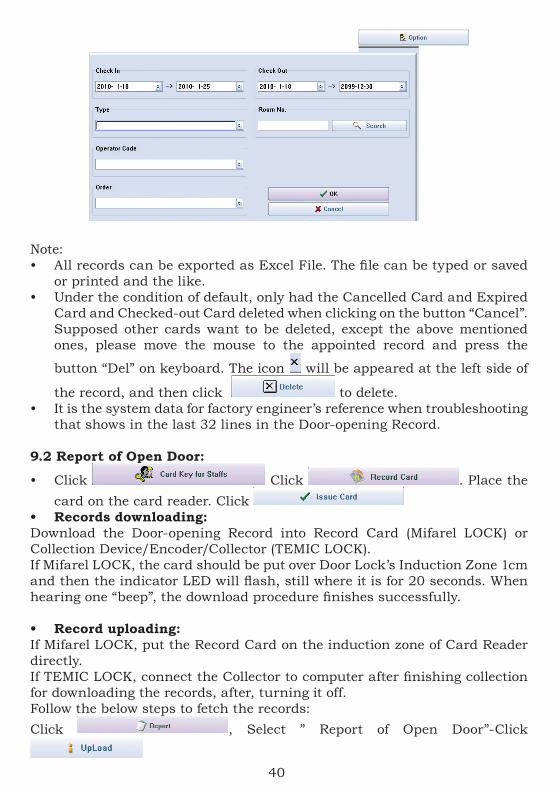
9. Raports:Click . Select on of the options: Report of cards, Report of guests, Report of open door.
9.1 Report of Cards:
Select in the upper corner of the window.
40
Note:• All records can be exported as Excel File. The file can be typed or saved
or printed and the like.• Under the condition of default, only had the Cancelled Card and Expired
Card and Checked-out Card deleted when clicking on the button “Cancel”. Supposed other cards want to be deleted, except the above mentioned ones, please move the mouse to the appointed record and press the
button “Del” on keyboard. The icon will be appeared at the left side of
the record, and then click to delete.• It is the system data for factory engineer’s reference when troubleshooting
that shows in the last 32 lines in the Door-opening Record.
9.2 Report of Open Door:
• Click Click . Place the card on the card reader. Click
• Records downloading:Download the Door-opening Record into Record Card (Mifarel LOCK) or Collection Device/Encoder/Collector (TEMIC LOCK).If Mifarel LOCK, the card should be put over Door Lock’s Induction Zone 1cm and then the indicator LED will flash, still where it is for 20 seconds. When hearing one “beep”, the download procedure finishes successfully.
• Record uploading:If Mifarel LOCK, put the Record Card on the induction zone of Card Reader directly.If TEMIC LOCK, connect the Collector to computer after finishing collection for downloading the records, after, turning it off. Follow the below steps to fetch the records:Click , Select ” Report of Open Door”-Click
41
10. Reception:
Click :
10.1 Single Client Reception:Directly click the “Designated Room” or input the “Room Number” or look for “Room Search” for room selection. Please note that the system will default current building for not input the building Number:
10.2 Group Reception:• Group check-in:Click Group Reception - Group Check In. Issue card.
42
Step1: Input information of Tour Guide (the Name and IC Number at less).Step2: Input Estimated Check-in Date or Estimated Check-out Time.Step3: Appoint room.Step4: Release card for each room.
• Group check-out:
Click Group Reception - Group Browser. Click
10.3 Reservation:• New reservation:
Adaugati informatii despre conducatorul de grup (Team Leader - Nume si serie document identitate CI), data de sosire si de plecare. Click pe Room Search (cautare camera) pentru a vedea toate camerele libere din perioada selectata. Click pe Make Reservation pentru a finaliza revervarea.
• Anulare rezervare:
Click Reservation - New Reservation - click .
10.4 Room Change:
43
Note: If, one room, for example, Check-out Time exceeds the computer’s
current time, “Ask for Rent” Icon will automatically display when refreshing Room Status. .
10.5 Room Status Chart:
Click , then click Room Status Chart:
10.6 Card Information:
Click , then click pe Card Information:
44
10.7 Room Change, Postpone, Check-out Card:Put the Guest Card on Card Reader induction zone and click the relevant button and operate as the indication:
10.8 Card Erase:
Put the card on the Card Reader induction zone and click to revoke the card information.
45
SYSTEM CONFIGURATION:
PROCEDURE:
Template
**1 When Hotel lock system �nshed all rooms setting, issue Setting card for all real doors.
*
2 It requires that always use a fresh Time card to activate locks.You must not activate all doors with a same and overdue
3 Function cards are issued to guests and hotel sta�. Time card.We suggest you do it �oor by �oor. Each �oor �nished you should re-issue Time card at the current time.
Guests hold Guest card. Sta� hold other cards (e.g. Floor card). it depends.
Single terminal Multi-terminal
This is a standard procedure.We suggest you do it as the above but do not guarantee for your fault if you don’t follow this procedure.
Open packing
Authorized card
Connecting to server’s
Database
Register by read Authorized card
and Licence code
Slotting
Register by read Authorized
card and Licence code in
all computers
Finished initialization.Ready for guests
Initialize doors
Locks
Installed
Encoder Disk
-Hotel lock system registered version-
Build all room types, room No.,�oors,change default password,entitle users
Authorized card
Setting cards
Time cards
Blank Cards
Issue function cards in Hotel lock system
Install Encoder driver in computer Install Encoder driver in all computers
Install Hotel Lock System in all
computers and Plug encoders
1*
Install Hotel Lock System in
computer and Plug encoder
*3
*2
Page 6
Video<initialize SYSTEM>
Page 8+Video<initialize SYSTEM>
Page 9
Page 5+Video<initialize lock>
Page 4
MORTISE AND PANEL:
**Battery-pack is hide in mortise for mortise model K1LThis is a standard right lever mortise. The left mortise is in reverse case.
78.0mm 20.0mm
mm0
.342
Connect to PCB boardConnect to battery pack
22.0mm
90.0mm
4.0mm
30.0mm
155.0mm
200.0mm
Handle install
Motor
Latch bolt
Auxiliary boltDeadbolt control install
FRONT SIDE
BACK SIDE
Cylinder install
Sensor window Battery-pack
front panelback panel
Cylinder cover
Thumb turn
Deadbolt
(ROOM OUTSIDE)ANSI Mortise model K2S Front panel L5118/5218-M1
46
LOCK INSTALL:
ROOM INSIDE
1. Cylinder2. Pcb reader3. 4.
Connector of pcb readerFront panel
5. Spindle of handle6. Door7. Mortise8. 9.
Connector of mortise
10. Back panel11.
Power connector
12. Battery-pack
13. Spindle of handle14.
Power connector ofbattery-pack
Strike15. 16.
Strike box
handle holea.
Cylinder cover
b. thumb turn holecylinder holec.
2
4 16
3
5
11
12
13
14
15
BATTERY
BATTERY
BATTERY
BATTERY
10 98
7
b
c
a
a’
b’
c’
*
ROOM OUTSIDE
**
This is a standard right lever lock. The left is in reverse case.Model K2S mortise requires door thickness at least 40.0mm.
*For other thickness door please contact with us seeking other mortise solution
11
6
Right for the hardware con�guration changes without notice is reserved.
arrow horizontal
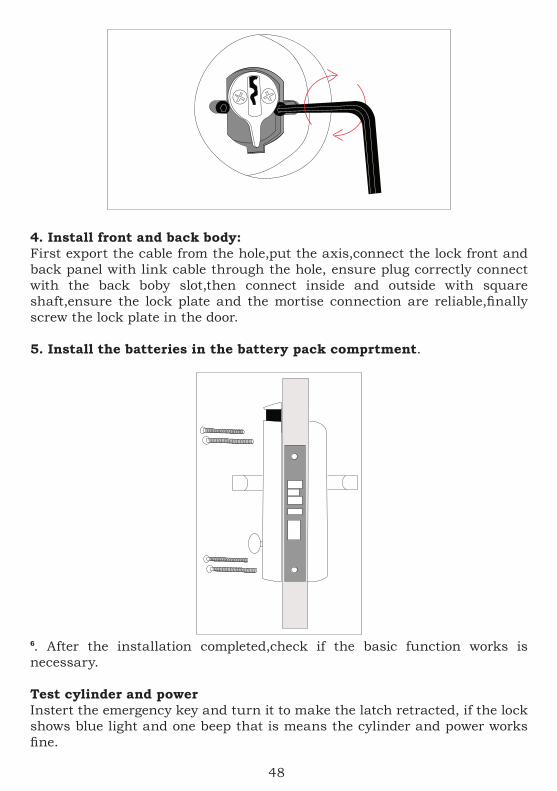
1. Punch holes:Lightly mark a height line on the edge and both faces of the door, attach the frontispiece template along the line you draw and the edge of the door; Wedge the side face template on the frontispiece template, confirm the up and down position, then move the right-and-left position which about the center position between the template center line and the door thickness, at last stick to the door; mark the 4x14mm 22 mm 2x30 mm holes and 200x30mm square 160x24mm square; remove the frontispiece template and apply it to the other side of thedoor, aligning it accurately with the side face template,mark the 4x14mm 22 mm 2x30 mm holes again.
Then drill the holes from both sideof the door synchronously, theside face slot which place flankplate is 5.0mm deep (namely200x30mm slot) and the slotwhich place mortise is96.0mm deep (namely160x24mm slot).
47
2. Install the mortisePut the mortise into the hole and holding it square to the door edge, draw around the faceplate. Remove the mortise and score the outline with a stanley knife to avoiding splitting when chiseling. Chisel a rebate to allow the latch to fit flush to the surface.Fix the mortise with the screws, with the bevel towards the door frame.
3. Fix the cylinderInsert the cylinder from front and tight the screws from back by using the inner hexagon screw driver
48
4. Install front and back body:First export the cable from the hole,put the axis,connect the lock front and back panel with link cable through the hole, ensure plug correctly connect with the back boby slot,then connect inside and outside with square shaft,ensure the lock plate and the mortise connection are reliable,finally screw the lock plate in the door.
5. Install the batteries in the battery pack comprtment.
6. After the installation completed,check if the basic function works is necessary.
Test cylinder and powerInstert the emergency key and turn it to make the latch retracted, if the lock shows blue light and one beep that is means the cylinder and power works fine.
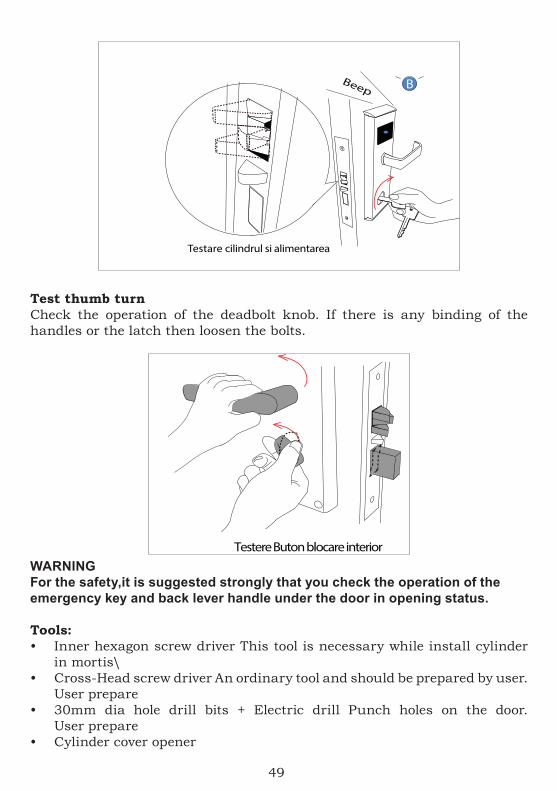
49
Beep B
Testare cilindrul si alimentarea
Test thumb turnCheck the operation of the deadbolt knob. If there is any binding of the handles or the latch then loosen the bolts.
Testere Buton blocare interiorWARNING For the safety,it is suggested strongly that you check the operation of the emergency key and back lever handle under the door in opening status.
Tools: • Inner hexagon screw driver This tool is necessary while install cylinder
in mortis\• Cross-Head screw driver An ordinary tool and should be prepared by user.
User prepare • 30mm dia hole drill bits + Electric drill Punch holes on the door.
User prepare• Cylinder cover opener
50
This tool is used to remove the cylinder cover.
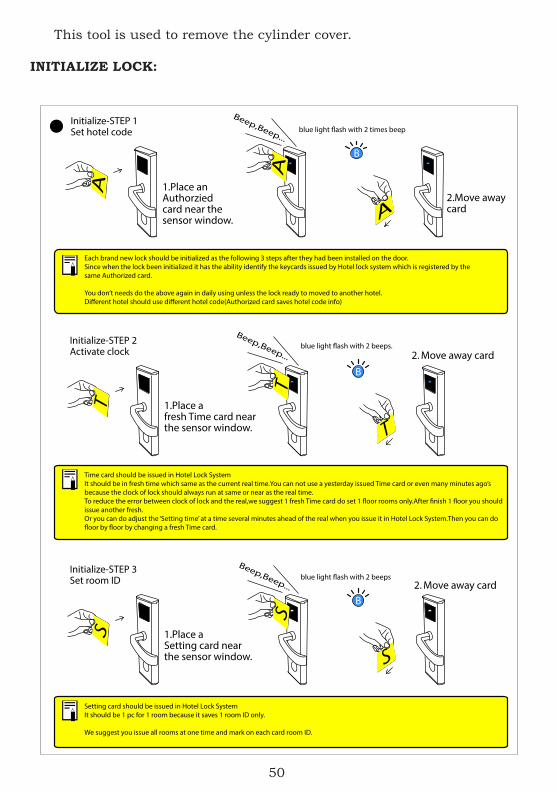
INITIALIZE LOCK:
Beep,Beep...
Beep,Beep...
Each brand new lock should be initialized as the following 3 steps after they had been installed on the door.Since when the lock been initialized it has the ability identify the keycards issued by Hotel lock system which is registered by the same Authorized card.
You don’t needs do the above again in daily using unless the lock ready to moved to another hotel.Di�erent hotel should use di�erent hotel code(Authorized card saves hotel code info)
1.Place an Authorziedcard near the sensor window.
2.
blue light �ash with 2 times beep.
cardMove away
Beep,Beep...
B
1.Place a
Initialize-STEP 2
fresh Time card nearthe sensor window.
Activate clock
B
1.Place a
2.
Setting card nearthe sensor window.
2.
Move away cardblue light �ash with 2 beeps.
Move away cardblue light �ash with 2 beeps.
Initialize-STEP 3
Initialize-STEP 1
Set room ID
Set hotel code
Time card should be issued in Hotel Lock SystemIt should be in fresh time which same as the current real time.You can not use a yesterday issued Time card or even many minutes ago’sbecause the clock of lock should always run at same or near as the real time.To reduce the error between clock of lock and the real,we suggest 1 fresh Time card do set 1 �oor rooms only.After �nish 1 �oor you shouldissue another fresh.Or you can do adjust the ‘Setting time’ at a time several minutes ahead of the real when you issue it in Hotel Lock System.Then you can do �oor by �oor by changing a fresh Time card.
We suggest you issue all rooms at one time and mark on each card room ID.
Setting card should be issued in Hotel Lock SystemIt should be 1 pc for 1 room because it saves 1 room ID only.
B
51
Clock of lockValid term
expiry
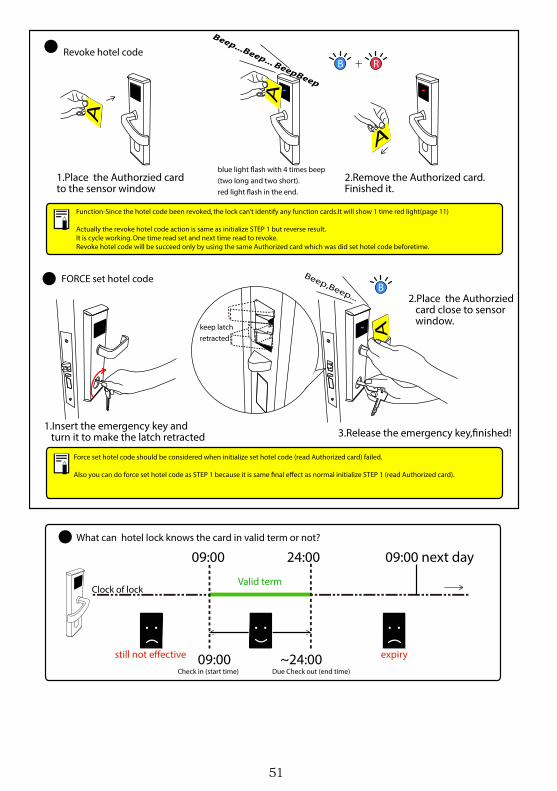
1.to the sensor window
Place the Authorzied card 2.blue light �ash with 4 times beep(two long and two short). red light �ash in the end.
Revoke hotel code
Finished it.Remove the Authorized card.
Check in (start time) ~24:00
Due Check out (end time)
FORCE set hotel code
1.
Beep,Beep... 2.
3.Insert the emergency key and turn it to make the latch retracted
Place the Authorzied card close to sensorwindow.
keep latch
Release the emergency key,�nished!
retracted
B
B R
Force set hotel code should be considered when initialize set hotel code (read Authorized card) failed.
Also you can do force set hotel code as STEP 1 because it is same �nal e�ect as normal initialize STEP 1 (read Authorized card).
+
still not e�ective 09:00
09:00 next dayWhat can hotel lock knows the card in valid term or not?
09:00 24:00
Function-Since the hotel code been revoked, the lock can’t identify any function cards.It will show 1 time red light(page 11)
Actually the revoke hotel code action is same as initialize STEP 1 but reverse result. It is cycle working. One time read set and next time read to revoke.Revoke hotel code will be succeed only by using the same Authorized card which was did set hotel code beforetime.
52
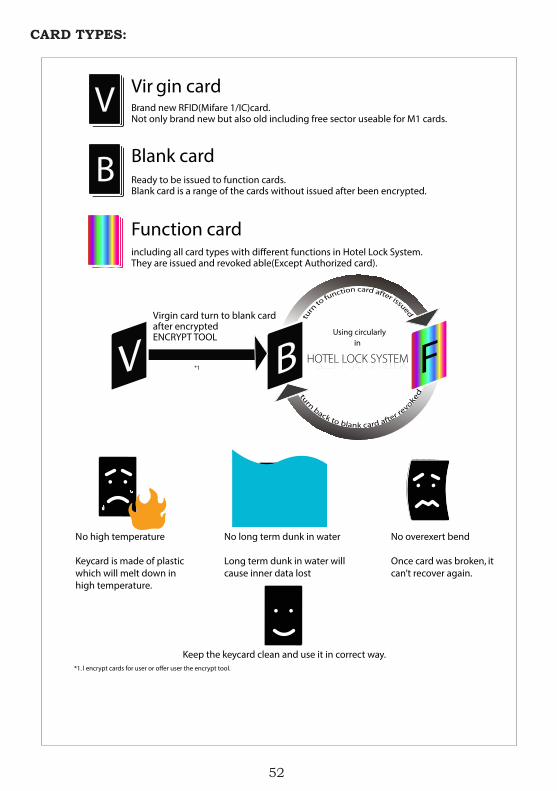
CARD TYPES:
Keep the keycard clean and use it in correct way.*1. l encrypt cards for user or o�er user the encrypt tool.
V
V
B
Vir gin cardBrand new RFID(Mifare 1/IC)card.Not only brand new but also old including free sector useable for M1 cards.
Blank cardReady to be issued to function cards.Blank card is a range of the cards without issued after been encrypted.
B F
Function cardincluding all card types with di�erent functions in Hotel Lock System.They are issued and revoked able(Except Authorized card).
1*
inUsing circularly
Virgin card turn to blank card after encrypted ENCRYPT TOOL
FFF
No high temperature
Keycard is made of plastic which will melt down in high temperature.
No long term dunk in water
Long term dunk in water will cause inner data lost
No overexert bend
Once card was broken, it can’t recover again.
53
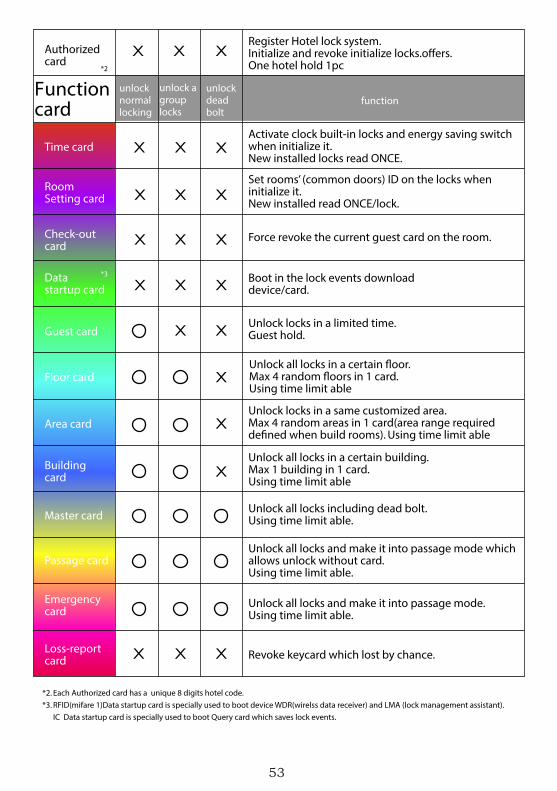
Function card
unlocknormallocking
unlock dead bolt
unlock a group locks
function
Time card
RoomSetting card
Check-out card
Datastartup card
Guest card
Floor card
Building
Area card
card
Master card
Passage card
Emergency card
Loss-report card
Activate clock built-in locks and energy saving switchwhen initialize it.New installed locks read ONCE.
Set rooms’ (common doors) ID on the locks when initialize it.New installed read ONCE/lock.
Force revoke the current guest card on the room.
Boot in the lock events download device/card.
Unlock locks in a limited time.Guest hold.
Unlock all locks in a certain �oor.Max 4 random �oors in 1 card.Using time limit able
Unlock all locks in a certain building.Max 1 building in 1 card.Using time limit able
Unlock all locks including dead bolt.Using time limit able.
Unlock locks in a same customized area.Max 4 random areas in 1 card(area range required de�ned when build rooms). Using time limit able
Unlock all locks and make it into passage mode. Using time limit able.
XX
X
X
X
X
X
X
X
X
X
X
X
X
X
X
X
Unlock all locks and make it into passage mode which allows unlock without card.Using time limit able.
XX
X
2*
3*
Revoke keycard which lost by chance.
*2. Each Authorized card has a unique 8 digits hotel code.*3. RFID(mifare 1)Data startup card is specially used to boot device WDR(wirelss data receiver) and LMA (lock management assistant). IC Data startup card is specially used to boot Query card which saves lock events.
Authorized card
X XXRegister Hotel lock system.Initialize and revoke initialize locks.o�ers.One hotel hold 1pc
54
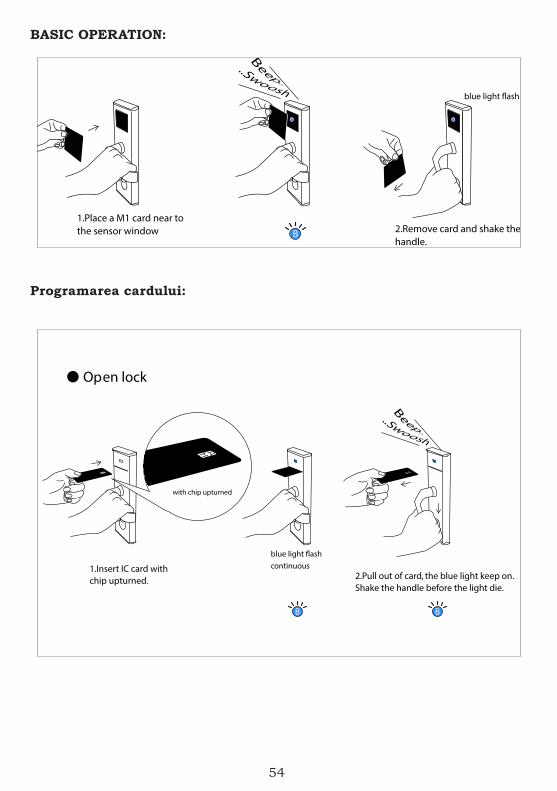
BASIC OPERATION:
1.the sensor window
Place a M1 card near to
blue light �ash
2.handle.
Remove card and shake the B
Programarea cardului:
blue light �ash continuous
2.Pull out of card, the blue light keep on. 1.
Shake the handle before the light die.
Insert IC card with chip upturned.
with chip upturned
Open lock
BB

