hota heinner xcx-450s
TRANSCRIPT

HOTA DE BUCATARIE cu DOUA MOTOARE
XCH-450S
CH-400
CH-400-BRW
CH-400BK
Alimentare: 220-240V, 50Hz
Iluminare: 2x40W
Putere motor 2x100W

Atentionare: daca acest produs a ajuns la dumneavoastra deteriorat va rugam sa-l returnati pentru
inlocuire sau remediere.
NU INSTALATI PRODUSUL DACA PREZINTA URME DE DETERIORARE!
Copiii trebuie supravegheati pentru a nu se juca cu aparatul!
Destinat pentru uzul casnic.
Instalarea trebuie efectuata de un electrician calificat.
Exista pericol de incendiu daca curatarea nu este efectuata conform instructiunilor.
Gasiti detaliile referitoare la metoda si frecventa operatiunilor de curatare, la sectiunea “INSTALARE SI
MENTENANTA”.
Nu trageti de cablul de alimentare cand doriti sa deconectati de la priza. Apucati stecherul si trageti
usor.
Inainte de curatare, asigurati-va ca aparatul este scos din priza.
INSTALARE SI MENTENANTA
1. INSTALARE
Metoda A
1. Pentru efecte optime, hota trebuie asezata la o distanta de 65-75 cm fata de suprafata unde
se gateste;
2. Pentru a efectua instalarea in perete, faceti 4 gauri cu diametrul de 8 mm in locul cel mai
convenabil tinand cont, in acelasi timp, de distanta de la centrul gaurii din spatele hotei;
3. Inserati diblurile in gaurile efectuate;
4. Inserati suruburile in dibluri si fixati bine;
5. Asezati hota in suruburile fixate;
6. Apoi folositi accesoriile incluse pentru a inchide suruburile in cele doua gauri din interiorul
hotei pentru a fixa hota in perete;
7. Puneti valva “one way” pe hota .

Metoda B
1) Faceti 4 gauri cu diametrul de Ø 6mm in partea de jos a zonei unde doriti sa fie fixata
hota;
2) Puneti valva “one way” pe hota, apoi instalati hota de partea inferioara a zonei de fixare
si fixati bine cu ajutorul celor 6 suruburi incluse;
3) Instalati placa ajustabila in spatele hotei pentru a nu exista spatii intre hota si suprafata
de fixare.
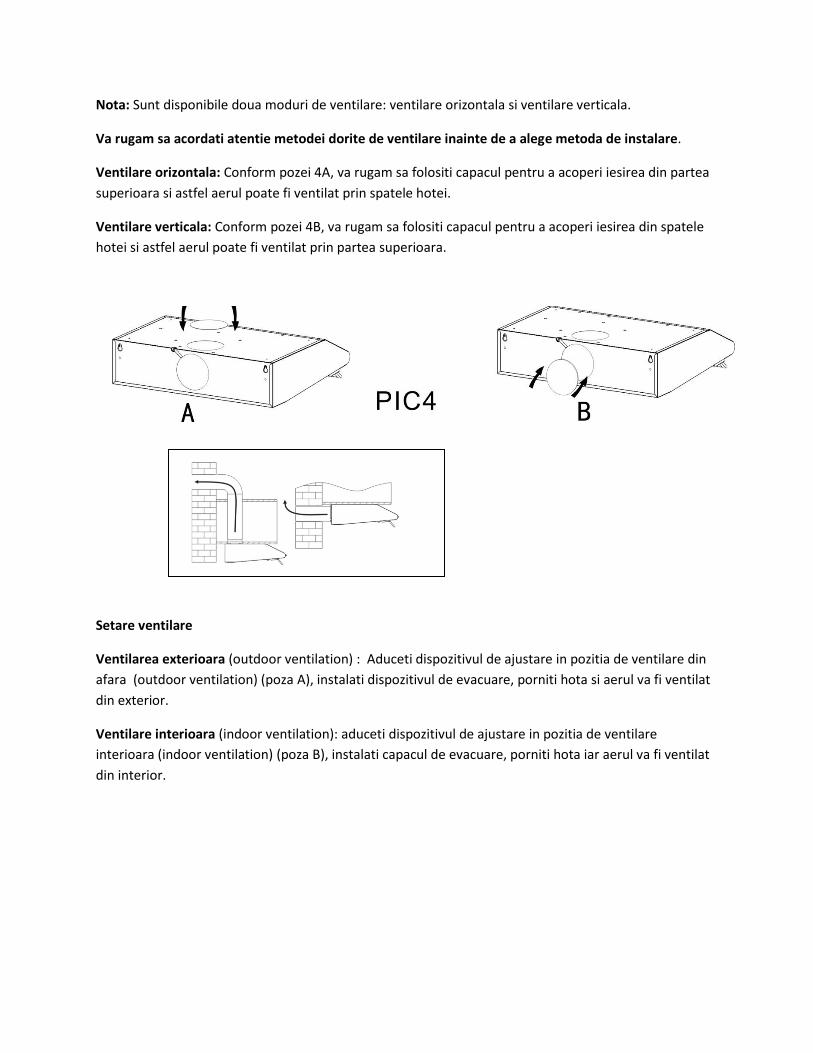
Nota: Sunt disponibile doua moduri de ventilare: ventilare orizontala si ventilare verticala.
Va rugam sa acordati atentie metodei dorite de ventilare inainte de a alege metoda de instalare.
Ventilare orizontala: Conform pozei 4A, va rugam sa folositi capacul pentru a acoperi iesirea din partea
superioara si astfel aerul poate fi ventilat prin spatele hotei.
Ventilare verticala: Conform pozei 4B, va rugam sa folositi capacul pentru a acoperi iesirea din spatele
hotei si astfel aerul poate fi ventilat prin partea superioara.
Setare ventilare
Ventilarea exterioara (outdoor ventilation) : Aduceti dispozitivul de ajustare in pozitia de ventilare din
afara (outdoor ventilation) (poza A), instalati dispozitivul de evacuare, porniti hota si aerul va fi ventilat
din exterior.
Ventilare interioara (indoor ventilation): aduceti dispozitivul de ajustare in pozitia de ventilare
interioara (indoor ventilation) (poza B), instalati capacul de evacuare, porniti hota iar aerul va fi ventilat
din interior.

Operare:
1. Pozitia “0” – hota va fi oprita
2. Butoanele “low”, “middle” and “high” vor actiona motorul sa functionze la viteza mica,
medie si, respectiv, mare
3. Daca apasati o data butonul “light”, lumina se va aprinde. Pentru a stinge lumina, mai
apasati o data.

MENTENANTA
Schimbarea si curatarea filtrului – figura de mai jos .
1.Puneti filtrul in apa la temperatura 40-50℃, impreuna cu putin detergent si lasati pentru 2-3 minute.
Apoi curatati, folosind o perie moale pentru a nu deteriora suprafata filtrului.
2. Filtrul poate fi spalat la masina de spalat vase. Introduceti in masina de spalat vase impreuna cu
detergent si spalati la 60 ℃.
Filtrele sunt metalice: nu folositi detergent cu proprietati corozive .
Atentie: Deconectati de la priza inainte de curatare.
Schimbarea becurilor
* Inainte de a schimba becurile, asigurati-va ca produsul este scos din priza.
* Deschideti filtrul conform imaginii de mai sus.
* Schimbati becul max 40W E14.

* Aduceti filtrul la pozitia originala.
ELIMINAREA DESEURILOR IN MOD RESPONSABIL FATA DE MEDIU
Poti ajuta la protejarea mediului!
Va rugam sa respectati regulamentele si legile locale: duceti echipamentele electrice
nefunctionale catre un centru de colectare al echipamentelor electrice uzate.
Importator: Asesoft Distribution
Europolis Logistic Park, Italia Street, 1-7, Chaijna, Ilfov, Romania
Tel: +4021 256 00 86, www.heinner.ro, www.asesoftdistribution.ro

COOKER HOOD with TWO MOTORS
XCH-450S
CH-400
CH-400-BRW
CH-400BK
Voltage: 220-240V, 50Hz
Illumination: 2x40W
Motor power: 2x100W
If this product has arrived damaged please return for change or repair.
DO NOT INSTALL THIS APPILANCE IF YOU FOUND IT DANAGED.
Children should be supervised to ensure that they do not play with the appliance.
This appliance is designed for domestic use only.
Any installation work must be carried out by a qualified electrician or competent person
There is a fire risk if cleaning is not carried out in accordance with the instructions.
Details concerning the method and frequency of cleaning are stated in the section
“INSTALLATION AND MAINTENANCE”.
Do not pull on the connection cord, but rather on the plug, to separate the appliance from the mains
When cleaning appliance, it must be off power first.
INSTALLATION AND MAINTENANCE
Installation
Method A
1. The cooker hoods should be placed at a distance of 65-75cm from the cooking surface
for best effect.
2. To install onto the wall, drill 4 holes of Ø 8mm on a suitable place according with the
center distance of hole in the back of the cooker hood.
3. Insert the nut into the holes.
4. Insert the screws into the nuts and tight
5. Put up the cooker hood onto the fixed screws
6. Then use the attached accessories enclosed to turn the screws into the two holes of
inside the hood, and then fix the screws to tighten the hood onto the wall.
7. Put the one way valve onto the cooker hood
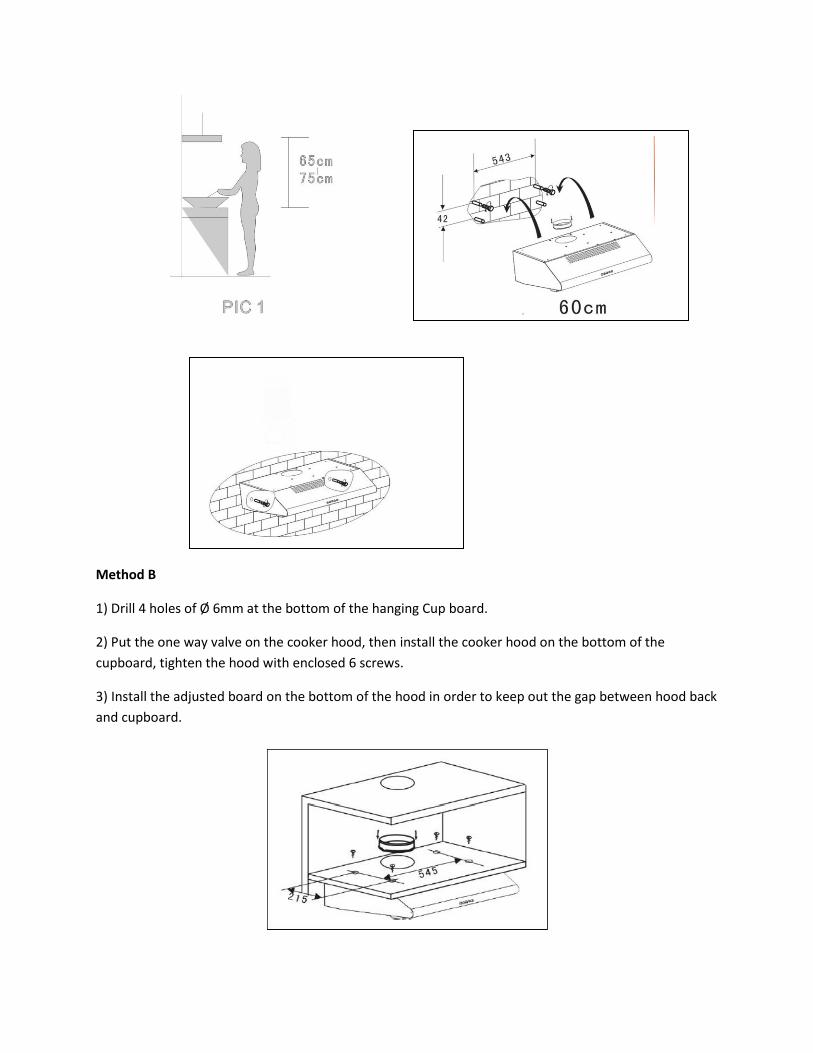
Method B
1) Drill 4 holes of Ø 6mm at the bottom of the hanging Cup board.
2) Put the one way valve on the cooker hood, then install the cooker hood on the bottom of the
cupboard, tighten the hood with enclosed 6 screws.
3) Install the adjusted board on the bottom of the hood in order to keep out the gap between hood back
and cupboard.

Notice
There are 2 methods for ventilation, including 'horizontal ventilation' and 'vertical ventilation'. Please
pay attention to the ventilation method when installation.
Horizontal ventilation: As pic. 4A shown, please use the cover to seal the outlet on the top, then the air
can be vented from back.
Vertical ventilation: As pic 4B shown, please use the cover to seal the outlet on the back, then the air
can be vented from top.
Air ventilation setting
Outdoor air ventilation: Turn the adjuster to outdoor position (pic.5A), install the outlet, turn on the
cooker hood, then the air will be vented from the outside outlet.
Indoor air ventilation: Turn the adjuster to indoor position (pic.5B), install the outlet cover, turn on the
cooker hood, then the air can be vented from the inside outlet
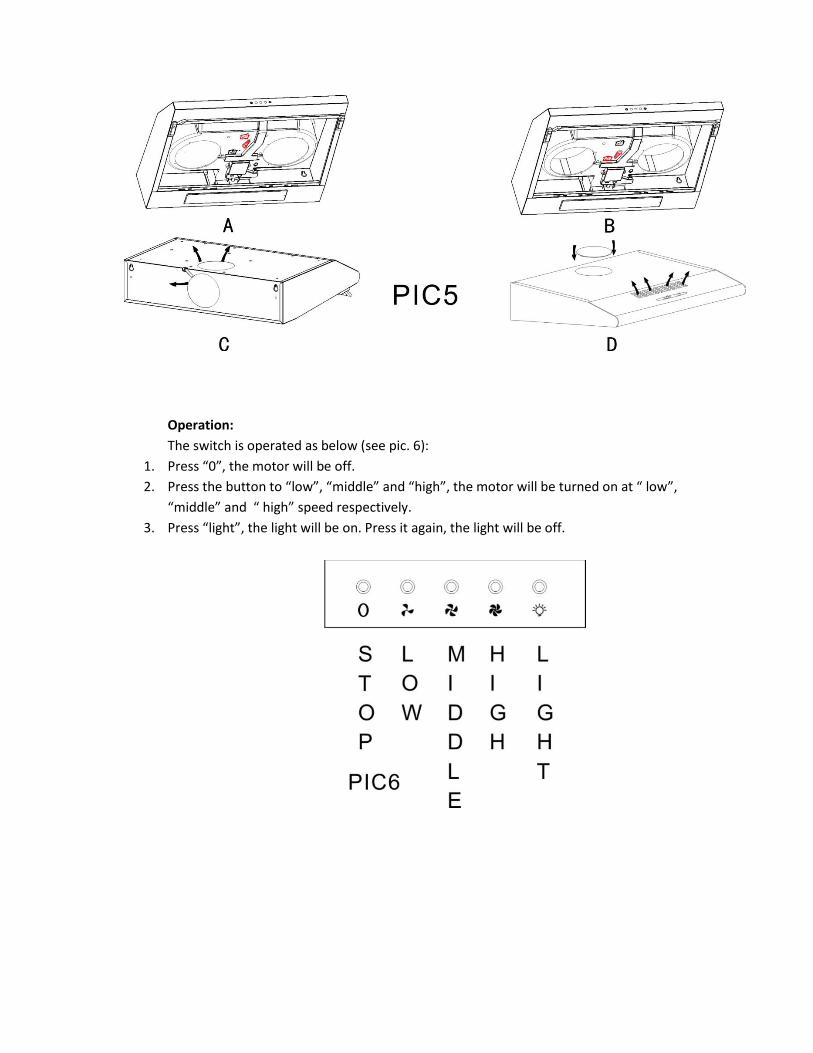
Operation:
The switch is operated as below (see pic. 6):
1. Press “0”, the motor will be off.
2. Press the button to “low”, “middle” and “high”, the motor will be turned on at “ low”,
“middle” and “ high” speed respectively.
3. Press “light”, the light will be on. Press it again, the light will be off.

Maintenance
Changing and cleaning the filter.
The methods are as below (pic7):
1. Put the filter into the water of 40-50℃, put some detergent in, and leave it for 2-3 minutes. Then use
the soft brush to clean it with proper strength, in order not to damage the filter.
2. The filter can be cleaned by dish washer. Put the filter into the dish washer and put some detergent
in, then turn the temperature to 60℃.
All the filters are made of metal. Please do not use any corrosive detergent when cleaning.
Notice: Please unplug before cleaning.
Changing the light
*Before changing the lights, make sure that the appliance is plugged off.
*Open the filter, see beside picture.

*Change the Max. 40W E14 olive-shaped bulb.
*Replace the filter to the original position.
Environment friendly disposal
You can help protect the environment! Please remember to respect the local regulations: hand in
the non-working electrical equipment’s to an appropriate waste disposal center.
Importer: Asesoft Distribution
Europolis Logistic Park, Italia Street, 1-7, Chaijna, Ilfov, Romania
Tel: +4021 256 00 86, www.heinner.com , www.asesoftdistribution.ro

КУХНЕНСКИ АБСОРБАТОР с ДВА МОТОРА
XCH-450S
CH-400
CH-400-BRW
CH-400BK
Захранване: 220-240V, 50Hz
Осветление: 2x40W
Мощност мотор: 2x100W

Внимание: Ако този продукт е пристигнал при вас повреден, моля да го върнете за подмяна или
поправка.
НЕ МОНТИРАЙТЕ ПРОДУКТА АКО ДАВА ПРИЗНАЦИ ЗА ПОВРЕДА!
Децата трябва да бъдат наблюдавани за да не си играят с апарта!
Предназначен за домашна употреба.
Монтажа трябва да бъде направен от ауторизиран квалифициран електротехник.
Има опасност от пожар ако почистването на апарата не се извършва според инструкциите.
Инструкциите за метода и честотата на почистване се намират в раздел „МОНТАЖ И
ПОДДРЪЖКА“.
Не дърпайте захранващият кабел когато искате да изключите апарата. Хванете щекера и го
издърпайте леко.
Преди почистване се подсигурете, че апарата е изключен от контакта.
МОНТАЖ И ПОДДРЪЖКА
1. МОНТАЖ
Метод A
1) За оптимални резултати, аспиратора трябва да бъде поставен на оптимално разстояние от
65-75 см. спрямо плоскостта за готвене;
2) За осъществяването на монтажа на стената, направете четири дупки с диаметър 8 мм. на
най-подходящото място като в същото време имате предвид разстоянието от центъра на
дупката от задната страна на аспиратора;
3) Поставете дюбелите в направените дупки;
4) Поставете винтовете в дюбелите и фиксирайте добре;
5) Поставете аспиратора във фиксираните винтове;
6) После използвайте включените аксесоари за да завиете винтовете в двете дупки от
вътрешната страна на аспиратора, за да фиксирате аспиратора за стената.
7) Сложете клапата “one way” на аспиратора.

Метод Б
1) Направете 4 дупки с диаметър Ø 6мм в долната част на зоната където желаете да
монтирате аспиратора;
2) Поставете клапата “one way” на аспиратора и после монтирайте аспиратора от
вътрешната страна на мястото за фиксиране и закрепете добре с помощта на шестте
включени винта;
3) Монтирайте регулируемата плоча на задната страна на аспиратора, за да няма
пространство между аспиратора и повърхността за монтаж.

Бележка: възможни са два вида вентилация: вертикална вентилация и хоризонтална вентилация.
Моля, обърнете внимание на желания метод на вентилация, преди избора на метод за
инсталиране.
Хоризонтална вентилация: Моля, използвайте капака, за да покрете отвора от горната страна,
така че въздуха да може да бъде вентилиран от задната страна на аспиратора, така като е
показано на снимка 4А.
Вертикална вентилация: Моля, използвайте капака, за да покриете отвора от задната страна на
аспиратора. По този начин въздуха ще бъде вентилиран от горната страна на аспиратора, така
както е показано на снимка 4B.
Настройка на вентилацията
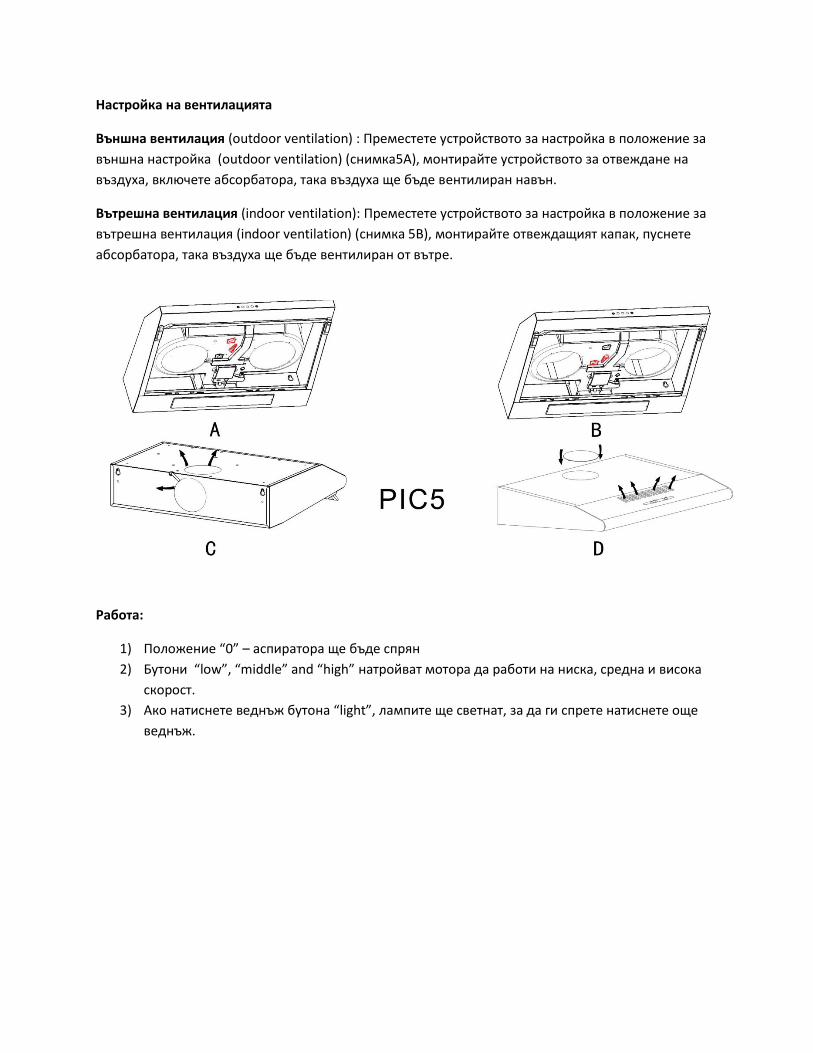
Външна вентилация (outdoor ventilation) : Преместете устройството за настройка в положение за
външна настройка (outdoor ventilation) (снимка5A), монтирайте устройството за отвеждане на
въздуха, включете абсорбатора, така въздуха ще бъде вентилиран навън.
Вътрешна вентилация (indoor ventilation): Преместете устройството за настройка в положение за
вътрешна вентилация (indoor ventilation) (снимка 5B), монтирайте отвеждащият капак, пуснете
абсорбатора, така въздуха ще бъде вентилиран от вътре.
Работа:
1) Положение “0” – аспиратора ще бъде спрян
2) Бутони “low”, “middle” and “high” натройват мотора да работи на ниска, средна и висока
скорост.
3) Ако натиснете веднъж бутона “light”, лампите ще светнат, за да ги спрете натиснете още
веднъж.

ПОДДРЪЖКА
Смяна и почистване на филтъра – виж картинката по-долу.
1. Сложете филтъра във загрята вода до 40-50℃, заедно с малко препарат и оставете за 2-3
минути. После почистете използвайки мека четка, за да не нарушите повърхността на филтъра.
2. Филтъра може да бъде мит в миялна машина. Поставете го в миялната машина заедно с
препарат за миене и настойте миялната на 60 ℃.
Филтрите са метални: не използвайте препарати с корозионно действие.
Внимание: Изключете аспиратора от контакта преди почистването му.

Смяна на крушките
* Моля, преди да смените крушките се подсигурете, че аспиратора е изключен от контакта.
* Отворете филтъра, така както е показано по-горе.
* Сменете крушката max 40W E14.
* Поставете филтъра на място.
ИЗХВЪРЛЯНЕТО НА ОТПАДЪЦИТЕ ПО ОТГОВОРЕН НАЧИН КЪМ ОКОЛНАТА СРЕДА
Можете да помогнете за опазване на околната среда!
Молим Ви да спазвате местните закони и правила: занесете нефункциониращите
електрически уреди в пунктовете за събиране на отпадъци от електрическо оборудване.
www.heinner.com