manual de utilizare dhs 2802 - dhsfitness.ro · observatie: apasati maneta frana/surubul mare ......
TRANSCRIPT
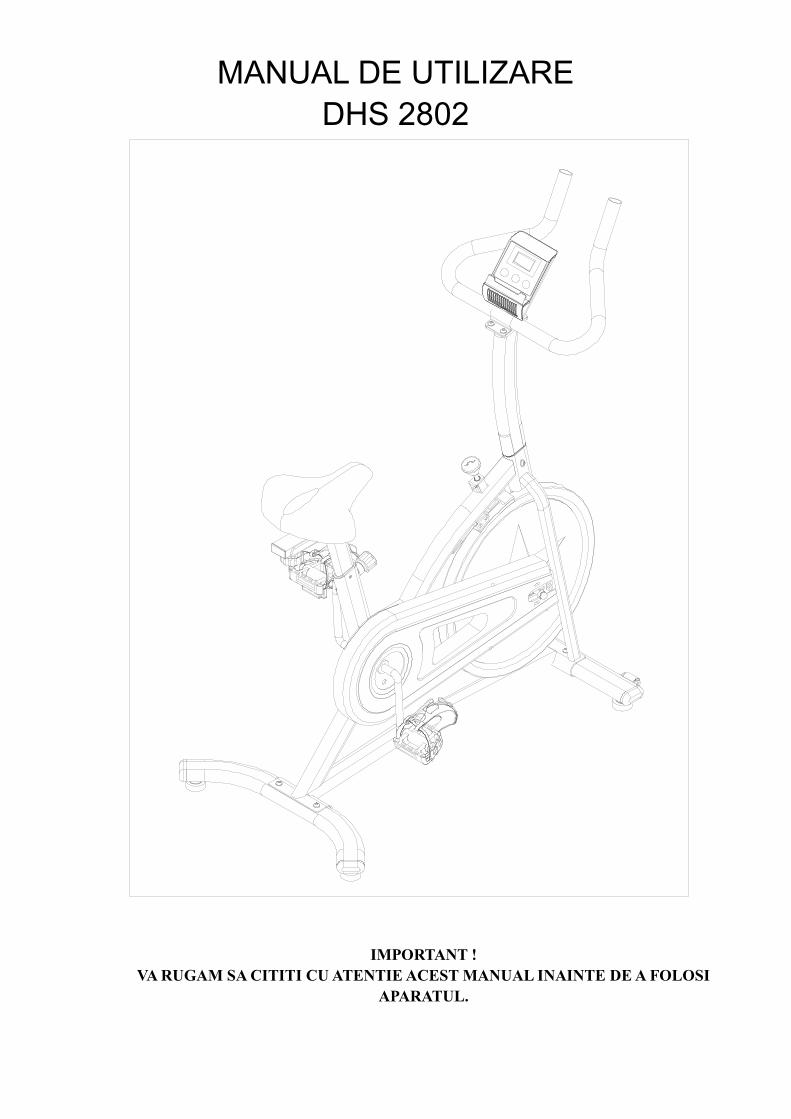
MANUAL DE UTILIZAREDHS 2802
IMPORTANT !VA RUGAM SA CITITI CU ATENTIE ACEST MANUAL INAINTE DE A FOLOSI
APARATUL.

2
Instructiuni importante de siguranta
Va multumim ca ati ales acest produs. Pentru a va garanta siguranta si sanatateadumneavoastra, va rugam sa folositi corect aparatul. Va rugam sa pastrati acest manual laindemana.
1. Inainte de a incepe antrenamentul, consultati doctorul pentru a va asigura ca nu aveti nici oproblema medicala sau fizica care ar putea sa va puna in pericol sanatatea si siguranta saucare ar putea sa va impiedice sa folositi corect aparatul. Urmati sfaturile doctorului dacasunteti sub tratament care va poate afecta ritmul batailor inimii, tensiunea sau nivelulcolesterolului.
2. Tineti cont de semnalele transmise de organism. Efectuarea de exercitii incorecte sauexcesive va poate afecta sanatatea. Intrerupeti antrenamentul daca aveti oricare dintresimptomele: durere in piept, respiratie neregulata, intreruperea respiratiei, ameteala saugreata. In acest caz trebuie sa consultati doctorul inainte de a va continua antrenamentul.
3. Nu lasati copiii sau animalele in preajma aparatului. Acest aparat a fost creat pentru a fifolosit doar de catre adulti.
4. Asezati aparatul pe o suprafata solida, plana, acoperita pentru a va proteja podeaua saucovorul. Pentru a fi in siguranta, asigurati-va ca pastrati o distanta minima de 0.6 m in jurulaparatului.
5. Inainte de a incepe antrenamentul, verificati daca toate piesele: suruburi, piulite si saibe, suntfixate si stranse corect.
6. Aparatul poate fi folosit in siguranta si eficient doar daca acesta a fost asamblat, intretinut sifolosit adecvat. Daca auziti vreun zgomot in timpul asamblarii sau a utilizarii, incheiatiantrenamentul imediat. Nu folositi aparatul pana cand nu a fost remediata problema.
7. Purtati haine si incaltaminte adecvata pentru antrenament. Evitati purtarea hainelor largi cares-ar putea agata de aparat sau care v-ar putea restrictiona sau impiedica miscarea
8. Greutatea maxima permisa a utilizatorului este 100 KG.9. Acest produs nu este potrivit pentru a fi folosit in scop terapeutic.10. Aveti grija sa nu va afectati spatele atunci cand ridicati sau mutati aparatul.11. Acest aparat a fost conceput pentru a fi folosit acasa si in spatiu interior.
3
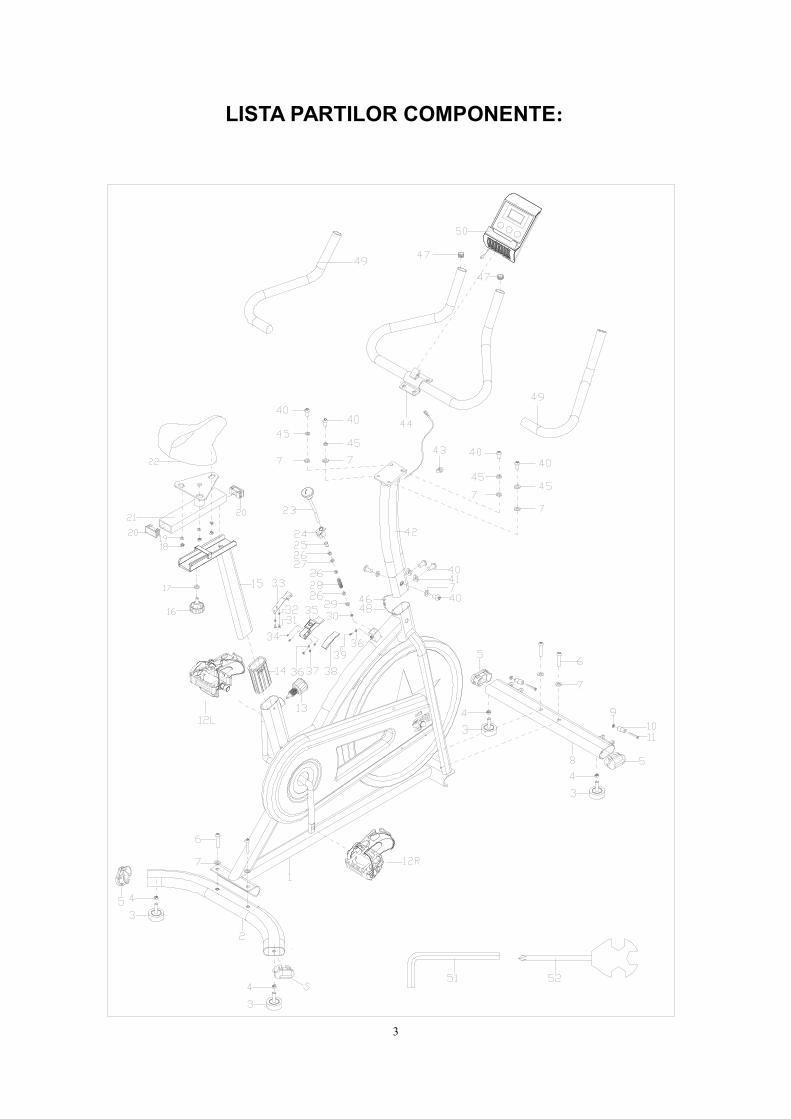
LISTA PARTILOR COMPONENTE:
4
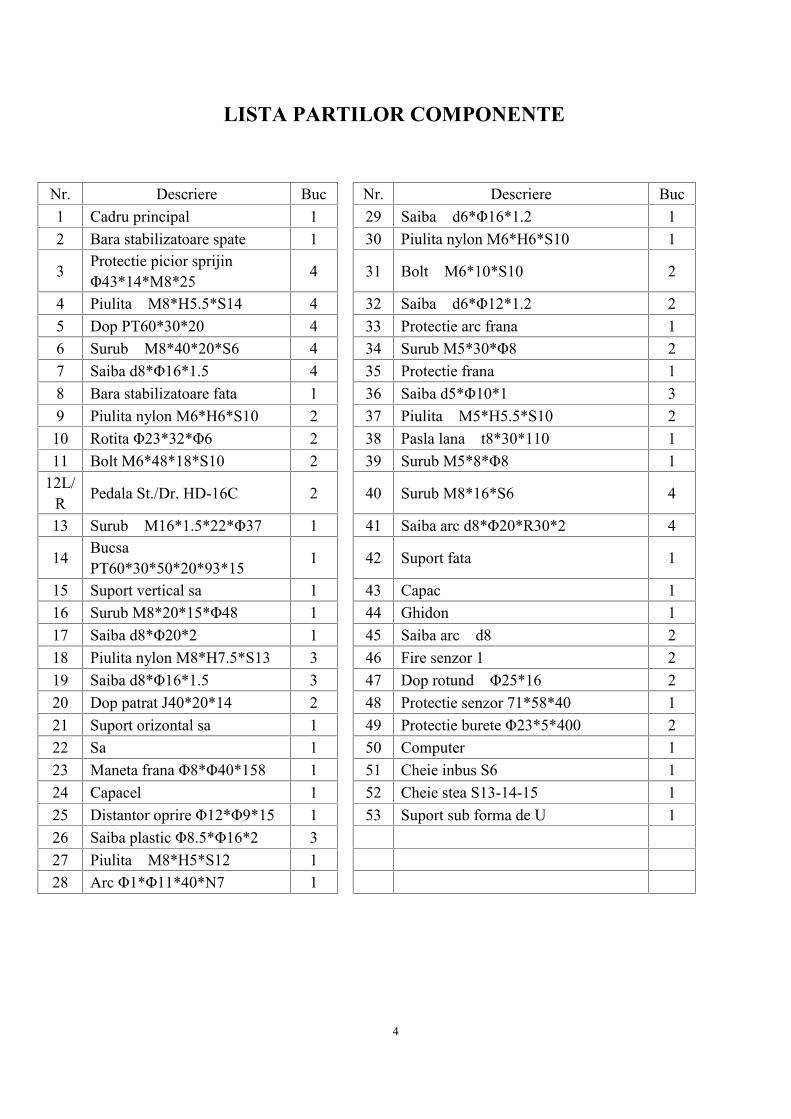
LISTA PARTILOR COMPONENTE
Nr. Descriere Buc Nr. Descriere Buc1 Cadru principal 1 29 Saiba d6*Φ16*1.2 12 Bara stabilizatoare spate 1 30 Piulita nylon M6*H6*S10 1
3 Protectie picior sprijinΦ43*14*M8*25 4 31 Bolt M6*10*S10 2
4 Piulita M8*H5.5*S14 4 32 Saiba d6*Φ12*1.2 25 Dop PT60*30*20 4 33 Protectie arc frana 16 Surub M8*40*20*S6 4 34 Surub M5*30*Φ8 27 Saiba d8*Φ16*1.5 4 35 Protectie frana 18 Bara stabilizatoare fata 1 36 Saiba d5*Φ10*1 39 Piulita nylon M6*H6*S10 2 37 Piulita M5*H5.5*S10 210 Rotita Φ23*32*Φ6 2 38 Pasla lana t8*30*110 111 Bolt M6*48*18*S10 2 39 Surub M5*8*Φ8 1
12L/R Pedala St./Dr. HD-16C 2 40 Surub M8*16*S6 4
13 Surub M16*1.5*22*Φ37 1 41 Saiba arc d8*Φ20*R30*2 4
14 BucsaPT60*30*50*20*93*15 1 42 Suport fata 1
15 Suport vertical sa 1 43 Capac 116 Surub M8*20*15*Φ48 1 44 Ghidon 117 Saiba d8*Φ20*2 1 45 Saiba arc d8 218 Piulita nylon M8*H7.5*S13 3 46 Fire senzor 1 219 Saiba d8*Φ16*1.5 3 47 Dop rotund Φ25*16 220 Dop patrat J40*20*14 2 48 Protectie senzor 71*58*40 121 Suport orizontal sa 1 49 Protectie burete Φ23*5*400 222 Sa 1 50 Computer 123 Maneta frana Φ8*Φ40*158 1 51 Cheie inbus S6 124 Capacel 1 52 Cheie stea S13-14-15 125 Distantor oprire Φ12*Φ9*15 1 53 Suport sub forma de U 126 Saiba plastic Φ8.5*Φ16*2 327 Piulita M8*H5*S12 128 Arc Φ1*Φ11*40*N7 1
5
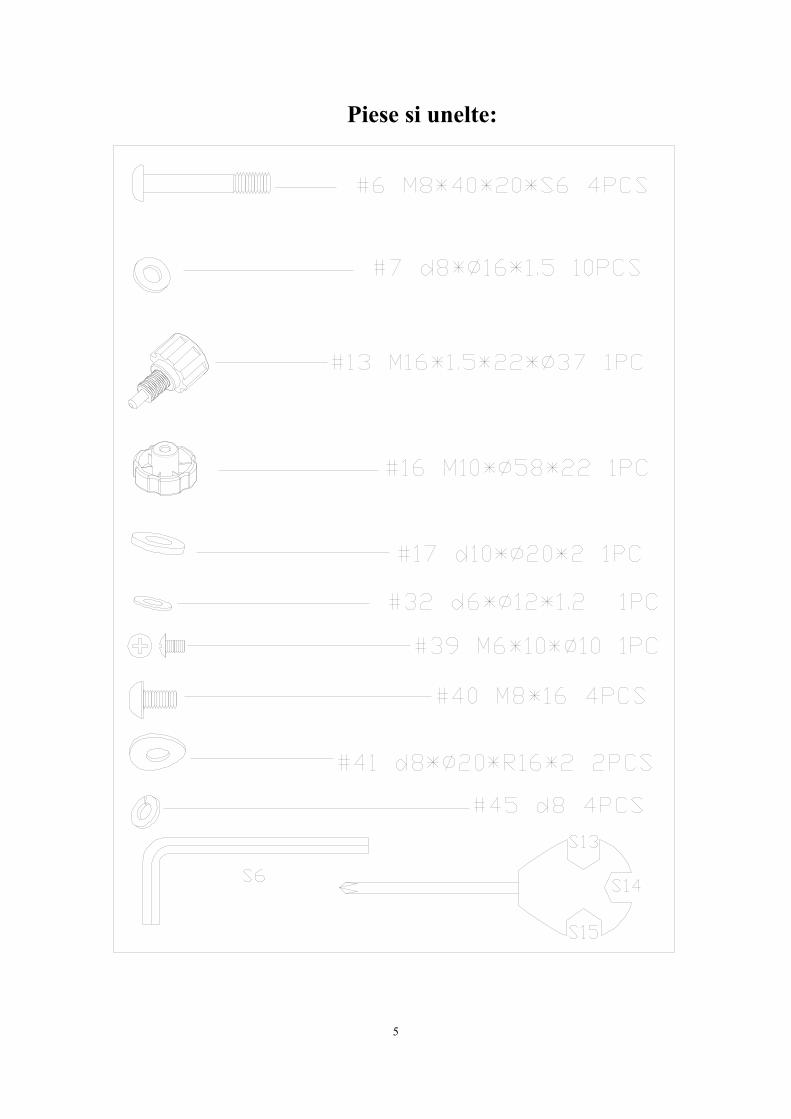
Piese si unelte:
6
INSTRUCTIUNI DE ASAMBLARE
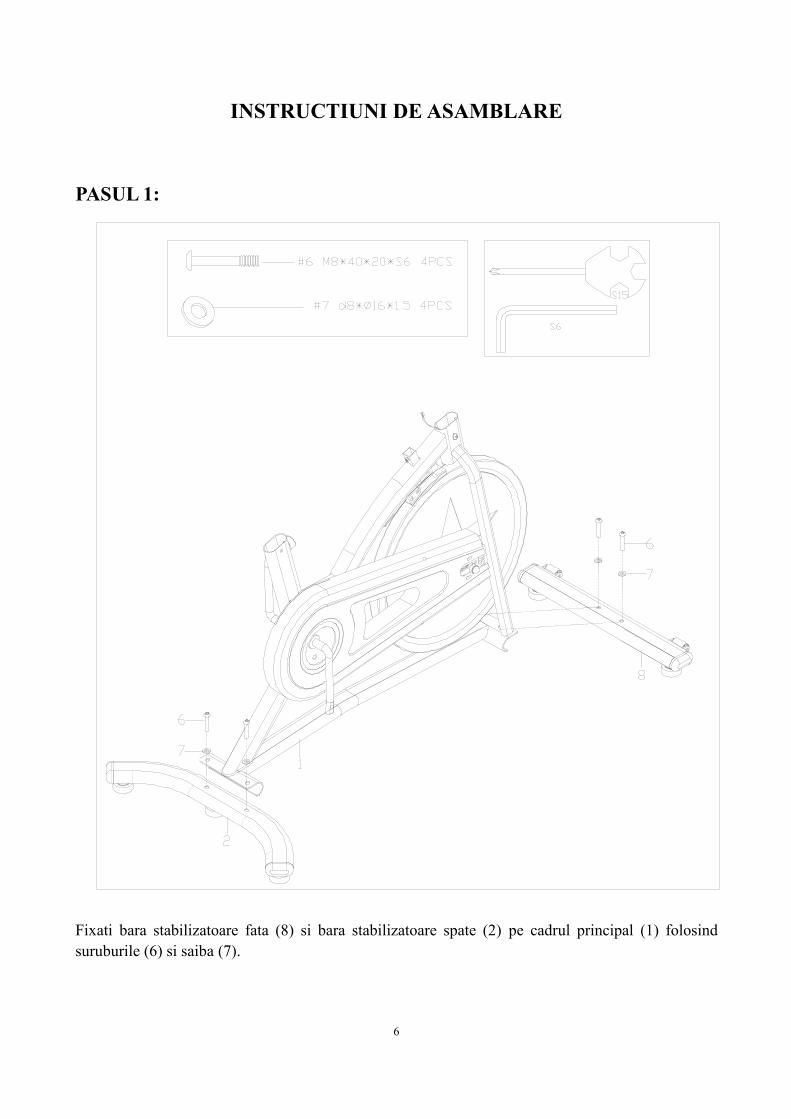
PASUL 1:
Fixati bara stabilizatoare fata (8) si bara stabilizatoare spate (2) pe cadrul principal (1) folosindsuruburile (6) si saiba (7).
7
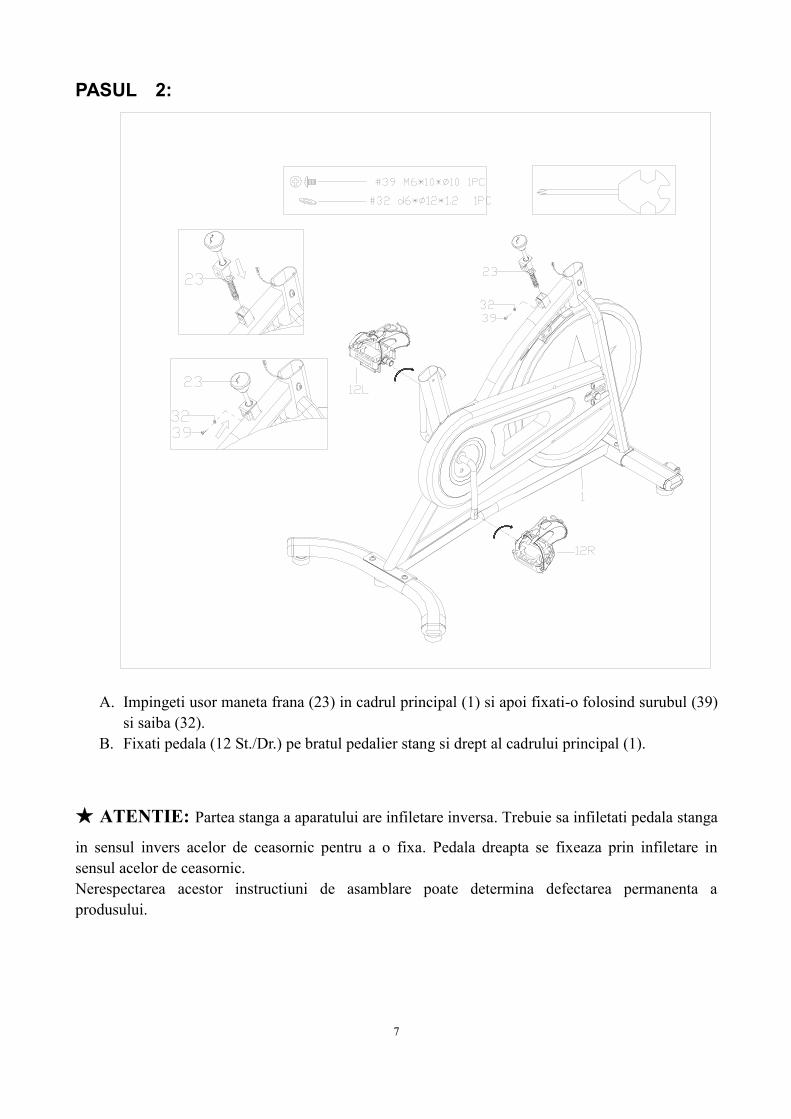
PASUL 2:
A. Impingeti usor maneta frana (23) in cadrul principal (1) si apoi fixati-o folosind surubul (39)si saiba (32).
B. Fixati pedala (12 St./Dr.) pe bratul pedalier stang si drept al cadrului principal (1).
★ ATENTIE: Partea stanga a aparatului are infiletare inversa. Trebuie sa infiletati pedala stanga
in sensul invers acelor de ceasornic pentru a o fixa. Pedala dreapta se fixeaza prin infiletare insensul acelor de ceasornic.Nerespectarea acestor instructiuni de asamblare poate determina defectarea permanenta aprodusului.

8
PASUL 3:
A. Fixati saua (22) in suportul orizontal al seii (21) folosind piulitele nylon (18) si saibele (19)
B. Introduceti suportul vertical al seii (15) in cadrul principal (1) si apoi fixati-l folosind
surubul (13).
C. Asezati suportul orizontal al seii (21) pe suportul vertical al seii (15) si apoi fixati-l folosind
surubul (16) si saiba (17).
9
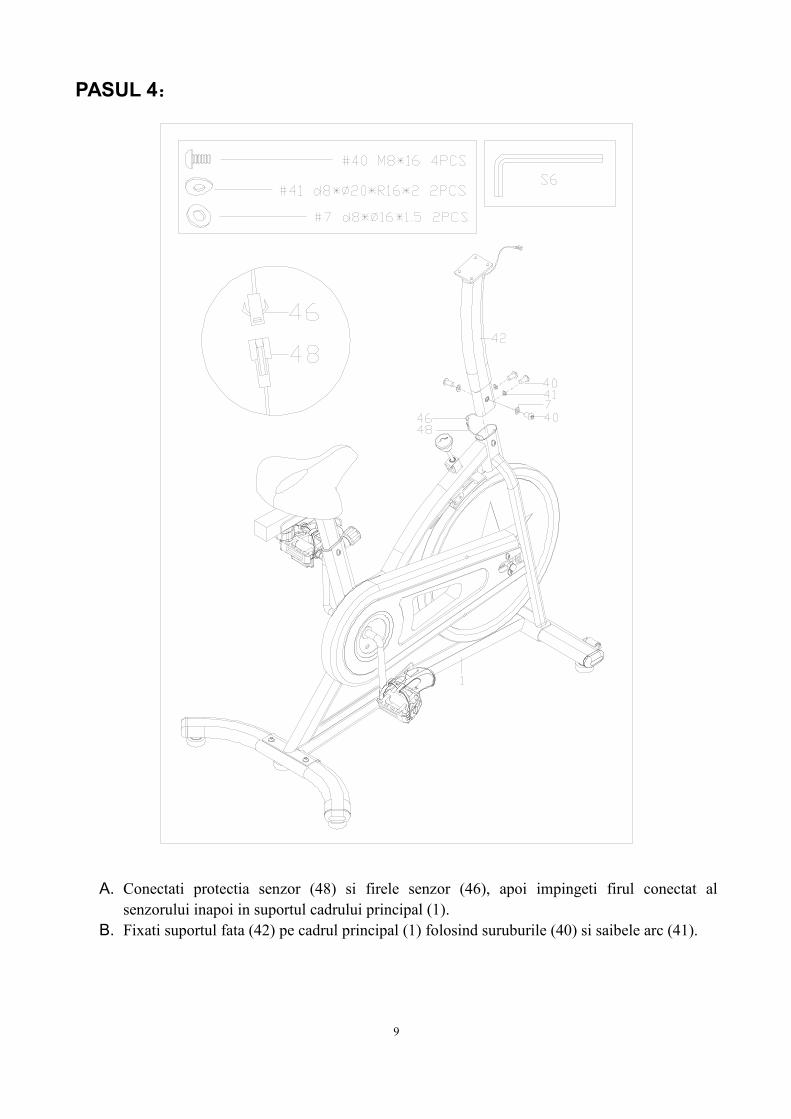
PASUL 4:
A. Conectati protectia senzor (48) si firele senzor (46), apoi impingeti firul conectat alsenzorului inapoi in suportul cadrului principal (1).
B. Fixati suportul fata (42) pe cadrul principal (1) folosind suruburile (40) si saibele arc (41).
10
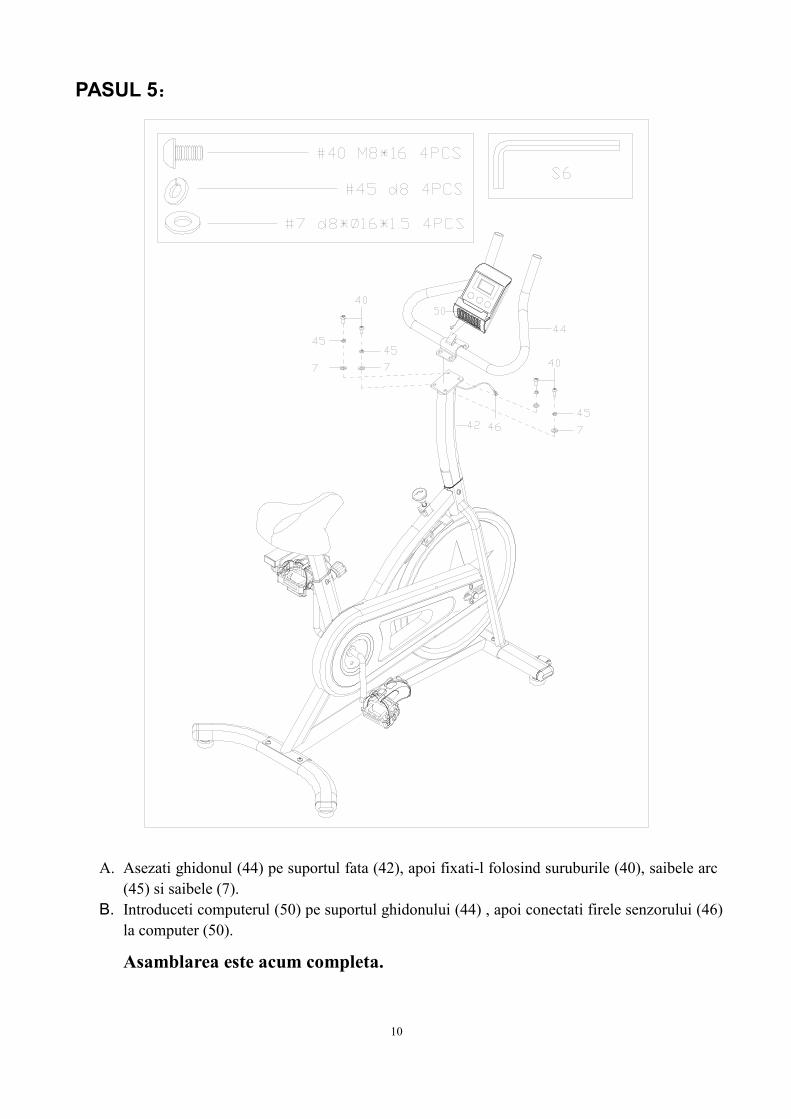
PASUL 5:
A. Asezati ghidonul (44) pe suportul fata (42), apoi fixati-l folosind suruburile (40), saibele arc(45) si saibele (7).
B. Introduceti computerul (50) pe suportul ghidonului (44) , apoi conectati firele senzorului (46)la computer (50).
Asamblarea este acum completa.
11
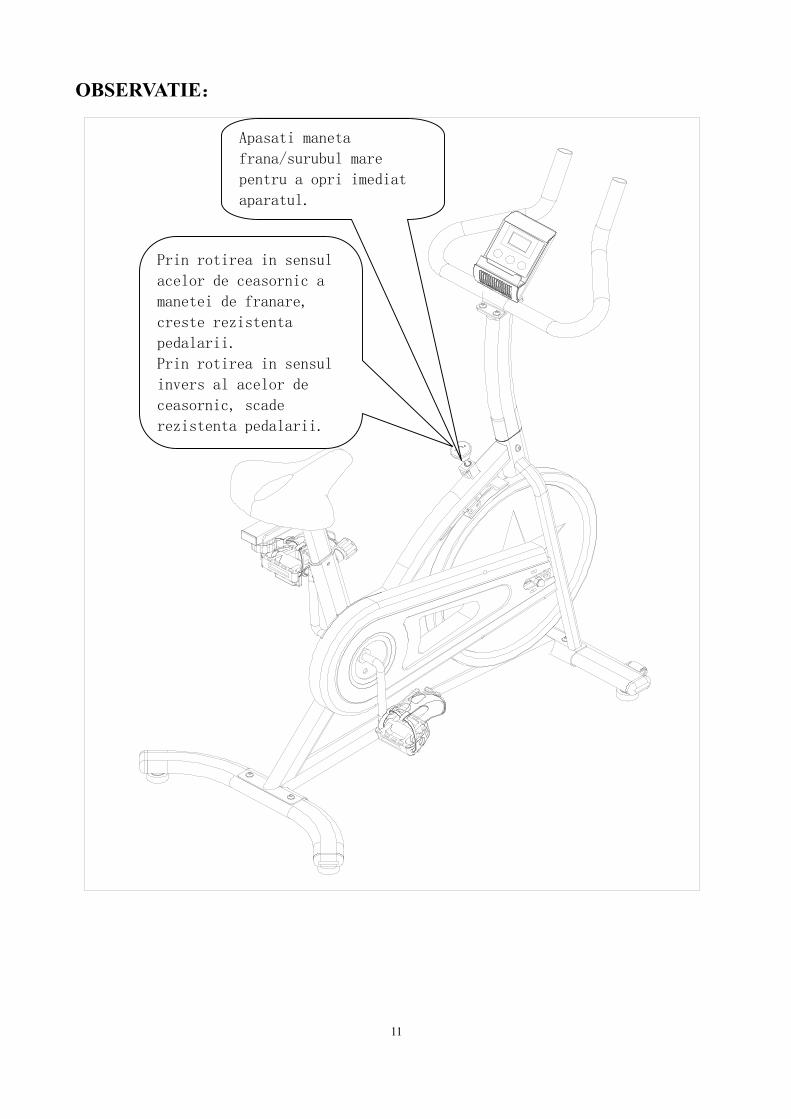
OBSERVATIE:
Apasati maneta
frana/surubul mare
pentru a opri imediat
aparatul.
Prin rotirea in sensul
acelor de ceasornic a
manetei de franare,
creste rezistenta
pedalarii.
Prin rotirea in sensul
invers al acelor de
ceasornic, scade
rezistenta pedalarii.
12
UTILIZARE SI INTRETINERE
1. Dacă nu există semnal la calculator, verificați dacă firele senzorilor (46 și 48) sunt conectatecorect.
2. Dacă afișajul devine neclar, înlocuiți bateriile pentru a îmbunătăți rezultatul.3. Această bicicletă poate fi regalata pentru a compensa suprafețele inegale. Pentru a alinia
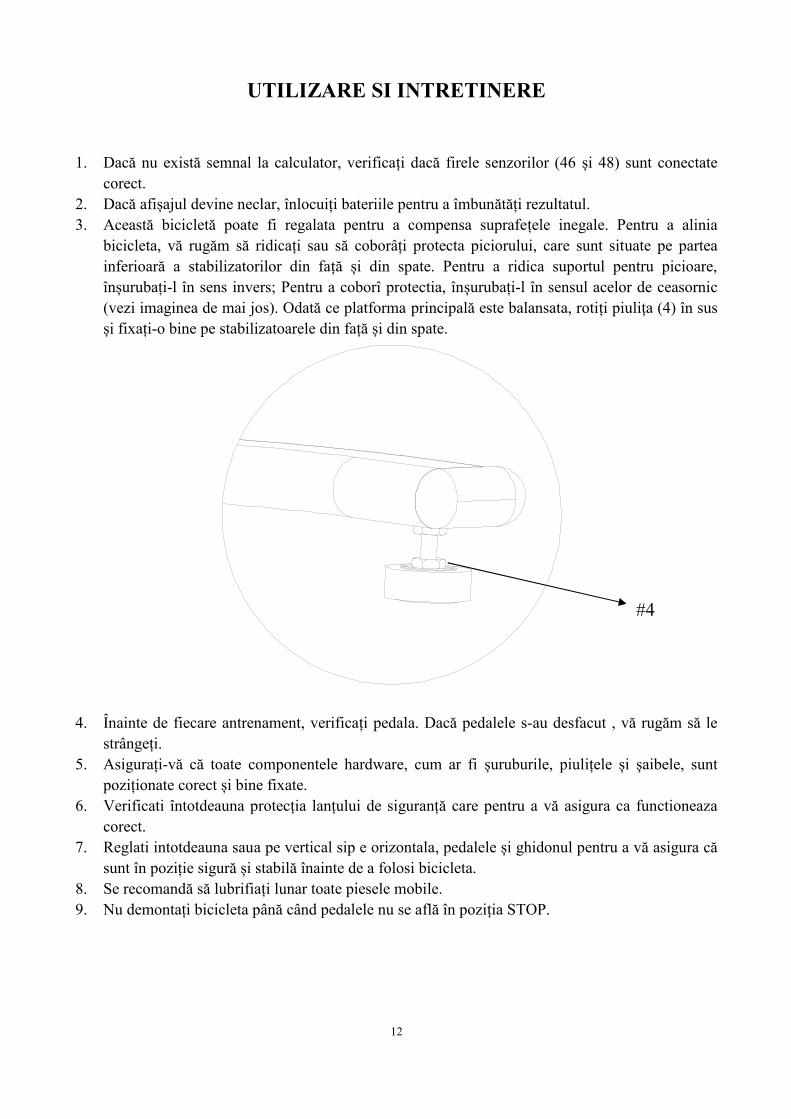
bicicleta, vă rugăm să ridicați sau să coborâți protecta piciorului, care sunt situate pe parteainferioară a stabilizatorilor din față și din spate. Pentru a ridica suportul pentru picioare,înșurubați-l în sens invers; Pentru a coborî protectia, înșurubați-l în sensul acelor de ceasornic(vezi imaginea de mai jos). Odată ce platforma principală este balansata, rotiți piulița (4) în susși fixați-o bine pe stabilizatoarele din față și din spate.
4. Înainte de fiecare antrenament, verificați pedala. Dacă pedalele s-au desfacut , vă rugăm să lestrângeți.
5. Asigurați-vă că toate componentele hardware, cum ar fi șuruburile, piulițele și șaibele, suntpoziționate corect și bine fixate.
6. Verificati întotdeauna protecția lanțului de siguranță care pentru a vă asigura ca functioneazacorect.
7. Reglati intotdeauna saua pe vertical sip e orizontala, pedalele și ghidonul pentru a vă asigura căsunt în poziție sigură și stabilă înainte de a folosi bicicleta.
8. Se recomandă să lubrifiați lunar toate piesele mobile.9. Nu demontați bicicleta până când pedalele nu se află în poziția STOP.
#4
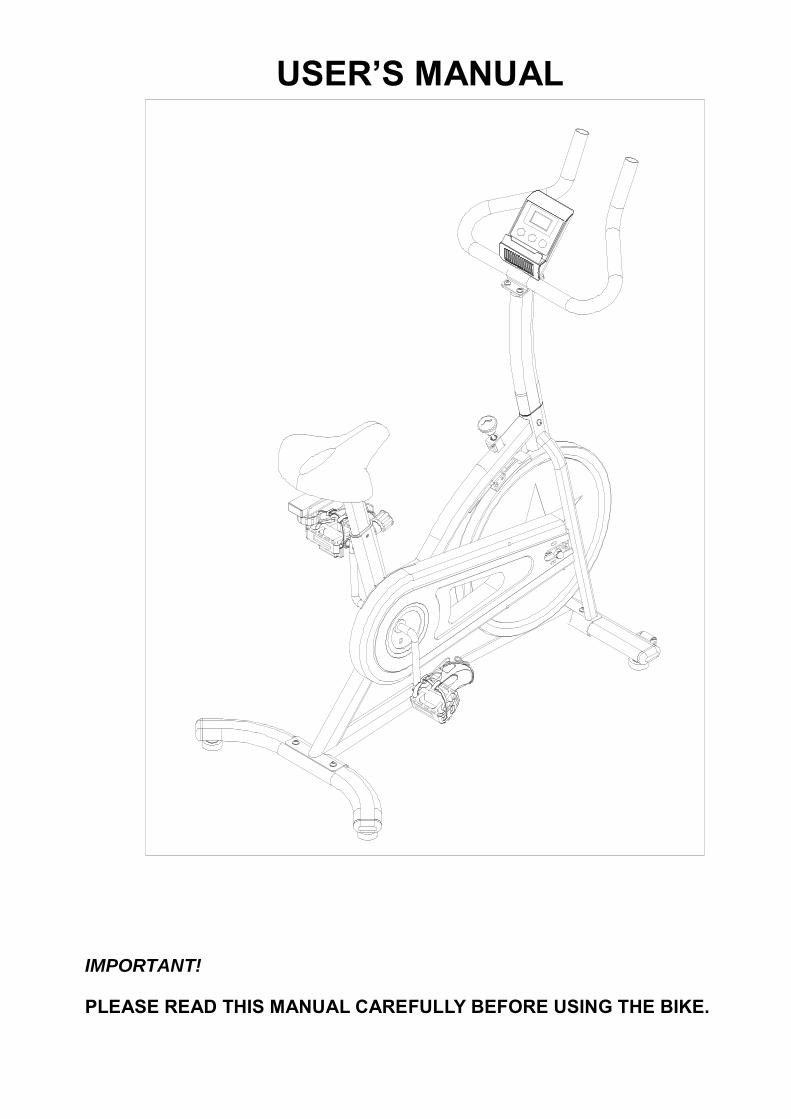
USER’S MANUAL
IMPORTANT!
PLEASE READ THIS MANUAL CAREFULLY BEFORE USING THE BIKE.
1
IMPORTANT SAFETY INFORMATION
We thank you for choosing our product. To ensure your safety and health, please use this
equipment correctly. It is important to read this entire manual before assembling and using
the equipment. Safe and effective use can only be achieved if the equipment is assembled,
maintained and used properly. It is your responsibility to ensure that all users of the
equipment are informed of all warnings and precautions.
1. Before starting any exercise program you should consult your physician to determine
if you have any medical or physical conditions that could put your health and safety at
risk, or prevent you from using the equipment properly. Your physician’s advice is
essential if you are taking medication that affects your heart rate, blood pressure or
cholesterol level.
2. Be aware of your body’s signals. Incorrect or excessive exercise can damage your
health. Stop exercising if you experience any of the following symptoms: pain,
tightness in your chest, irregular heartbeat, and extreme shortness of breath,
lightheadedness, dizziness or feelings of nausea. If you do experience any of these
conditions, you should consult your physician before continuing with your exercise
program.
3. Keep children and pets away from the equipment. The equipment is designed for adult
use only.
4. Use the equipment on a solid, flat level surface with a protective cover for your floor or
carpet. To ensure safety, the equipment should have at least 2 feet of free space all
around it.
5. Ensure that all nuts and bolts are securely tightened before using the equipment. The
safety of the equipment can only be maintained if it is regularly examined for damage
and/or ware and tear.
6. Always use the equipment as indicated. If you find any defective components while
assembling or checking the equipment, or if you hear any unusual noises coming from
the equipment during exercise, stop using the equipment immediately and don’t use
the equipment until the problem has been rectified.
7. Wear suitable clothing while using the equipment. Avoid wearing loose clothing that
may become entangled in the equipment.
8. The maximum weight capacity of this unit is 220 pounds.
9. The equipment is not suitable for therapeutic use.
10. You must take care of yourself when lifting and moving the equipment so as not to
injure your back. Always use proper lifting technique and seek assistance if necessary.
11. This equipment is designed for indoor and home use only, it is not intended for
commercial use.
2
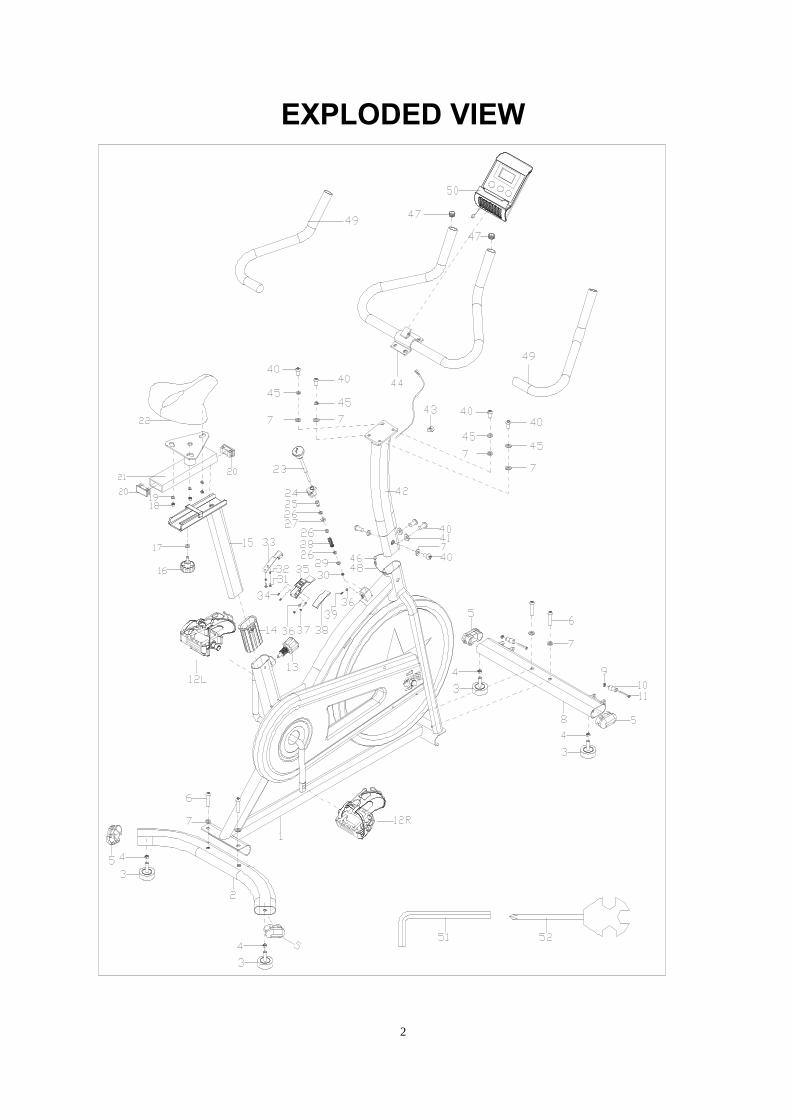
EXPLODED VIEW
3
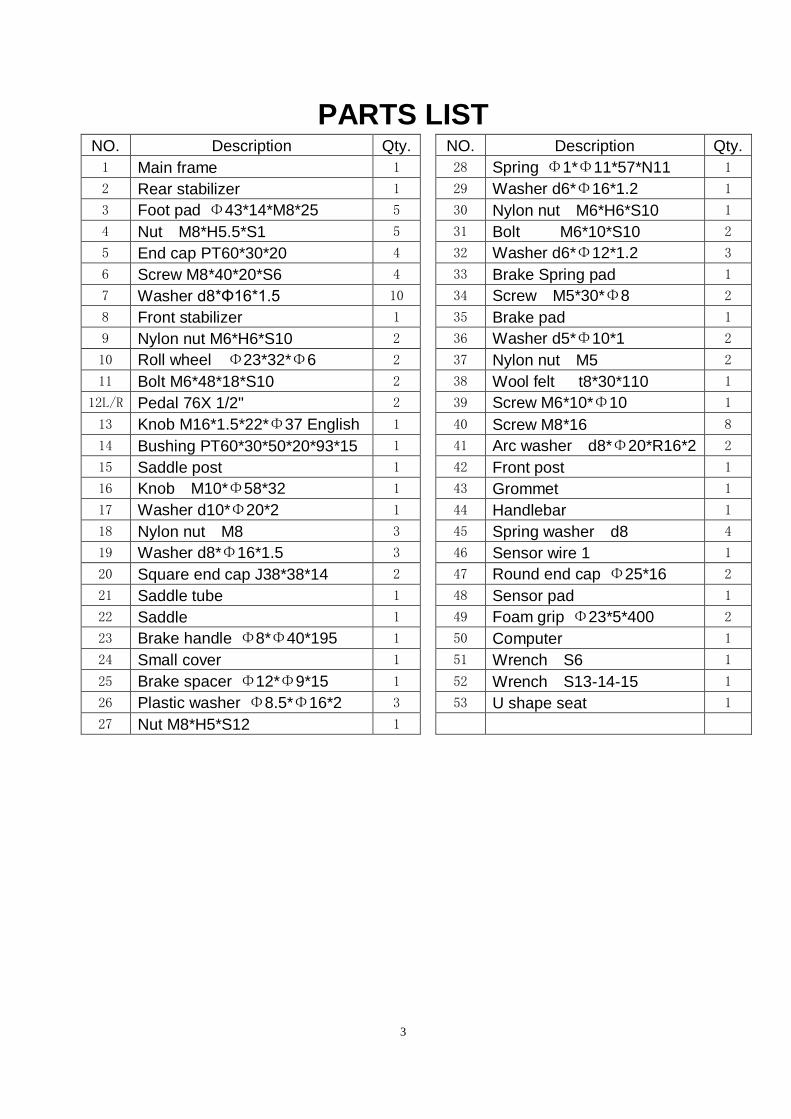
PARTS LIST NO. Description Qty. NO. Description Qty.
1 Main frame 1 28 Spring Φ1*Φ11*57*N11 1
2 Rear stabilizer 1 29 Washer d6*Φ16*1.2 1
3 Foot pad Φ43*14*M8*25 5 30 Nylon nut M6*H6*S10 1
4 Nut M8*H5.5*S1 5 31 Bolt M6*10*S10 2
5 End cap PT60*30*20 4 32 Washer d6*Φ12*1.2 3
6 Screw M8*40*20*S6 4 33 Brake Spring pad 1
7 Washer d8*Φ16*1.5 10 34 Screw M5*30*Φ8 2
8 Front stabilizer 1 35 Brake pad 1
9 Nylon nut M6*H6*S10 2 36 Washer d5*Φ10*1 2
10 Roll wheel Φ23*32*Φ6 2 37 Nylon nut M5 2
11 Bolt M6*48*18*S10 2 38 Wool felt t8*30*110 1
12L/R Pedal 76X 1/2" 2 39 Screw M6*10*Φ10 1
13 Knob M16*1.5*22*Φ37 English 1 40 Screw M8*16 8
14 Bushing PT60*30*50*20*93*15 1 41 Arc washer d8*Φ20*R16*2 2
15 Saddle post 1 42 Front post 1
16 Knob M10*Φ58*32 1 43 Grommet 1
17 Washer d10*Φ20*2 1 44 Handlebar 1
18 Nylon nut M8 3 45 Spring washer d8 4
19 Washer d8*Φ16*1.5 3 46 Sensor wire 1 1
20 Square end cap J38*38*14 2 47 Round end cap Φ25*16 2
21 Saddle tube 1 48 Sensor pad 1
22 Saddle 1 49 Foam grip Φ23*5*400 2
23 Brake handle Φ8*Φ40*195 1 50 Computer 1
24 Small cover 1 51 Wrench S6 1
25 Brake spacer Φ12*Φ9*15 1 52 Wrench S13-14-15 1
26 Plastic washer Φ8.5*Φ16*2 3 53 U shape seat 1
27 Nut M8*H5*S12 1
4
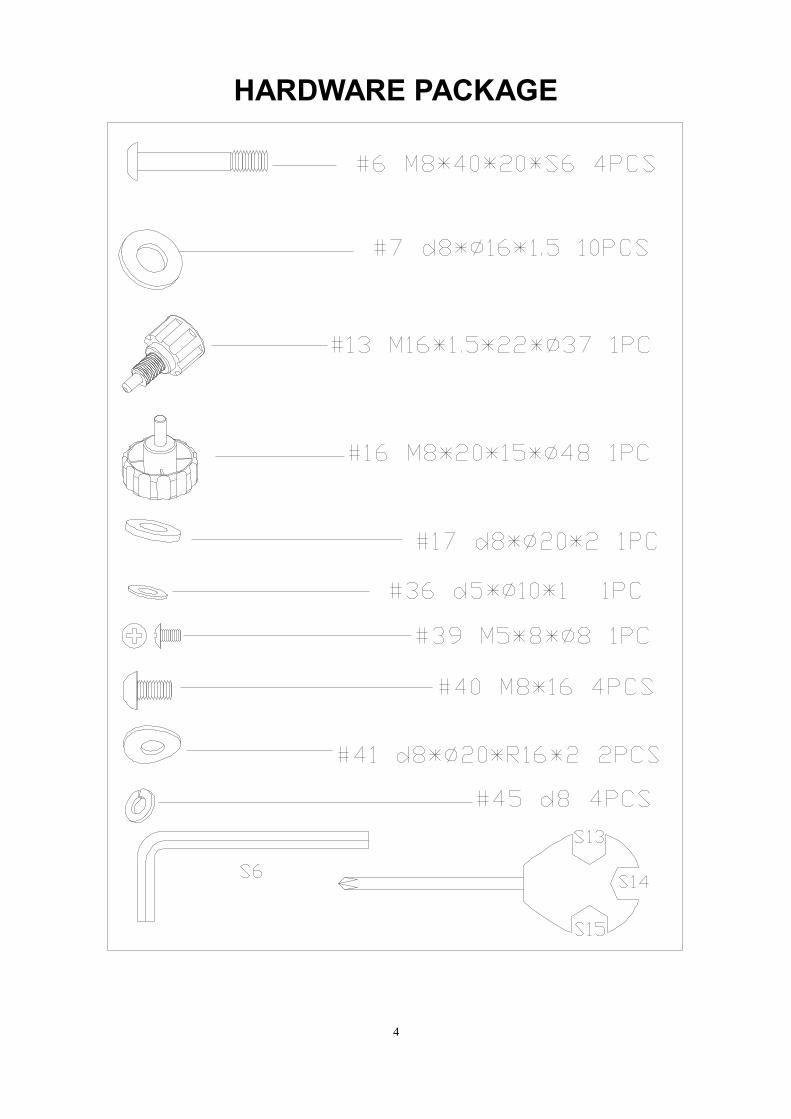
HARDWARE PACKAGE
5
ASSEMBLY INSTRUCTIONS
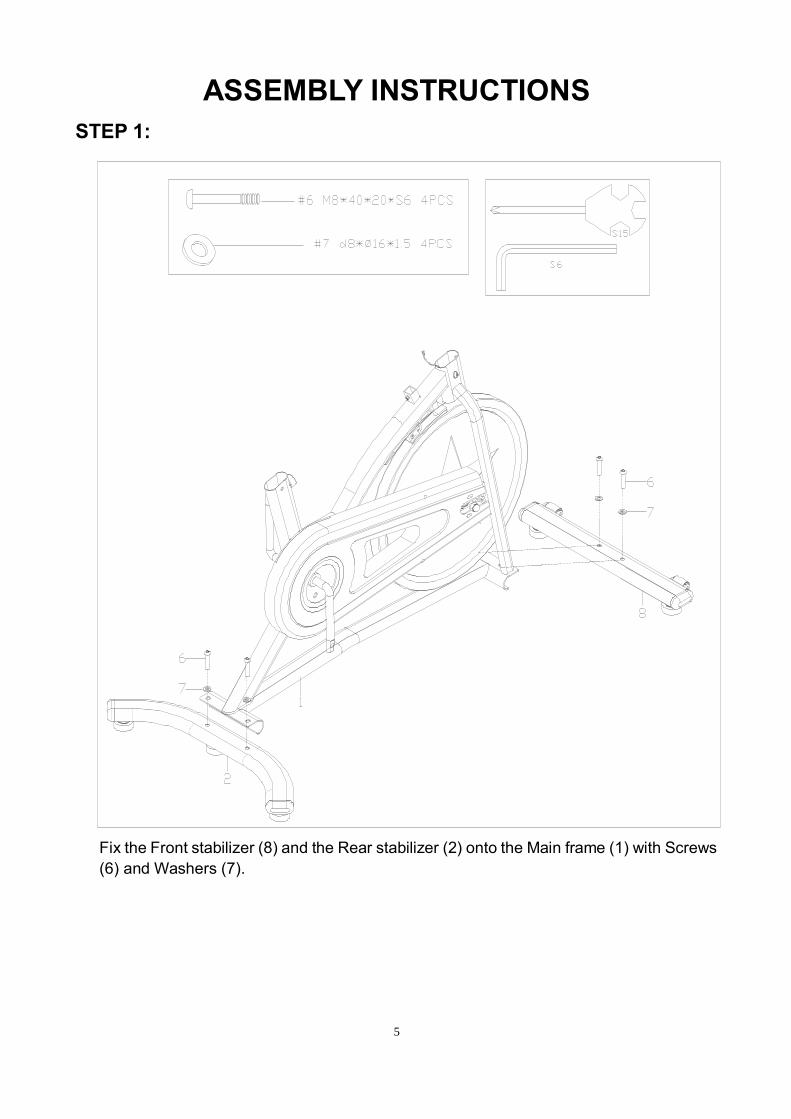
STEP 1:
Fix the Front stabilizer (8) and the Rear stabilizer (2) onto the Main frame (1) with Screws
(6) and Washers (7).
6
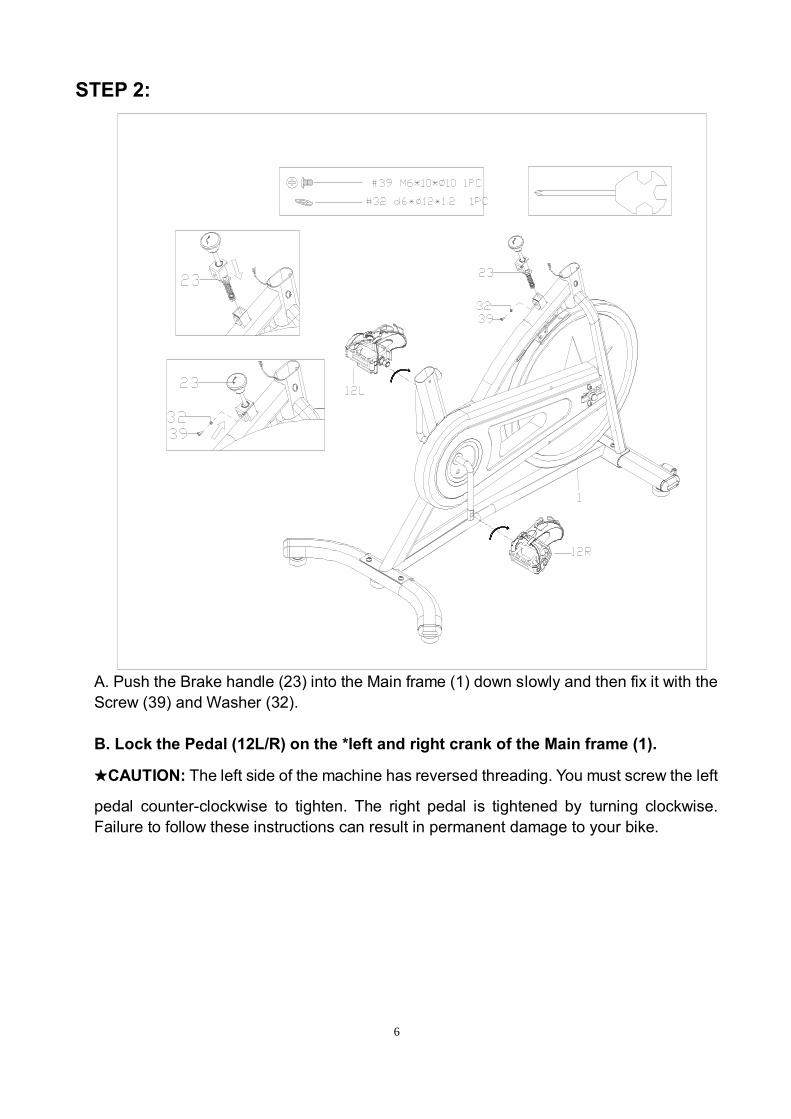
STEP 2:
A. Push the Brake handle (23) into the Main frame (1) down slowly and then fix it with the
Screw (39) and Washer (32).
B. Lock the Pedal (12L/R) on the *left and right crank of the Main frame (1).
★CAUTION: The left side of the machine has reversed threading. You must screw the left
pedal counter-clockwise to tighten. The right pedal is tightened by turning clockwise.
Failure to follow these instructions can result in permanent damage to your bike.
7
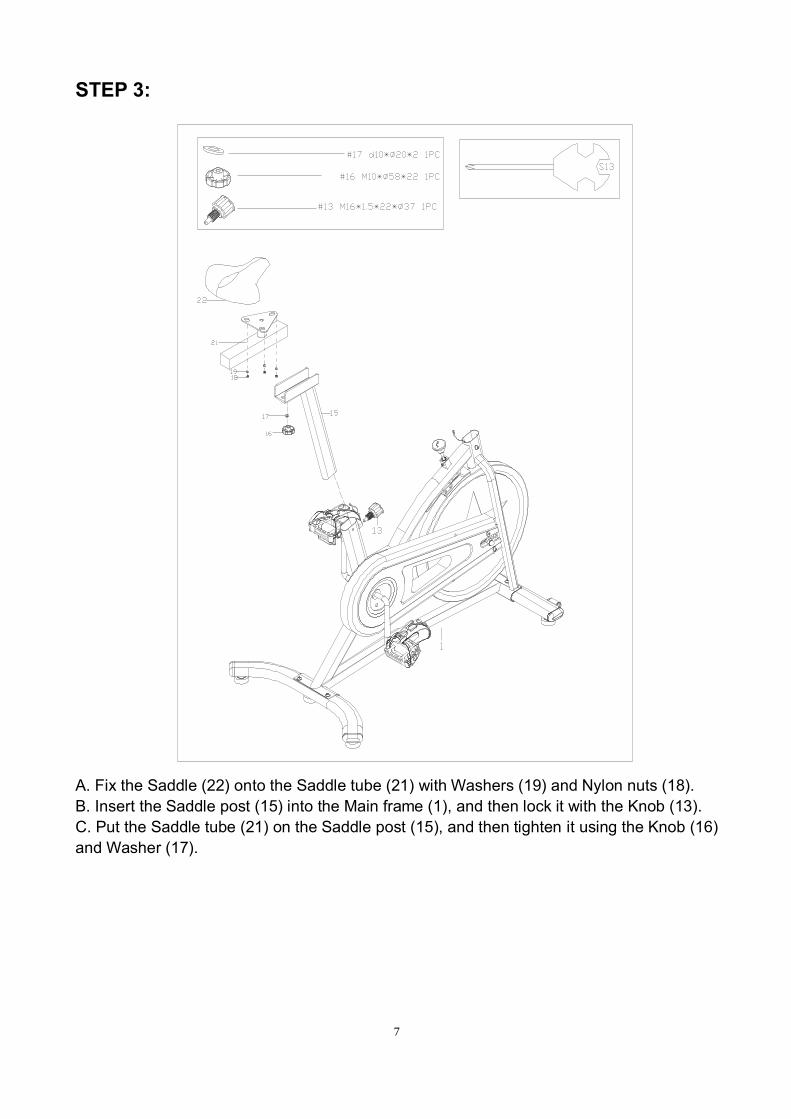
STEP 3:
A. Fix the Saddle (22) onto the Saddle tube (21) with Washers (19) and Nylon nuts (18).
B. Insert the Saddle post (15) into the Main frame (1), and then lock it with the Knob (13).
C. Put the Saddle tube (21) on the Saddle post (15), and then tighten it using the Knob (16)
and Washer (17).
8
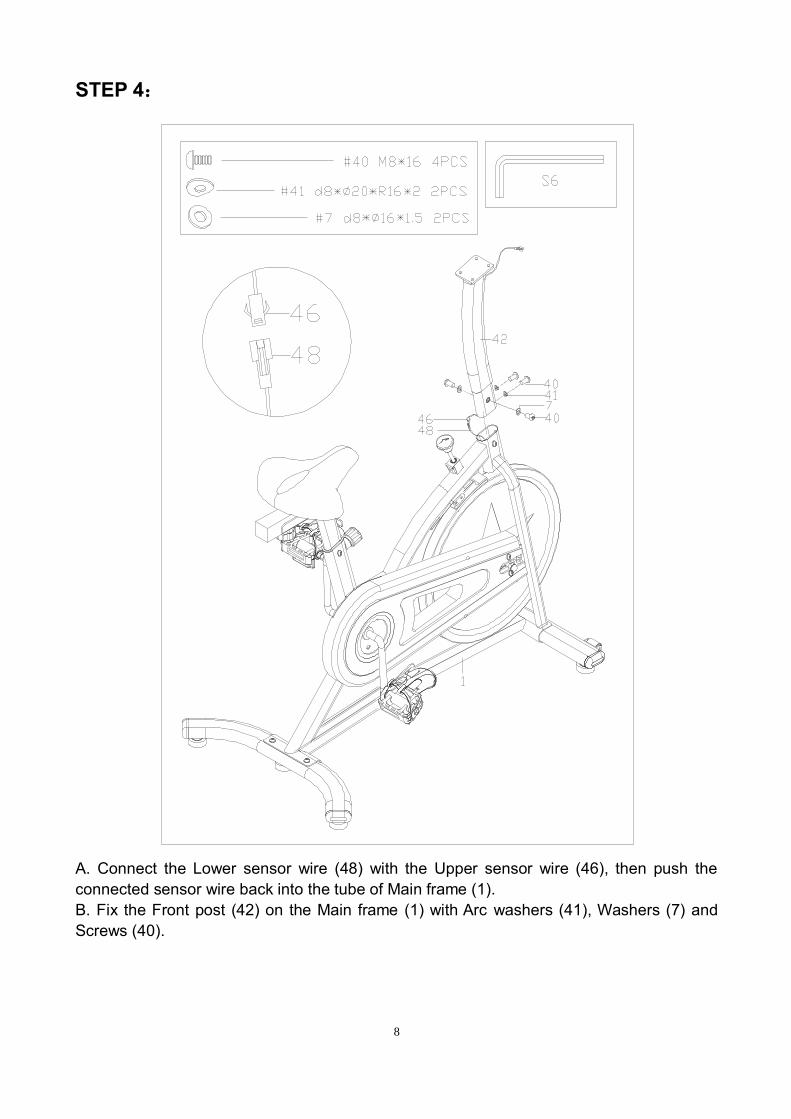
STEP 4:
A. Connect the Lower sensor wire (48) with the Upper sensor wire (46), then push the
connected sensor wire back into the tube of Main frame (1).
B. Fix the Front post (42) on the Main frame (1) with Arc washers (41), Washers (7) and
Screws (40).
9
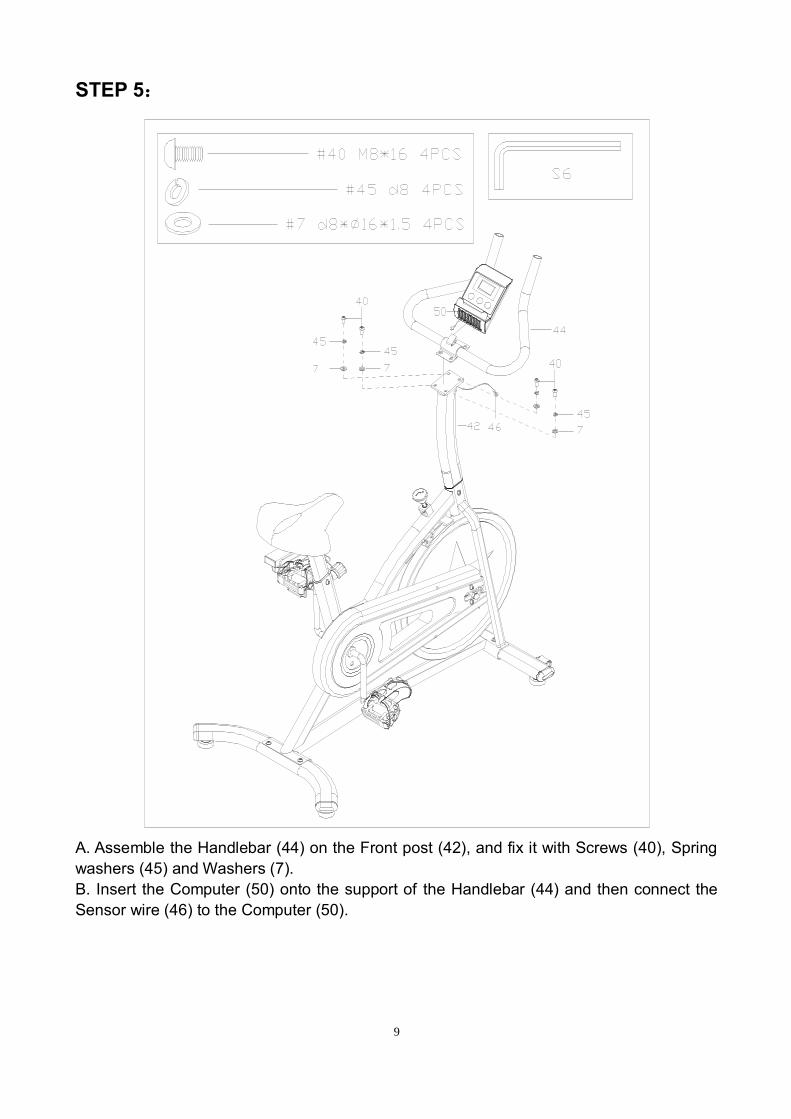
STEP 5:
A. Assemble the Handlebar (44) on the Front post (42), and fix it with Screws (40), Spring
washers (45) and Washers (7).
B. Insert the Computer (50) onto the support of the Handlebar (44) and then connect the
Sensor wire (46) to the Computer (50).
10
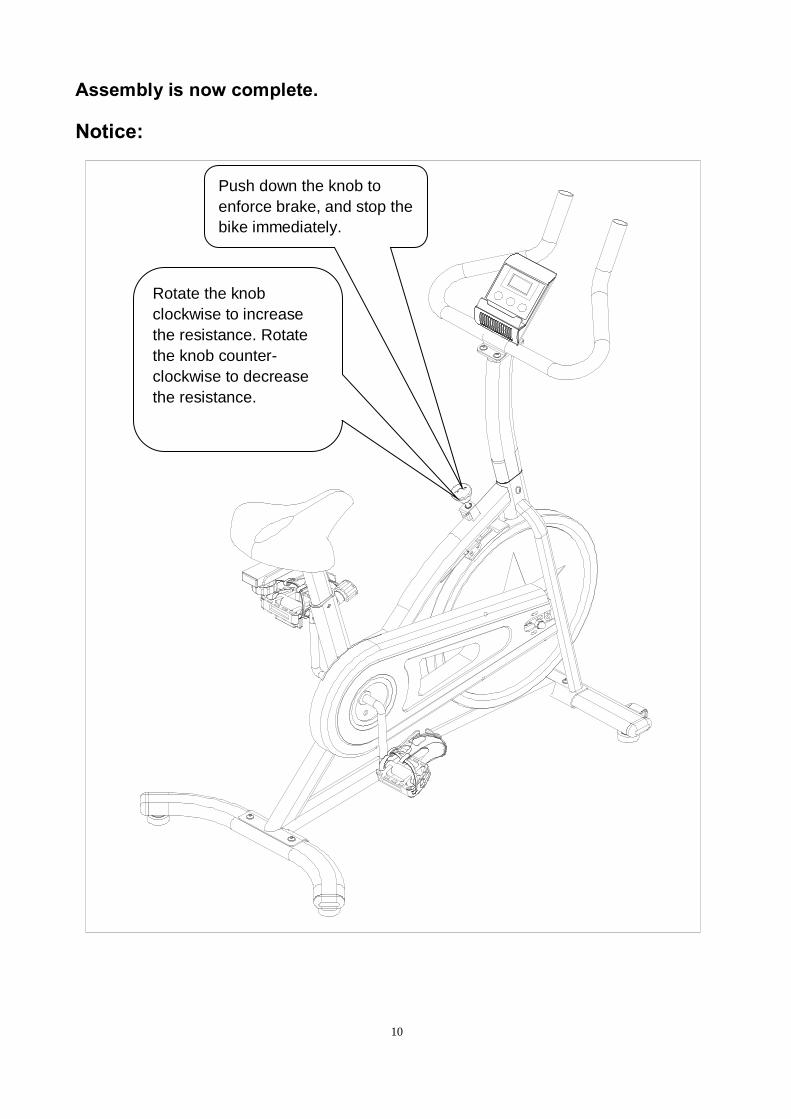
Assembly is now complete.
Notice:
Push down the knob to
enforce brake, and stop the
bike immediately.
Rotate the knob
clockwise to increase
the resistance. Rotate
the knob counter-
clockwise to decrease
the resistance.
11
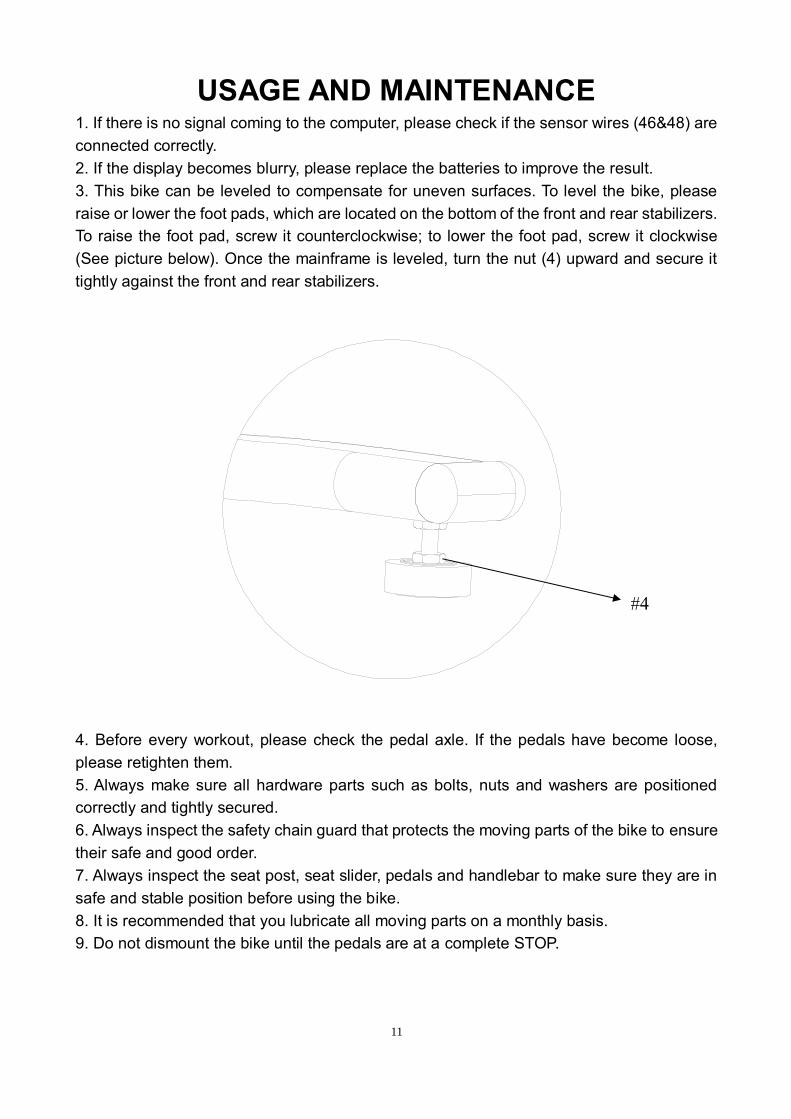
USAGE AND MAINTENANCE 1. If there is no signal coming to the computer, please check if the sensor wires (46&48) are
connected correctly.
2. If the display becomes blurry, please replace the batteries to improve the result.
3. This bike can be leveled to compensate for uneven surfaces. To level the bike, please
raise or lower the foot pads, which are located on the bottom of the front and rear stabilizers.
To raise the foot pad, screw it counterclockwise; to lower the foot pad, screw it clockwise
(See picture below). Once the mainframe is leveled, turn the nut (4) upward and secure it
tightly against the front and rear stabilizers.
4. Before every workout, please check the pedal axle. If the pedals have become loose,
please retighten them.
5. Always make sure all hardware parts such as bolts, nuts and washers are positioned
correctly and tightly secured.
6. Always inspect the safety chain guard that protects the moving parts of the bike to ensure
their safe and good order.
7. Always inspect the seat post, seat slider, pedals and handlebar to make sure they are in
safe and stable position before using the bike.
8. It is recommended that you lubricate all moving parts on a monthly basis.
9. Do not dismount the bike until the pedals are at a complete STOP.
#4