Download - Virtual Host
VirtualHost – Site-uri multiple pe un server web Daca avem nevoie de un server web care sa serveasca paginile unui site il putem pune repede pe picioare dupa ce am instalat sistemul de operare urmand un tutorial creat pentru sistemul de operare sau distributia care ne intereseaza – ex. FreeBSD, Ubuntu sau CentOS. Dupa instalare treaba e destul de directa. Accesam http://localhost/ si putem vedea pagina care ne intereseaza sau modificam adresa IP la care serverul Apache asculta cereri pentru a accesa siteul folosind un IP routabil.
In majoritatea cazurilor, avand in vedere ca orice sistem desktop poate fi transformat intr-un server web decent, ne intereseaza sa gazduim mai multe siteuri pe acelasi calculator. Pentru a face asta serverul Apache ne pune la dispozitie posibilitatea de a crea hosturi virtuale, VirtualHosts, o metoda prin care ii spunem serverului web ce pagina sa serveasca in functie de cerere. VirtualHosts se poate face pe baza de adresa IP sau pe baza de nume. IP Based VirtualHosts, adica hosturile virtuale bazate pe adresa IP, nu sunt folosite decat foarte rar datorita risipei de adrese IP. E nevoie de cate o adresa IP diferite pentru fiecare domeniu sau subdomeniu gazduit pe server. De obicei se foloseste NameBased VirtualHosts, adica hosturi virtuale bazate pe nume. Cu NameBased VirtualHosts putem gazdui pe aceeasi adresa IP mai multe domenii sau subdomenii fara ca vizitatorul sa stie asta si implicit fara a exista posibilitatea ca ceva sa il deranjeze in timpul navigarii.
Pentru adaugarea unui VirtualHosts care sa raspunda la un alt nume de host decat cel asociat masinii pe care ruleaza serverul web trebuie sa modificam fisierul httpd.conf si sa adaugam urmatoarele linii:
<virtualhost 1.2.3.4:80> ServerName exemplu.ro ServerAlias www.exemplu.ro DocumentRoot /home/exemplu/public_html ErrorLog /var/log/apache/exemplu.ro_error_log</virtualhost>
In cazul de fata am adaugat domeniul exemplu.ro. Acum serverul web, care am presupus ca asculta conexiuni pe adresa IP 1.2.3.4, va afisa continutul din directorul /home/exemplu/public_html cand va primi o cerere pentru o resursa din cadrul siteului exemplu.ro si asta pentru ca browserele, conform protocolului HTTP, atunci cand trimit o cerere trimit si un header cu numele Host cu ajutorul caruia serverul web identifica resursa ceruta.
Bazandu-ne pe codul introdus mai sus putem deduce ca resursa va fi valabila doar daca cererea de conexiune vine pe adresa IP specificata in cadrul directivei VirtualHost. Trebuie sa fiti atenti cand adaugati un VirtualHost sa adaugati o adresa IP care este asociata serverului curent si care e specificata in zona DNS a domeniului pentru ca pointarea DNS sa se faca corect.
Tot din codul de mai sus putem deduce ca serverul va oferi resursa ceruta doar daca in cererea care o face vizitatorul e mentionat domeniul exemplu.ro (valoarea pentru ServerName) sau subdomeniul www.exemplu.ro care va oferi acelasi continut ca exemplu.ro pentru ca l-am definit ca adresa secundara pentru aceeasi resursa (ServerAlias).
1
Cu DocumentRoot ii spunem serverului web de unde sa ia informatia cand cererea vine pe IP-ul specificat in directiva VirtualHost pentru domeniul specificat in ServerName sau unul din subdomeniile sau domeniile secundare specificate in ServerAlias. In cazul nostru stim ca atunci cand vizitatorul intra pe http://exemplu.ro sau pe http://www.exemplu.ro el va primi informatia stocata pe server in directorul /home/exemplu/public_html, director specificat de directiva DocumentRoot.
Directiva ErrorLog nu e necesara pentru ca un VirtualHost sa functioneze corect dar e foarte utila cand facem debuging pentru ca toate erorile hostului mentionat in VirtualHost vor fi salvate in fisierul mentionat in directiva ErrorLog.
E important ca dupa orice modificare a fisierului httpd.conf sa rulati comanda „apachectl restart” pentru ca modificarile sa fie luate in considerare de serverul web. Optional, daca e vorba de un server in productie, puteti rula comanda „apachectl configtest” inainte de restart pentru a verifica sintaxa corecta a modificarilor facute evitand astfel downtimeul sau erorile care pot aparea.
De asemenea e bine sa creati anumite restrictii sau reguli generale pentru directorul public_html din cadrul directoarelor utilizatorilor pentru a nu fi necesara mentionarea restrictiilor in cadrul fiecarui VirtualHost. De exemplu, puteti adauga urmatoarele reguli inainte de definirea oricarui VirtualHost pentru a va asigura ca fiecare site are posibilitatea sa functioneze in parametri normali:
<directory /home/*/public_html> Options -Indexes -Includes -ExecCGI FollowSymLinks UseCanonicalName Off Allow from all AllowOverride All</directory>
Tutorial instalare Virtualmin, Webmin, Ubuntu pe VPSitc webmin virtualmin ubuntu vps Înca nu s-a comentat, e liniste. 12:20, Sâmbătă, 4 Aprilie 2015
Material realizat cu susținerea SmartVPS, un serviciu Teen Telecom. Cei care optează pentru un plan VPS de la ei au 10% discount folosind codul: 10SMARTSTANDARD
Acesta este un material care prezintă pas cu pas instalarea Webmin, Virtualmin pe un VPS (Virtual Private Server).
Se adresează celor care doresc să experimenteze administrarea unui server Linux, hosting, sau celor care doresc să-și administreze propriile domenii cu o flexibilitate mai mare decât cea pe care le-o oferă o soluție de shared hosting.
Chestiuni teoretice, prezentare soft
2
1. Ubuntu: Este un sistem de operare Linux, derivat din Debian. Este dezvoltat de către Canonical și este oferit gratuit, monetizarea venind din vânzarea suportului tehnic. Ubuntu oferă sisteme de operare pentru servere, desktop-uri cât și pentru terminale mobile. Ne vom axa aici pe sistemul de operare pentru servere, în special suitele LTS, Long Term Support. Mai multe detalii aici: http://www.ubuntu.com/server
2. Webmin / Virtualmin: Webmin este o unealtă web pentru configurarea sistemelor Unix. Virtualmin este un panou de control care oferă posibilitatea de a configura domenii pentru hosting. Este bazat pe Webmin și este o foarte bună alternativă, gratuită, la CPanel.
3. VPS: Virtual Private Server sau Virtual Dedicated Server. Este o mașină virtuală, independentă, izolată. Pe un server fizic pot rula mai multe astfel de mașini virtuale permițând astfel partajarea resurselor. Fiecare masina virtuală poate rula propriul ei sistem de operare, poate fi oprită, restartată funcționând ca un server fizic, diferența fiind că restart-ul, boot-ul și alte operațiuni se fac la nivel software fiind astfel mult mai rapide. Management-ul unei mașini virtuale se face dintr-un panou de control, oferit de cei la care aveți VPS-ul.
Cei de la Teen, care îmi asigură acest VPS , oferă OpenVZ ca soluție de virtualizare pentru abonamentele de tip standard. Este o soluție de virtualizare bazată pe kernel-ul Linux cu impact minim asupra performantei. Detalii și panoul de control oferit de SmartVPS vor fi detaliate mai jos.
4. PuTTY: este un emulator de terminal, gratuit. Îl puteți downloada de aici: http://www.putty.org/ . Vă permite să vă conectați prin SSH la VPS și puteți gestiona server-ul folosind comenzi într-o consolă. Presupune cunoștințe mai avansate decât folosirea Webmin, dar vă poate salva în momentul în care apar probleme și Webmin refuză să pornească.
Achiziționarea VPS-ului:Pe http://smartvps.ro/ puteți vedea toate planurile oferite. Voi vorbi strict despre planul Standard S care oferă pentru 10 euro lunar: Intel(R) Xeon(R) CPU L5639 @ 2.13GHz, 1 cores, 1GB RAM și 20GB stocare SSD. Din pagina de comandă vă puteți configura hostname-ul și parola de root. Apoi alegeți imaginea pe care o doriți instalată și finalizați comanda. În cazul de față vom selecta Ubuntu 14.04 64bit. După finalizare și confirmare veți primi o serie de emailuri inclusiv datele de acces la VPS Control - panoul de administrare al VPS-ului.
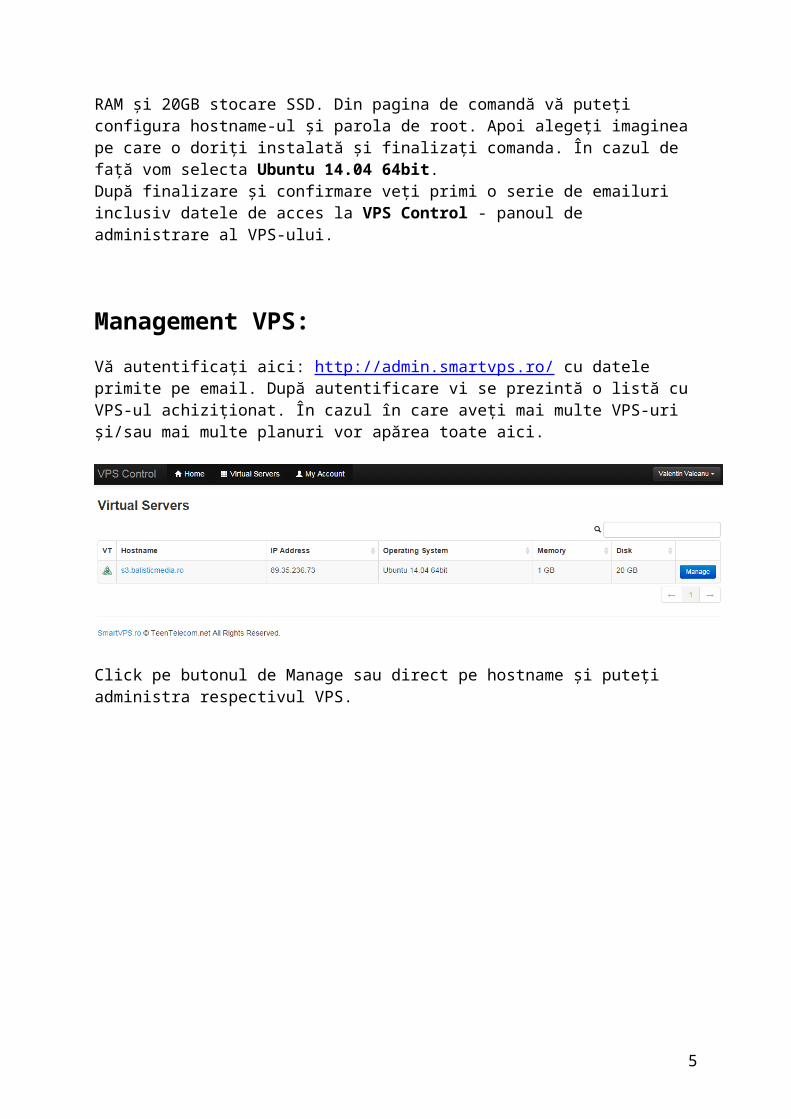
Management VPS:Vă autentificați aici: http://admin.smartvps.ro/ cu datele primite pe email. După autentificare vi se prezintă o listă cu VPS-ul achiziționat. În cazul în care aveți mai multe VPS-uri și/sau mai multe planuri vor apărea toate aici.
3
Click pe butonul de Manage sau direct pe hostname și puteți administra respectivul VPS.
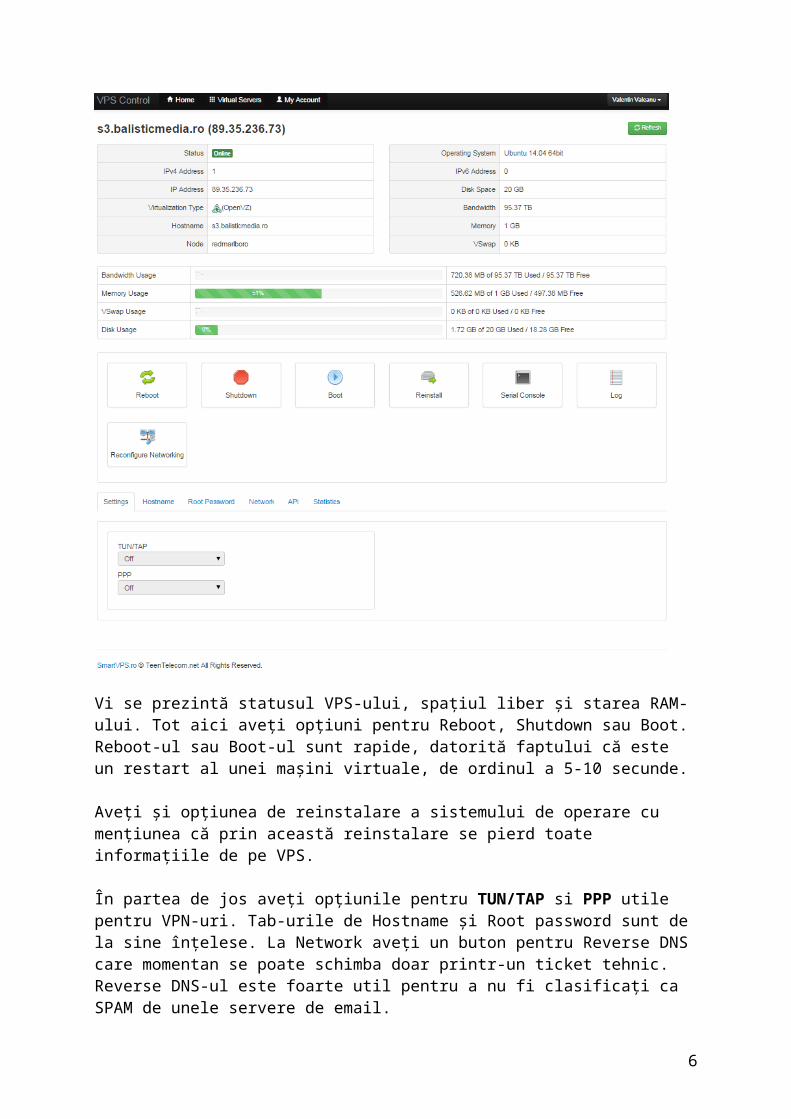
Vi se prezintă statusul VPS-ului, spațiul liber și starea RAM-ului. Tot aici aveți opțiuni pentru Reboot, Shutdown sau Boot. Reboot-ul sau Boot-ul sunt rapide, datorită faptului că este un restart al unei mașini virtuale, de ordinul a 5-10 secunde.
Aveți și opțiunea de reinstalare a sistemului de operare cu mențiunea că prin această
4
reinstalare se pierd toate informațiile de pe VPS.
În partea de jos aveți opțiunile pentru TUN/TAP si PPP utile pentru VPN-uri. Tab-urile de Hostname și Root password sunt de la sine înțelese. La Network aveți un buton pentru Reverse DNS care momentan se poate schimba doar printr-un ticket tehnic. Reverse DNS-ul este foarte util pentru a nu fi clasificați ca SPAM de unele servere de email.
Mai multe despre Reverse DNS și configurare aici.
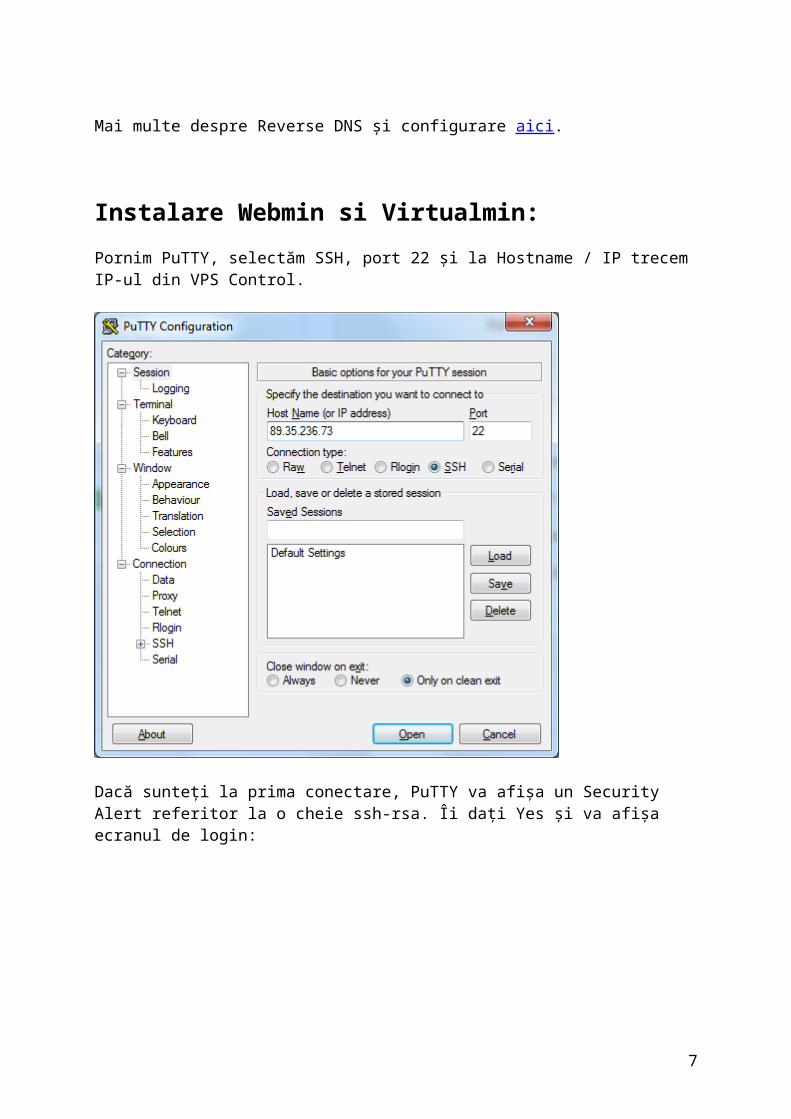
Instalare Webmin si Virtualmin:Pornim PuTTY, selectăm SSH, port 22 și la Hostname / IP trecem IP-ul din VPS Control.
Dacă sunteți la prima conectare, PuTTY va afișa un Security Alert referitor la o cheie ssh-rsa. Îi dați Yes și va afișa ecranul de login:
5
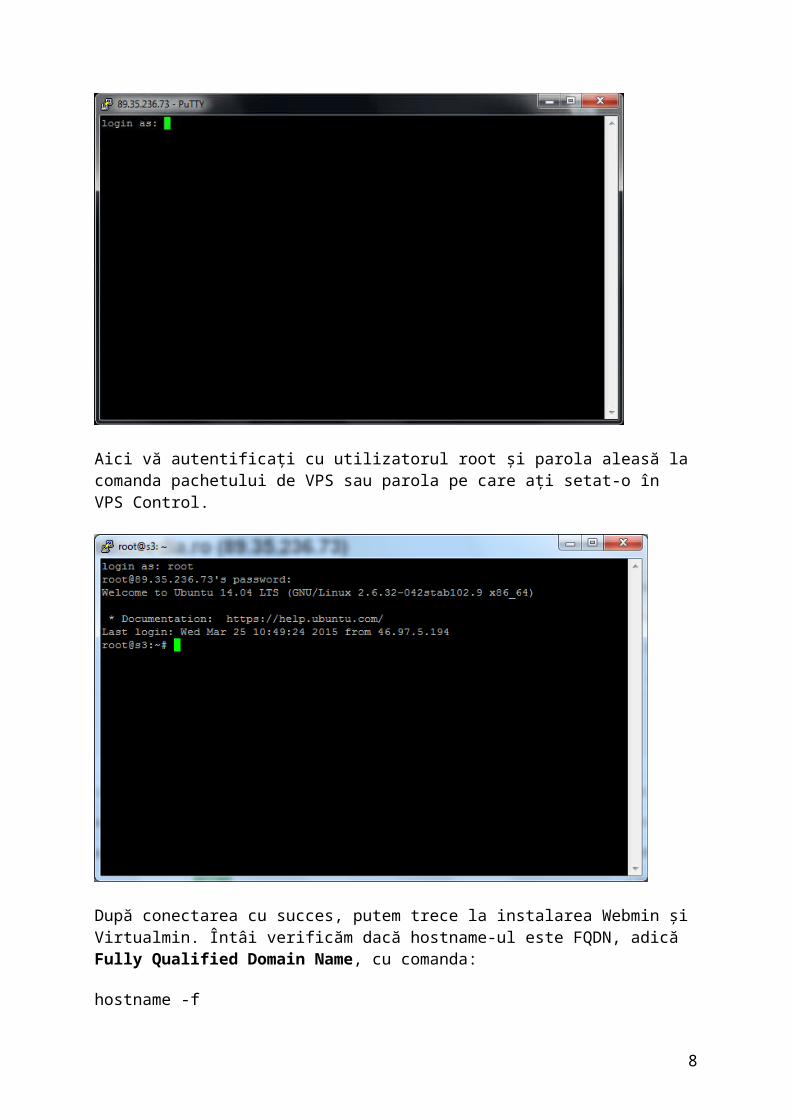
Aici vă autentificați cu utilizatorul root și parola aleasă la comanda pachetului de VPS sau parola pe care ați setat-o în VPS Control.
După conectarea cu succes, putem trece la instalarea Webmin și Virtualmin. Întâi verificăm dacă hostname-ul este FQDN, adică Fully Qualified Domain Name, cu comanda:
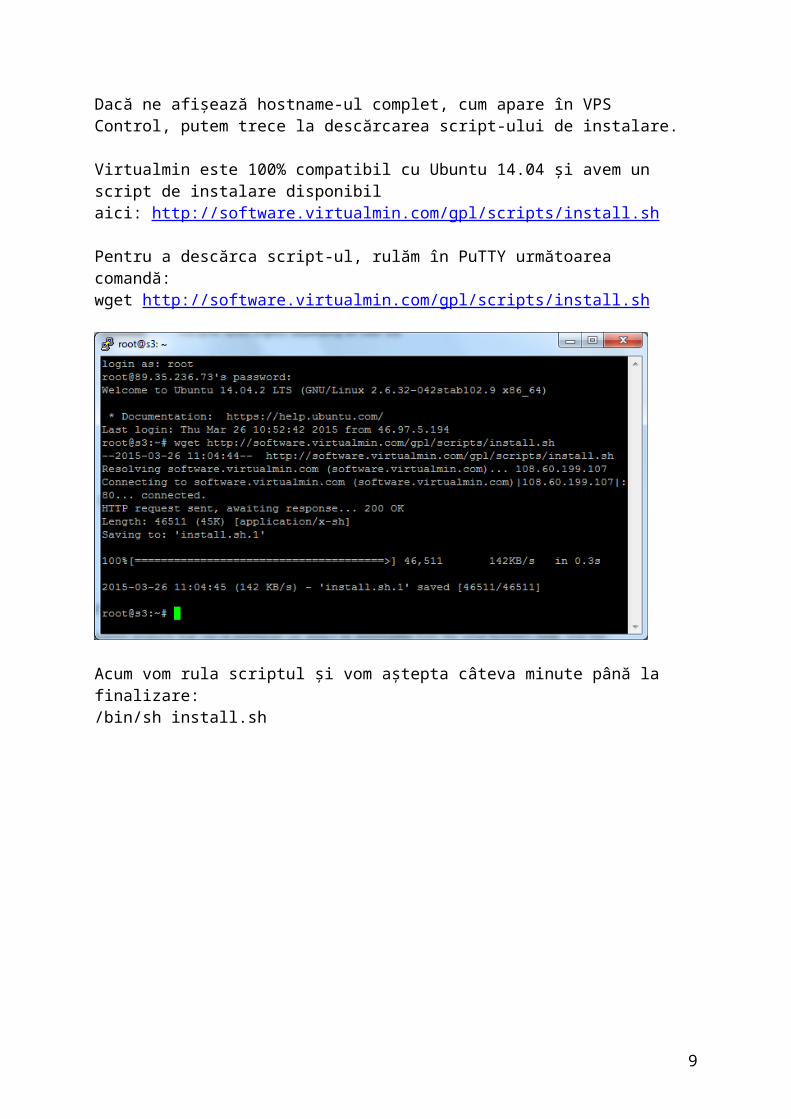
hostname -f Dacă ne afișează hostname-ul complet, cum apare în VPS Control, putem trece la descărcarea script-ului de instalare.
Virtualmin este 100% compatibil cu Ubuntu 14.04 și avem un script de instalare disponibil
6
aici: http://software.virtualmin.com/gpl/scripts/install.sh
Pentru a descărca script-ul, rulăm în PuTTY următoarea comandă:wget http://software.virtualmin.com/gpl/scripts/install.sh
Acum vom rula scriptul și vom aștepta câteva minute până la finalizare:/bin/sh install.sh
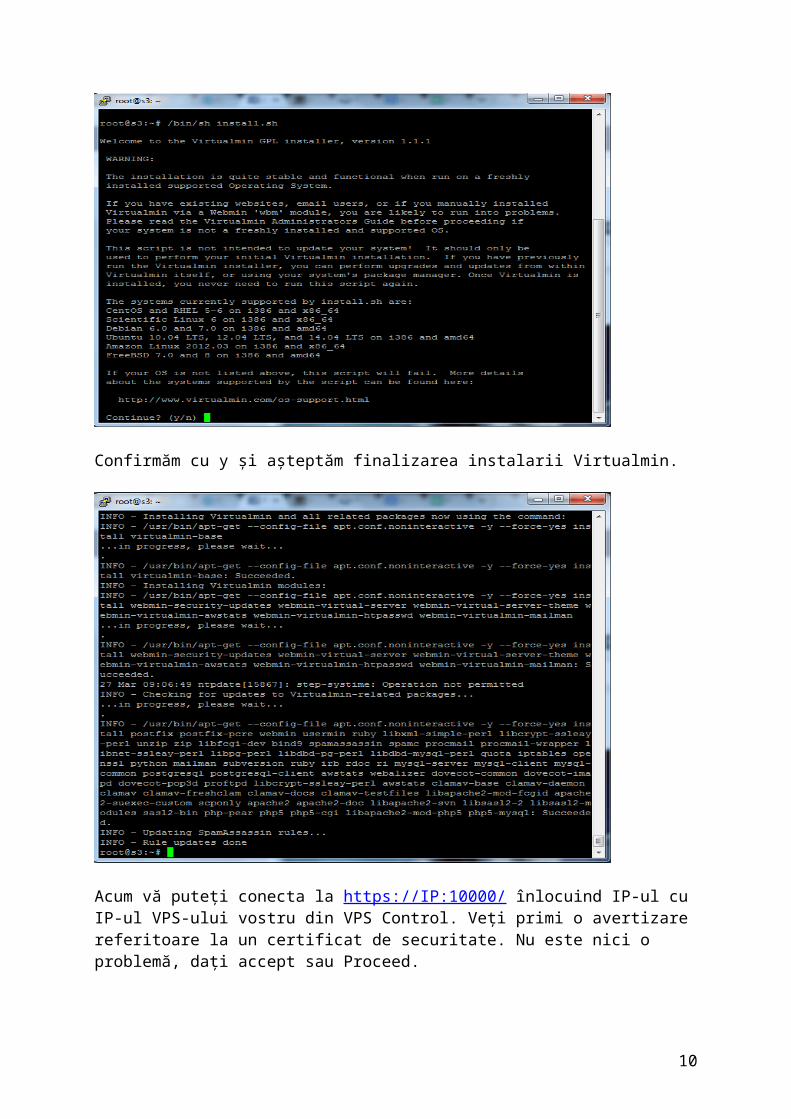
Confirmăm cu y și așteptăm finalizarea instalarii Virtualmin.
7
Acum vă puteți conecta la https://IP:10000/ înlocuind IP-ul cu IP-ul VPS-ului vostru din VPS Control. Veți primi o avertizare referitoare la un certificat de securitate. Nu este nici o problemă, dați accept sau Proceed.
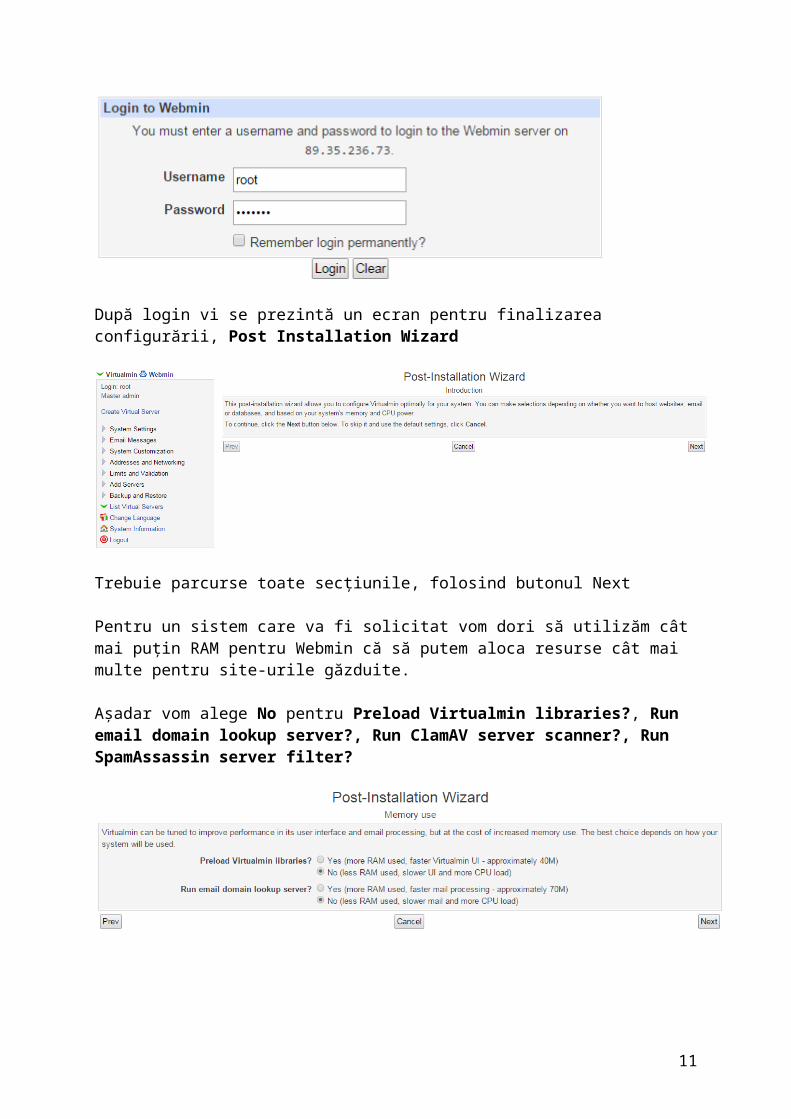
După login vi se prezintă un ecran pentru finalizarea configurării, Post Installation Wizard
Trebuie parcurse toate secțiunile, folosind butonul Next
8
Pentru un sistem care va fi solicitat vom dori să utilizăm cât mai puțin RAM pentru Webmin că să putem aloca resurse cât mai multe pentru site-urile găzduite.
Așadar vom alege No pentru Preload Virtualmin libraries?, Run email domain lookup server?, Run ClamAV server scanner?, Run SpamAssassin server filter?
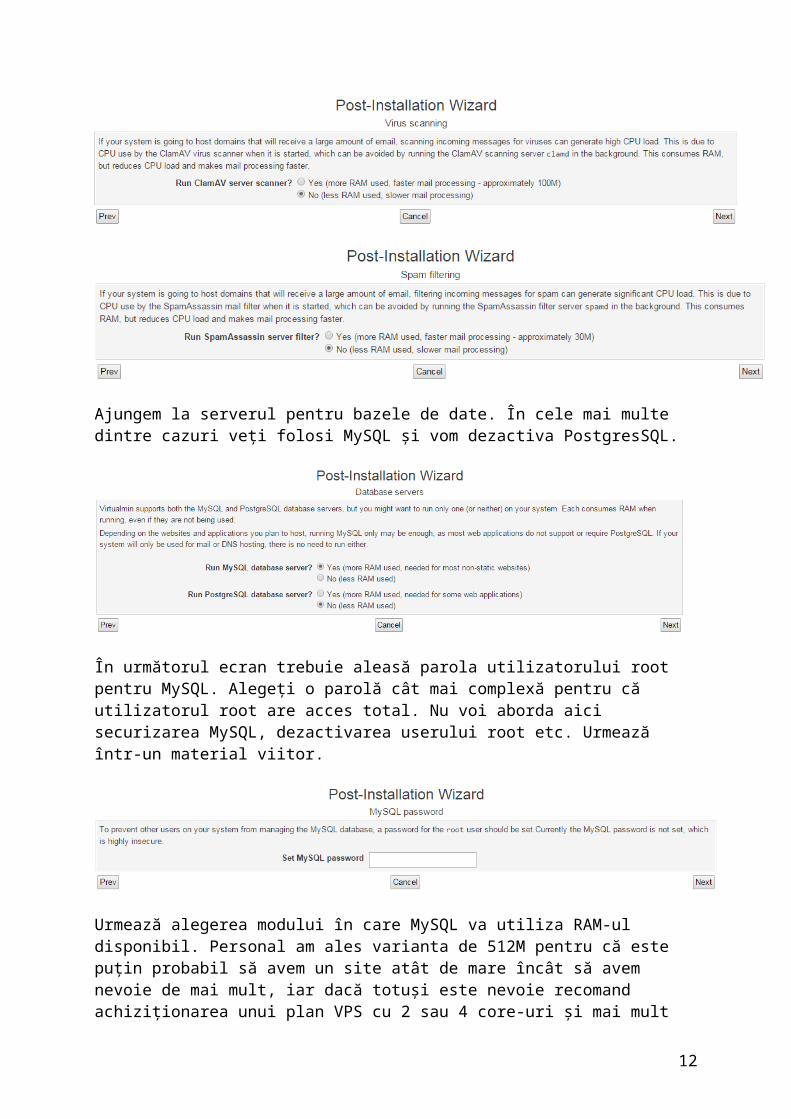
Ajungem la serverul pentru bazele de date. În cele mai multe dintre cazuri veți folosi MySQL și vom dezactiva PostgresSQL.
În următorul ecran trebuie aleasă parola utilizatorului root pentru MySQL. Alegeți o parolă cât mai complexă pentru că utilizatorul root are acces total. Nu voi aborda aici securizarea MySQL, dezactivarea userului root etc. Urmează într-un material viitor.
9
Urmează alegerea modului în care MySQL va utiliza RAM-ul disponibil. Personal am ales varianta de 512M pentru că este puțin probabil să avem un site atât de mare încât să avem nevoie de mai mult, iar dacă totuși este nevoie recomand achiziționarea unui plan VPS cu 2 sau 4 core-uri și mai mult RAM.
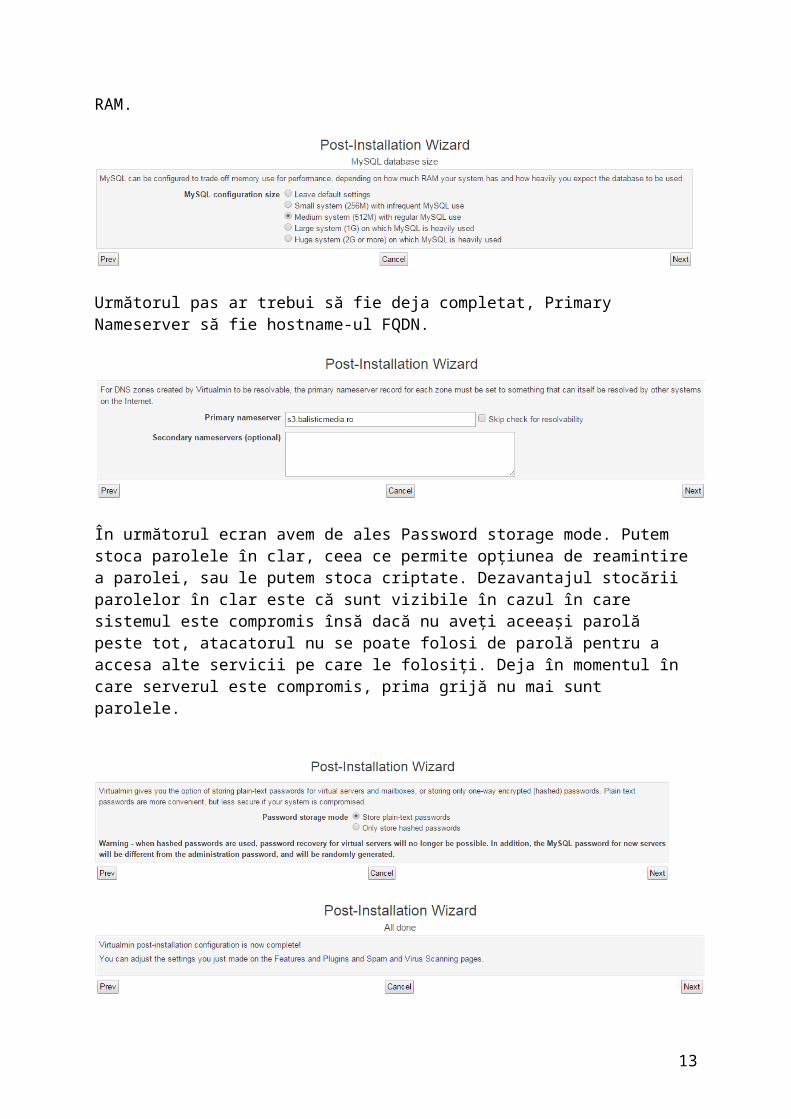
Următorul pas ar trebui să fie deja completat, Primary Nameserver să fie hostname-ul FQDN.
În următorul ecran avem de ales Password storage mode. Putem stoca parolele în clar, ceea ce permite opțiunea de reamintire a parolei, sau le putem stoca criptate. Dezavantajul stocării parolelor în clar este că sunt vizibile în cazul în care sistemul este compromis însă dacă nu aveți aceeași parolă peste tot, atacatorul nu se poate folosi de parolă pentru a accesa alte servicii pe care le folosiți. Deja în momentul în care serverul este compromis, prima grijă nu mai sunt parolele.
10
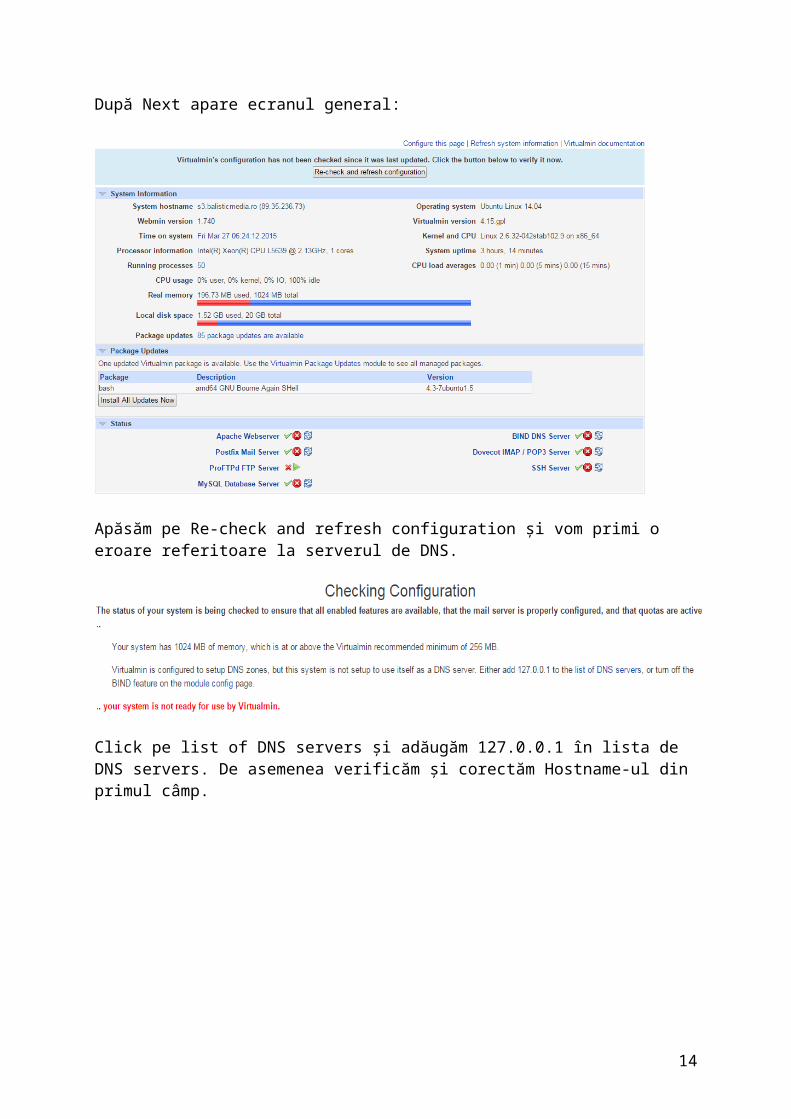
După Next apare ecranul general:
Apăsăm pe Re-check and refresh configuration și vom primi o eroare referitoare la serverul de DNS.
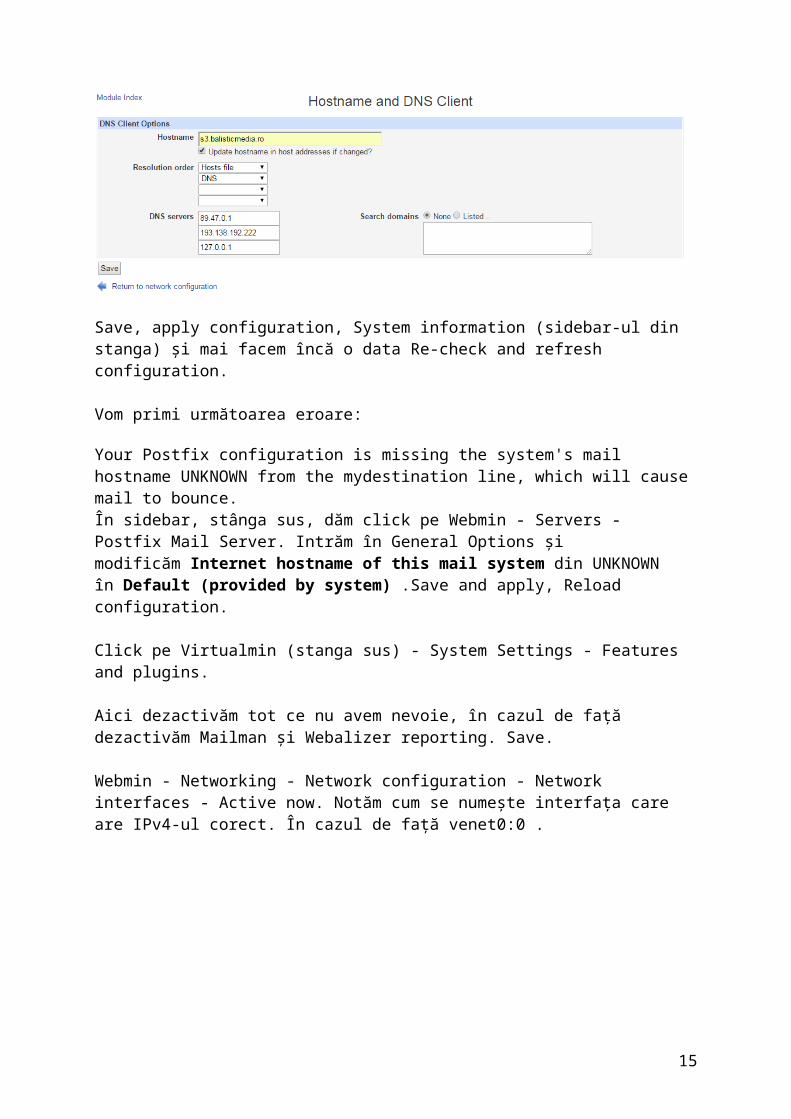
Click pe list of DNS servers și adăugăm 127.0.0.1 în lista de DNS servers. De asemenea verificăm și corectăm Hostname-ul din primul câmp.
11
Save, apply configuration, System information (sidebar-ul din stanga) și mai facem încă o data Re-check and refresh configuration.
Vom primi următoarea eroare:
Your Postfix configuration is missing the system's mail hostname UNKNOWN from the mydestination line, which will cause mail to bounce.În sidebar, stânga sus, dăm click pe Webmin - Servers - Postfix Mail Server. Intrăm în General Options și modificăm Internet hostname of this mail system din UNKNOWN în Default (provided by system) .Save and apply, Reload configuration.
Click pe Virtualmin (stanga sus) - System Settings - Features and plugins.
Aici dezactivăm tot ce nu avem nevoie, în cazul de față dezactivăm Mailman și Webalizer reporting. Save.
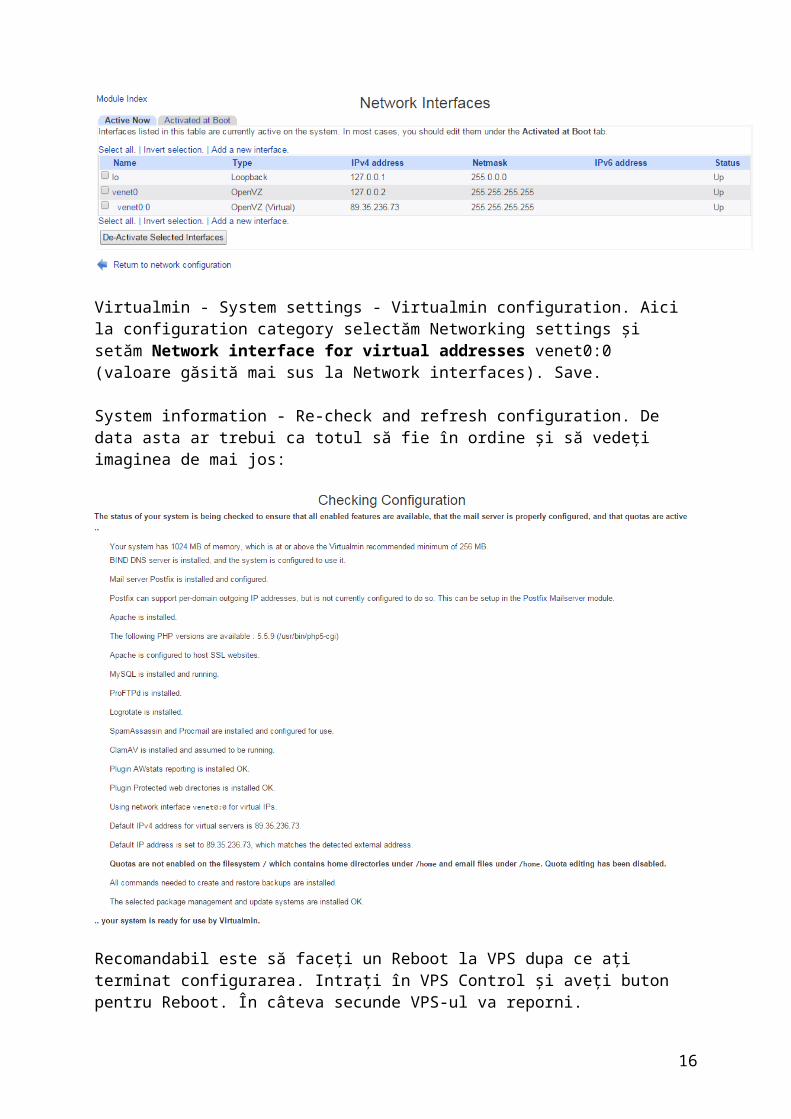
Webmin - Networking - Network configuration - Network interfaces - Active now. Notăm cum se numește interfața care are IPv4-ul corect. În cazul de față venet0:0 .
Virtualmin - System settings - Virtualmin configuration. Aici la configuration category selectăm Networking settings și setăm Network interface for virtual addresses venet0:0 (valoare găsită mai sus la Network interfaces). Save.
System information - Re-check and refresh configuration. De data asta ar trebui ca totul să fie în ordine și să vedeți imaginea de mai jos:
12
Recomandabil este să faceți un Reboot la VPS dupa ce ați terminat configurarea. Intrați în VPS Control și aveți buton pentru Reboot. În câteva secunde VPS-ul va reporni.
Urmănd pașii de mai sus, RAM-ul utilizat de Webmin și Virtualmin este în jur de 100MB. Dacă nu dezactivam ClamAV-ul, preload-ul la librarii și SpamAssasin-ul am fi avut între 500 si 600 MB ocupați având prea puțin spatiu de manevră dacă ar fi apărut vârfuri de încărcare pe site.
Recomand de asemenea și instalarea update-urilor care vă apar în ecranul de System information.
Pentru a utiliza cât mai eficient resursele eu dezactivez Background Status Collection. Intrați la Webmim - Webmin - Webmin configuration - Background Status Collection. Aici setăm background collection la o valoare mai mare sau chiar Never. Save.
Din system information putem oricând să facem un Refresh System information și vom avea datele actualizate.
Dacă în ecranul de System information este raportat greșit Time on system, click pe el, change timezone, Europe/Bucharest - Save.
System information - refresh system information și ar trebui să fie totul ok.
13
Acum suntem gata să găzduim site-uri, dar despre asta într-un articol viitor.
How To Set Up Apache Virtual Hosts on Ubuntu 14.04 LTSTags: Apache Distribution: Ubuntu
Introduction
The Apache web server is the most popular way of serving web content on the internet. It accounts for more than half of all active websites on the internet and is extremely powerful and flexible.
Apache breaks its functionality and components into individual units that can be customized and configured independently. The basic unit that describes an individual site or domain is called a virtual host.
These designations allow the administrator to use one server to host multiple domains or sites off of a single interface or IP by using a matching mechanism. This is relevant to anyone looking to host more than one site off of a single VPS.
Each domain that is configured will direct the visitor to a specific directory holding that site's information, never indicating that the same server is also responsible for other sites. This scheme is expandable without any software limit as long as your server can handle the load.
In this guide, we will walk you through how to set up Apache virtual hosts on an Ubuntu 14.04 VPS. During this process, you'll learn how to serve different content to different visitors depending on which domains they are requesting.
PrerequisitesBefore you begin this tutorial, you should create a non-root user as described in steps 1-4 here.
You will also need to have Apache installed in order to work through these steps. If you haven't already done so, you can get Apache installed on your server through apt-get:
sudo apt-get updatesudo apt-get install apache2
After these steps are complete, we can get started.
For the purposes of this guide, my configuration will make a virtual host for example.com and another for test.com. These will be referenced throughout the guide, but you should substitute your own domains or values while following along.
To learn how to set up your domain names with DigitalOcean, follow this link. If you do not have domains available to play with, you can use dummy values.
We will show how to edit your local hosts file later on to test the configuration if you are using dummy values. This will allow you to test your configuration from your home
14
computer, even though your content won't be available through the domain name to other visitors.
Step One — Create the Directory StructureThe first step that we are going to take is to make a directory structure that will hold the site data that we will be serving to visitors.
Our document root (the top-level directory that Apache looks at to find content to serve) will be set to individual directories under the /var/www directory. We will create a directory here for both of the virtual hosts we plan on making.
Within each of these directories, we will create a public_html file that will hold our actual files. This gives us some flexibility in our hosting.
For instance, for our sites, we're going to make our directories like this:
sudo mkdir -p /var/www/example.com/public_htmlsudo mkdir -p /var/www/test.com/public_html
The portions in red represent the domain names that we are wanting to serve from our VPS.
Step Two — Grant PermissionsNow we have the directory structure for our files, but they are owned by our root user. If we want our regular user to be able to modify files in our web directories, we can change the ownership by doing this:
sudo chown -R $USER:$USER /var/www/example.com/public_htmlsudo chown -R $USER:$USER /var/www/test.com/public_html
The $USER variable will take the value of the user you are currently logged in as when you press "ENTER". By doing this, our regular user now owns the public_html subdirectories where we will be storing our content.
We should also modify our permissions a little bit to ensure that read access is permitted to the general web directory and all of the files and folders it contains so that pages can be served correctly:
sudo chmod -R 755 /var/www
Your web server should now have the permissions it needs to serve content, and your user should be able to create content within the necessary folders.
Step Three — Create Demo Pages for Each Virtual HostWe have our directory structure in place. Let's create some content to serve.
15
We're just going for a demonstration, so our pages will be very simple. We're just going to make an index.html page for each site.
Let's start with example.com. We can open up an index.html file in our editor by typing:
nano /var/www/example.com/public_html/index.html
In this file, create a simple HTML document that indicates the site it is connected to. My file looks like this:
<html> <head> <title>Welcome to Example.com!</title> </head> <body> <h1>Success! The example.com virtual host is working!</h1> </body></html>
Save and close the file when you are finished.
We can copy this file to use as the basis for our second site by typing:
cp /var/www/example.com/public_html/index.html /var/www/test.com/public_html/index.html
We can then open the file and modify the relevant pieces of information:
nano /var/www/test.com/public_html/index.html<html> <head> <title>Welcome to Test.com!</title> </head> <body> <h1>Success! The test.com virtual host is working!</h1> </body></html>
Save and close this file as well. You now have the pages necessary to test the virtual host configuration.
Step Four — Create New Virtual Host FilesVirtual host files are the files that specify the actual configuration of our virtual hosts and dictate how the Apache web server will respond to various domain requests.
Apache comes with a default virtual host file called 000-default.conf that we can use as a jumping off point. We are going to copy it over to create a virtual host file for each of our domains.
We will start with one domain, configure it, copy it for our second domain, and then make the few further adjustments needed. The default Ubuntu configuration requires that each virtual host file end in .conf.
16

Create the First Virtual Host File
Start by copying the file for the first domain:
sudo cp /etc/apache2/sites-available/000-default.conf /etc/apache2/sites-available/example.com.conf
Open the new file in your editor with root privileges:
sudo nano /etc/apache2/sites-available/example.com.conf
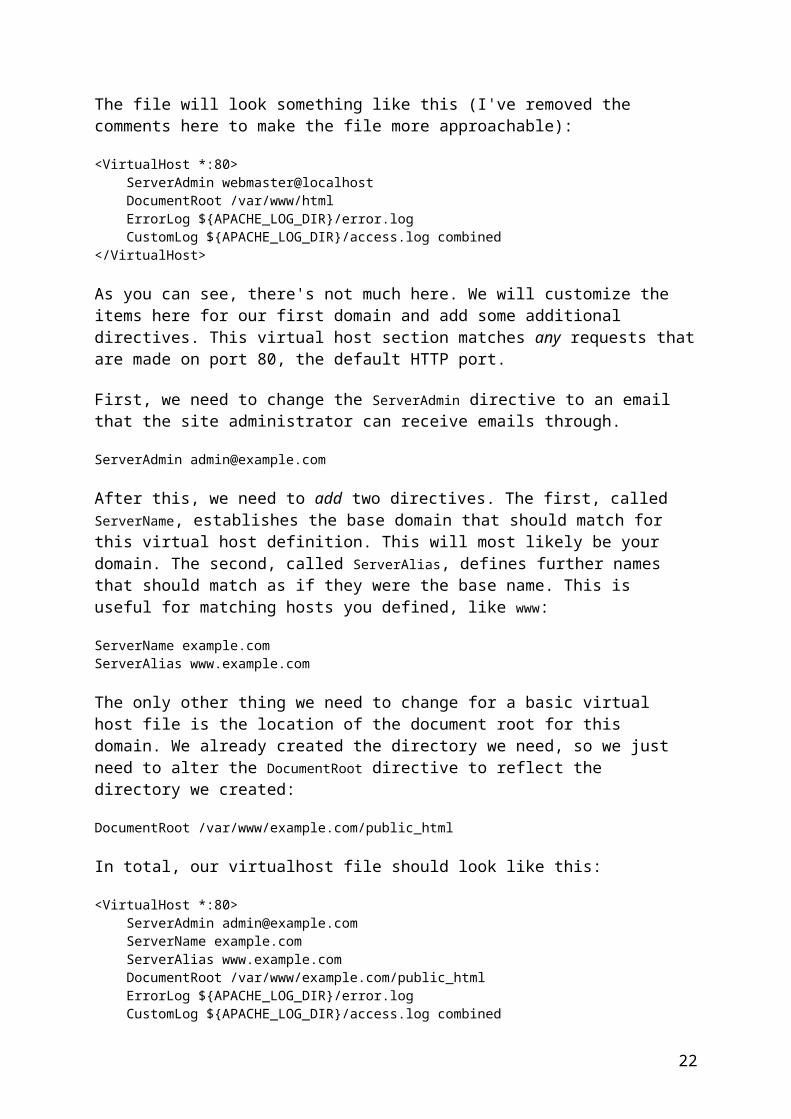
The file will look something like this (I've removed the comments here to make the file more approachable):
<VirtualHost *:80> ServerAdmin webmaster@localhost DocumentRoot /var/www/html ErrorLog ${APACHE_LOG_DIR}/error.log CustomLog ${APACHE_LOG_DIR}/access.log combined</VirtualHost>
As you can see, there's not much here. We will customize the items here for our first domain and add some additional directives. This virtual host section matches any requests that are made on port 80, the default HTTP port.
First, we need to change the ServerAdmin directive to an email that the site administrator can receive emails through.
ServerAdmin [email protected]
After this, we need to add two directives. The first, called ServerName, establishes the base domain that should match for this virtual host definition. This will most likely be your domain. The second, called ServerAlias, defines further names that should match as if they were the base name. This is useful for matching hosts you defined, like www:
ServerName example.comServerAlias www.example.com
The only other thing we need to change for a basic virtual host file is the location of the document root for this domain. We already created the directory we need, so we just need to alter the DocumentRoot directive to reflect the directory we created:
DocumentRoot /var/www/example.com/public_html
In total, our virtualhost file should look like this:
<VirtualHost *:80> ServerAdmin [email protected] ServerName example.com ServerAlias www.example.com DocumentRoot /var/www/example.com/public_html ErrorLog ${APACHE_LOG_DIR}/error.log CustomLog ${APACHE_LOG_DIR}/access.log combined</VirtualHost>
17
Save and close the file.
Copy First Virtual Host and Customize for Second Domain
Now that we have our first virtual host file established, we can create our second one by copying that file and adjusting it as needed.
Start by copying it:
sudo cp /etc/apache2/sites-available/example.com.conf /etc/apache2/sites-available/test.com.conf
Open the new file with root privileges in your editor:
sudo nano /etc/apache2/sites-available/test.com.conf
You now need to modify all of the pieces of information to reference your second domain. When you are finished, it may look something like this:
<VirtualHost *:80> ServerAdmin [email protected] ServerName test.com ServerAlias www.test.com DocumentRoot /var/www/test.com/public_html ErrorLog ${APACHE_LOG_DIR}/error.log CustomLog ${APACHE_LOG_DIR}/access.log combined</VirtualHost>
Save and close the file when you are finished.
Step Five — Enable the New Virtual Host FilesNow that we have created our virtual host files, we must enable them. Apache includes some tools that allow us to do this.
We can use the a2ensite tool to enable each of our sites like this:
sudo a2ensite example.com.confsudo a2ensite test.com.conf
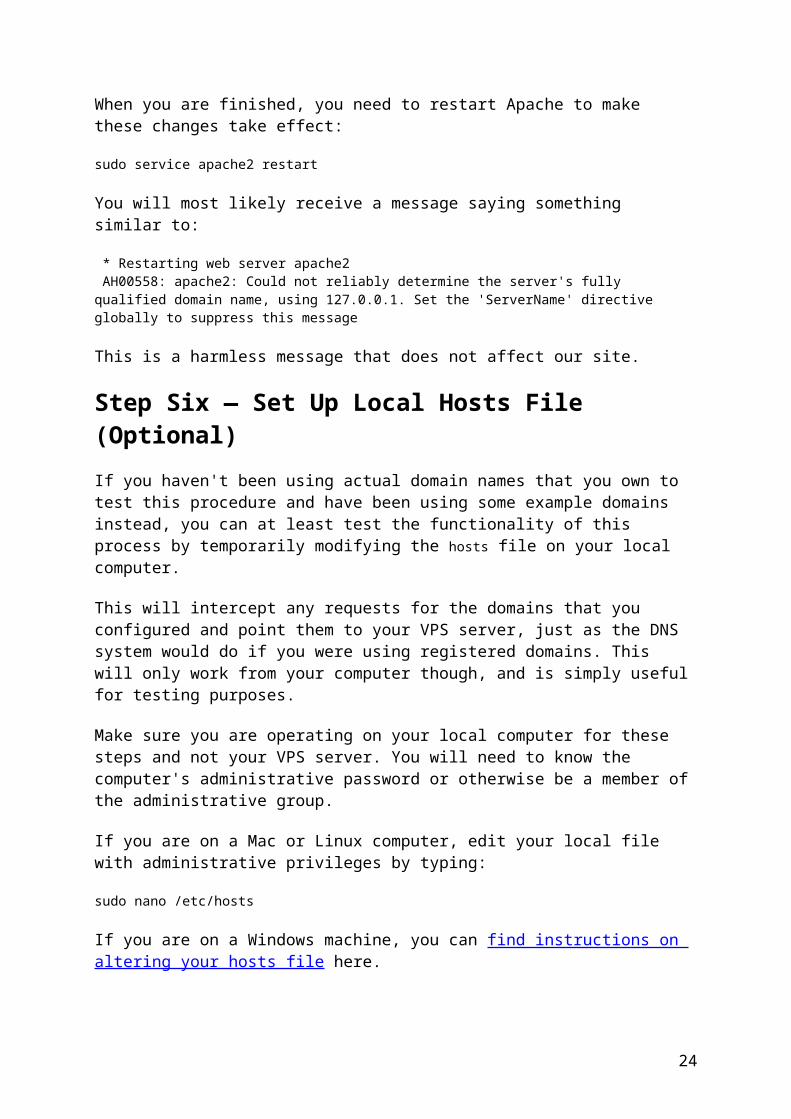
When you are finished, you need to restart Apache to make these changes take effect:
sudo service apache2 restart
You will most likely receive a message saying something similar to:
* Restarting web server apache2 AH00558: apache2: Could not reliably determine the server's fully qualified domain name, using 127.0.0.1. Set the 'ServerName' directive globally to suppress this message
This is a harmless message that does not affect our site.
18
Step Six — Set Up Local Hosts File (Optional)If you haven't been using actual domain names that you own to test this procedure and have been using some example domains instead, you can at least test the functionality of this process by temporarily modifying the hosts file on your local computer.
This will intercept any requests for the domains that you configured and point them to your VPS server, just as the DNS system would do if you were using registered domains. This will only work from your computer though, and is simply useful for testing purposes.
Make sure you are operating on your local computer for these steps and not your VPS server. You will need to know the computer's administrative password or otherwise be a member of the administrative group.
If you are on a Mac or Linux computer, edit your local file with administrative privileges by typing:
sudo nano /etc/hosts
If you are on a Windows machine, you can find instructions on altering your hosts file here.
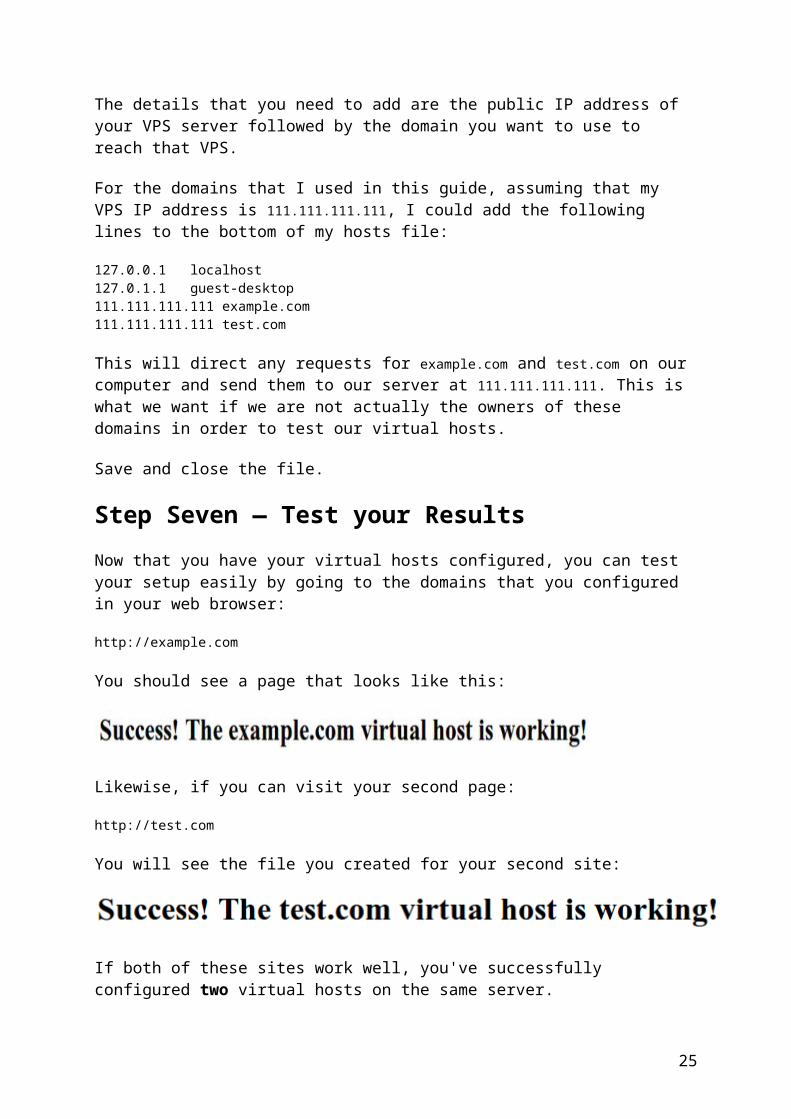
The details that you need to add are the public IP address of your VPS server followed by the domain you want to use to reach that VPS.
For the domains that I used in this guide, assuming that my VPS IP address is 111.111.111.111, I could add the following lines to the bottom of my hosts file:
127.0.0.1 localhost127.0.1.1 guest-desktop111.111.111.111 example.com111.111.111.111 test.com
This will direct any requests for example.com and test.com on our computer and send them to our server at 111.111.111.111. This is what we want if we are not actually the owners of these domains in order to test our virtual hosts.
Save and close the file.
Step Seven — Test your ResultsNow that you have your virtual hosts configured, you can test your setup easily by going to the domains that you configured in your web browser:
http://example.com
You should see a page that looks like this:
19
Likewise, if you can visit your second page:
http://test.com
You will see the file you created for your second site:
If both of these sites work well, you've successfully configured two virtual hosts on the same server.
If you adjusted your home computer's hosts file, you may want to delete the lines you added now that you verified that your configuration works. This will prevent your hosts file from being filled with entries that are not actually necessary.
If you need to access this long term, consider purchasing a domain name for each site you need and setting it up to point to your VPS server.
ConclusionIf you followed along, you should now have a single server handling two separate domain names. You can expand this process by following the steps we outlined above to make additional virtual hosts.
There is no software limit on the number of domain names Apache can handle, so feel free to make as many as your server is capable of handling.
How To Host Multiple Websites Securely With Nginx And Php-fpm On Ubuntu 14.04Tags: PHP, Nginx, Security Distribution: Ubuntu
Introduction
It's well known that the LEMP stack (Linux, nginx, MySQL, PHP) provides unmatched speed and reliability for running PHP sites. Other benefits of this popular stack such as security and isolation are less popular, though.
In this article we'll show you the security and isolation benefits of running sites on LEMP with different Linux users. This will be done by creating different php-fpm pools for each nginx server block (site or virtual host).
PrerequisitesThis guide has been tested on Ubuntu 14.04. The described installation and configuration would be similar on other OS or OS versions, but the commands and location of configuration files may vary.
20
It also assumes you already have nginx and php-fpm set up. If not, please follow step one and step three from the article How To Install Linux, nginx, MySQL, PHP (LEMP) stack on Ubuntu 14.04.
All the commands in this tutorial should be run as a non-root user. If root access is required for the command, it will be preceded by sudo. If you don't already have that set up, follow this tutorial: Initial Server Setup with Ubuntu 14.04.
You will also need a fully qualified domain name (fqdn) that points to the Droplet for testing in addition to the default localhost. If you don't have one at hand, you can use site1.example.org. Edit the /etc/hosts file with your favorite editor like this sudo vim /etc/hosts and add this line (replace site1.example.org with your fqdn if you are using it):
/etc/hosts...127.0.0.1 site1.example.org...
Reasons to Secure LEMP AdditionallyUnder a common LEMP setup there is only one php-fpm pool which runs all PHP scripts for all sites under the same user. This poses two major problems:
If a web application on one nginx server block, i.e. subdomain or separate site, gets compromised, all of the sites on this Droplet will be affected too. The attacker is able to read the configuration files, including database details, of the other sites or even alter their files.
If you want to give a user access to a site on your Droplet, you will be practically giving him access to all sites. For example, your developer needs to work on the staging environment. However, even with very strict file permissions you will be still giving him access to all the sites, including your main site, on the same Droplet.
The above problems are solved in php-fpm by creating a different pool which runs under a different user for each site.
Step 1 — Configuring php-fpmIf you have covered the prerequisites, then you should already have one functional website on the Droplet. Unless you have specified a custom fqdn for it, you should be able to access it under the fqdn localhost locally or by the IP of the droplet remotely.
Now we'll create a second site (site1.example.org) with its own php-fpm pool and Linux user.
Let's start with creating the necessary user. For best isolation, the new user should have its own group. So first create the user group site1:
sudo groupadd site1
21
Then please create an user site1 belonging to this group:
sudo useradd -g site1 site1
So far the new user site1 does not have a password and cannot log in the Droplet. If you need to provide someone with direct access to the files of this site, then you should create a password for this user with the command sudo passwd site1. With the new user/password combination a user can log in remotely by ssh or sftp. For more info and security details check the article Setup a secondary SSH/SFTP user with limited directory access.
Next, create a new php-fpm pool for site1. A php-fpm pool in its very essence is just an ordinary Linux process which runs under certain user/group and listens on a Linux socket. It could also listen on an IP:port combination too but this would require more Droplet resources, and it's not the preferred method.
By default, in Ubuntu 14.04 every php-fpm pool should be configured in a file inside the directory /etc/php5/fpm/pool.d. Every file with the extensions .conf in this directory is automatically loaded in the php-fpm global configuration.
So for our new site let's create a new file /etc/php5/fpm/pool.d/site1.conf. You can do this with your favorite editor like this:
sudo vim /etc/php5/fpm/pool.d/site1.conf
This file should contain:
/etc/php5/fpm/pool.d/site1.conf[site1]user = site1group = site1listen = /var/run/php5-fpm-site1.socklisten.owner = www-datalisten.group = www-dataphp_admin_value[disable_functions] = exec,passthru,shell_exec,systemphp_admin_flag[allow_url_fopen] = offpm = dynamicpm.max_children = 5pm.start_servers = 2pm.min_spare_servers = 1pm.max_spare_servers = 3chdir = /
In the above configuration note these specific options:
[site1] is the name of the pool. For each pool you have to specify a unique name. user and group stand for the Linux user and the group under which the new pool will
be running. listen should point to a unique location for each pool. listen.owner and listen.group define the ownership of the listener, i.e. the socket
of the new php-fpm pool. Nginx must be able to read this socket. That's why the socket is created with the user and group under which nginx runs - www-data.
22

php_admin_value allows you to set custom php configuration values. We have used it to disable functions which can run Linux commands - exec,passthru,shell_exec,system.
php_admin_flag is similar to php_admin_value, but it is just a switch for boolean values, i.e. on and off. We'll disable the PHP function allow_url_fopen which allows a PHP script to open remote files and could be used by attacker.
Note: The above php_admin_value and php_admin_flag values could be also applied globally. However, a site may need them, and that's why by default they are not configured. The beauty of php-fpm pools is that it allows you to fine tune the security settings of each site. Furthermore, these options can be used for any other php settings, outside of the security scope, to further customize the environment of a site.
The pm options are outside of the current security topic, but you should know that they allow you to configure the performance of the pool.
The chdir option should be / which is the root of the filesystem. This shouldn't be changed unless you use another important option chroot.
The option chroot is not included in the above configuration on purpose. It would allow you to run a pool in a jailed environment, i.e. locked inside a directory. This is great for security because you can lock the pool inside the web root of the site. However, this ultimate security will cause serious problems for any decent PHP application which relies on system binaries and applications such as Imagemagick, which will not be available. If you are further interested in this topic please read the article How To Use Firejail to Set Up a WordPress Installation in a Jailed Environment.
Once you have finished with the above configuration restart php-fpm for the new settings to take effect with the command:
sudo service php5-fpm restart
Verify that the new pool is properly running by searching for its processes like this:
ps aux |grep site1
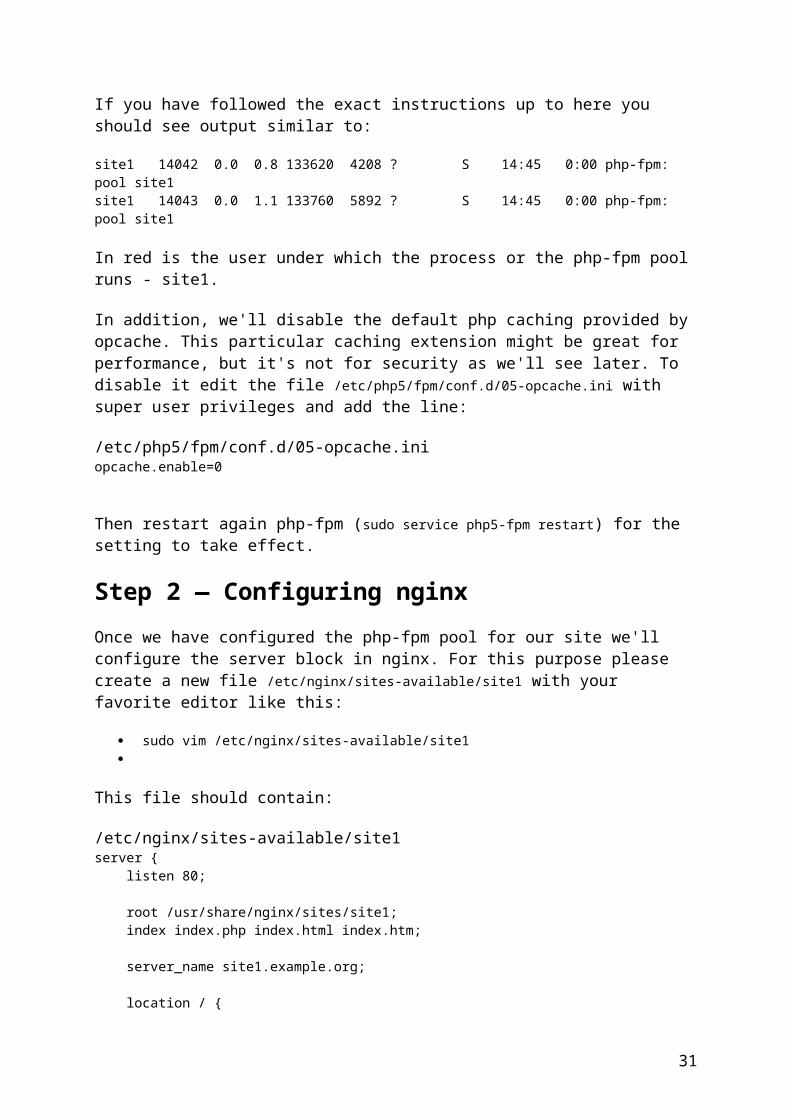
If you have followed the exact instructions up to here you should see output similar to:
site1 14042 0.0 0.8 133620 4208 ? S 14:45 0:00 php-fpm: pool site1site1 14043 0.0 1.1 133760 5892 ? S 14:45 0:00 php-fpm: pool site1
In red is the user under which the process or the php-fpm pool runs - site1.
In addition, we'll disable the default php caching provided by opcache. This particular caching extension might be great for performance, but it's not for security as we'll see later. To disable it edit the file /etc/php5/fpm/conf.d/05-opcache.ini with super user privileges and add the line:
23
/etc/php5/fpm/conf.d/05-opcache.iniopcache.enable=0
Then restart again php-fpm (sudo service php5-fpm restart) for the setting to take effect.
Step 2 — Configuring nginxOnce we have configured the php-fpm pool for our site we'll configure the server block in nginx. For this purpose please create a new file /etc/nginx/sites-available/site1 with your favorite editor like this:
sudo vim /etc/nginx/sites-available/site1
This file should contain:
/etc/nginx/sites-available/site1server { listen 80;
root /usr/share/nginx/sites/site1; index index.php index.html index.htm;
server_name site1.example.org;
location / { try_files $uri $uri/ =404; }
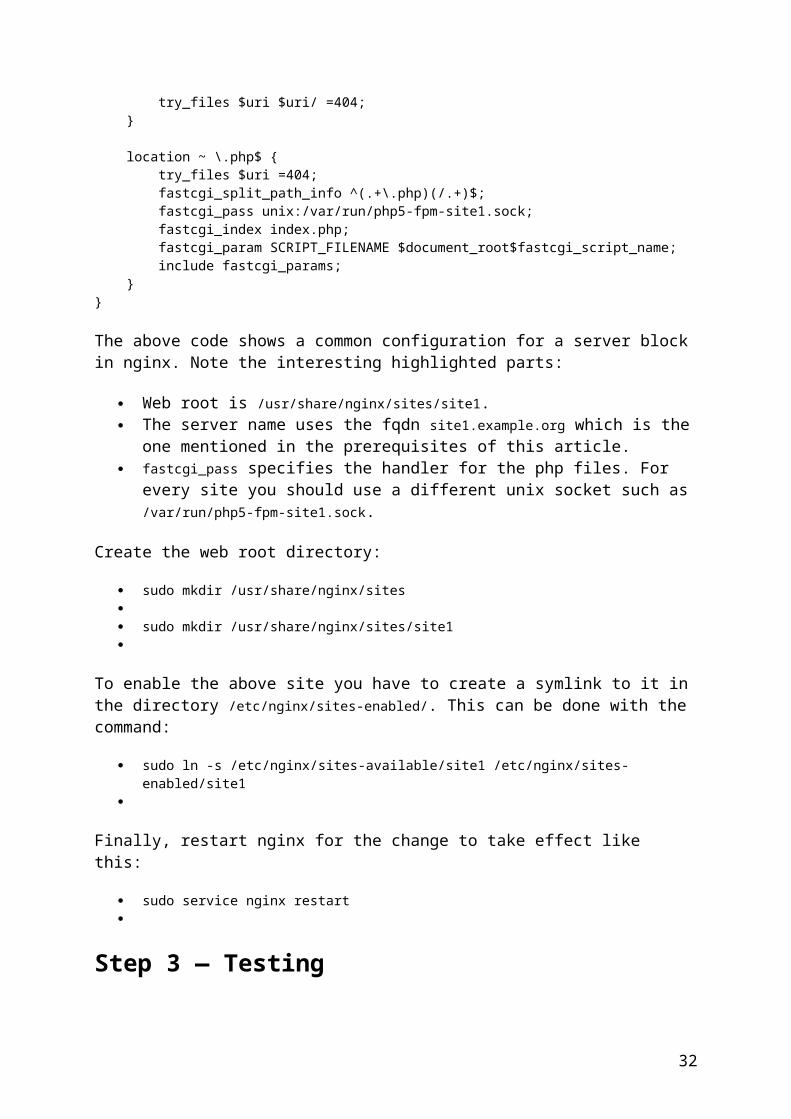
location ~ \.php$ { try_files $uri =404; fastcgi_split_path_info ^(.+\.php)(/.+)$; fastcgi_pass unix:/var/run/php5-fpm-site1.sock; fastcgi_index index.php; fastcgi_param SCRIPT_FILENAME $document_root$fastcgi_script_name; include fastcgi_params; }}
The above code shows a common configuration for a server block in nginx. Note the interesting highlighted parts:
Web root is /usr/share/nginx/sites/site1. The server name uses the fqdn site1.example.org which is the one mentioned in the
prerequisites of this article. fastcgi_pass specifies the handler for the php files. For every site you should use a
different unix socket such as /var/run/php5-fpm-site1.sock.
Create the web root directory:
sudo mkdir /usr/share/nginx/sites
24
sudo mkdir /usr/share/nginx/sites/site1
To enable the above site you have to create a symlink to it in the directory /etc/nginx/sites-enabled/. This can be done with the command:
sudo ln -s /etc/nginx/sites-available/site1 /etc/nginx/sites-enabled/site1
Finally, restart nginx for the change to take effect like this:
sudo service nginx restart
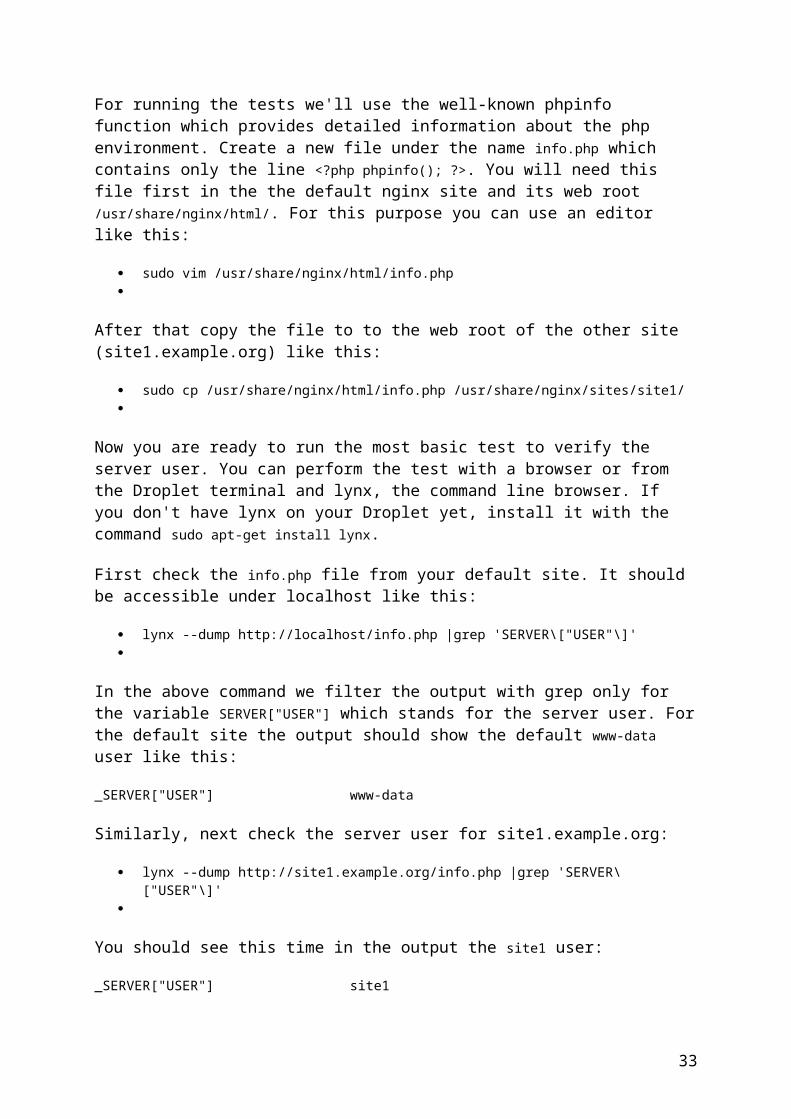
Step 3 — TestingFor running the tests we'll use the well-known phpinfo function which provides detailed information about the php environment. Create a new file under the name info.php which contains only the line <?php phpinfo(); ?>. You will need this file first in the the default nginx site and its web root /usr/share/nginx/html/. For this purpose you can use an editor like this:
sudo vim /usr/share/nginx/html/info.php
After that copy the file to to the web root of the other site (site1.example.org) like this:
sudo cp /usr/share/nginx/html/info.php /usr/share/nginx/sites/site1/
Now you are ready to run the most basic test to verify the server user. You can perform the test with a browser or from the Droplet terminal and lynx, the command line browser. If you don't have lynx on your Droplet yet, install it with the command sudo apt-get install lynx.
First check the info.php file from your default site. It should be accessible under localhost like this:
lynx --dump http://localhost/info.php |grep 'SERVER\["USER"\]'
In the above command we filter the output with grep only for the variable SERVER["USER"] which stands for the server user. For the default site the output should show the default www-data user like this:
_SERVER["USER"] www-data
Similarly, next check the server user for site1.example.org:
lynx --dump http://site1.example.org/info.php |grep 'SERVER\["USER"\]'
25
You should see this time in the output the site1 user:
_SERVER["USER"] site1
If you have made any custom php settings on a per php-fpm pool basis, then you can also check their corresponding values in the above manner by filtering the output that interests you.
So far, we know that our two sites run under different users, but now let's see how to secure a connection. To demonstrate the security problem we are solving in this article, we'll create a file with sensitive information. Usually such a file contains the connection string to the database and include the user and password details of the database user. If anyone finds out that information, the person is able to do anything with the related site.
With your favorite editor create a new file in your main site /usr/share/nginx/html/config.php. That file should contain:
/usr/share/nginx/html/config.php<?php$pass = 'secret';?>
In the above file we define a variable called pass which holds the value secret. Naturally, we want to restrict the access to this file, so we'll set its permissions to 400, which give read only access to the owner of the file.
To change the permissions to 400 run the command:
sudo chmod 400 /usr/share/nginx/html/config.php
Also, our main site runs under the user www-data who should be able to read this file. Thus, change the ownership of the file to that user like this:
sudo chown www-data:www-data /usr/share/nginx/html/config.php
In our example we'll use another file called /usr/share/nginx/html/readfile.php to read the secret information and print it. This file should contain the following code:
/usr/share/nginx/html/readfile.php<?phpinclude('/usr/share/nginx/html/config.php');print($pass);?>
Change the ownership of this file to www-data as well:
sudo chown www-data:www-data /usr/share/nginx/html/readfile.php
26
To confirm all permissions and ownerships are correct in the web root run the command ls -l /usr/share/nginx/html/. You should see output similar to:
-r-------- 1 www-data www-data 27 Jun 19 05:35 config.php-rw-r--r-- 1 www-data www-data 68 Jun 21 16:31 readfile.php
Now access the latter file on your default site with the command lynx --dump http://localhost/readfile.php. You should be able to see printed in the output secret which shows that the file with sensitive information is accessible within the same site, which is the expected correct behavior.
Now copy the file /usr/share/nginx/html/readfile.php to your second site, site1.example.org like this:
sudo cp /usr/share/nginx/html/readfile.php /usr/share/nginx/sites/site1/
To keep the site/user relations in order, make sure that within each site the files are owned by the respective site user. Do this by changing the ownership of the newly copied file to site1 with the command:
sudo chown site1:site1 /usr/share/nginx/sites/site1/readfile.php
To confirm you have set the correct permissions and ownership of the file, please list the contents of the site1 web root with the command ls -l /usr/share/nginx/sites/site1/. You should see:
-rw-r--r-- 1 site1 site1 80 Jun 21 16:44 readfile.php
Then try to access the same file from site1.example.com with the command lynx --dump http://site1.example.org/readfile.php. You will only see empty space returned. Furthermore, if you search for errors in the error log of nginx with the grep command sudo grep error /var/log/nginx/error.log you will see:
2015/06/30 15:15:13 [error] 894#0: *242 FastCGI sent in stderr: "PHP message: PHP Warning: include(/usr/share/nginx/html/config.php): failed to open stream: Permission denied in /usr/share/nginx/sites/site1/readfile.php on line 2
Note: You would also see a similar error in the lynx output if you have display_errors set to On in php-fpm configuration file /etc/php5/fpm/php.ini.
The warning shows that a script from the site1.example.org site cannot read the sensitive file config.php from the main site. Thus, sites which run under different users cannot compromise the security of each other.
If you go back to the end of configuration part of this article, you will see that we have disabled the default caching provided by opcache. If you are curious why, try to enable again opcache by setting with super user privileges opcache.enable=1 in the file
27
/etc/php5/fpm/conf.d/05-opcache.ini and restart php5-fpm with the command sudo service php5-fpm restart.
Amazingly, if you run again the test steps in the exactly the same order, you'll be able to read the sensitive file regardless of its ownership and permission. This problem in opcache has been reported for a long time, but by the time of this article it has not been fixed yet.
ConclusionFrom a security point of view it's essential to use php-fpm pools with a different user for every site on the same Nginx web server. Even if it comes with a small performance penalty, the benefit of such isolation could prevent serious security breaches.
The idea described in this article is not unique, and it's present in other similar PHP isolation technologies such as SuPHP. However, the performance of all other alternatives is much worse than that of php-fpm.
Home » Linux » How To Install OwnCloud 8 on Ubuntu 14.04
How To Install OwnCloud 8 on Ubuntu 14.04
For those of you who didn’t know, OwnCloud is a free and open-source software which enables you to create a private “file-hosting” cloud. OwnCloud is similar to DropBox service with the diference of being free to download and install on your private server. Owncloud made by PHP and backend database MySQL (MariaDB), SQLLite or PostgreSQL. OwnCloud also enables you to easily view and sync address book, calendar events, tasks and bookmarks. You can access it via the good looking and easy to use web interface or install OwnCloud client on your Desktop or Laptop machine (supports Linux, Windows and Mac OSX).
This article assumes you have at least basic knowledge of linux, know how to use the shell, and most importantly, you host your site on your own VPS. The installation is quite simple. I will show you through the step by step installation OwnCloud 8 on Ubuntu 14.04.
Step 1. First of all log in to your server as root and make sure that all packages are up to date.
12
apt-get updateapt-get upgrade
Step 2. Instal Apache web server on your Ubuntu 14.04 VPS if it is not already installed.
28
1 apt-get install apache2Step 3. Next, install PHP on your server.
1 apt-get install php5 php5-mysql
Once the installation is done add the following PHP modules required by OwnCloud:
1 apt-get install php5-gd php5-json php5-curl php5-intl php5-mcrypt php5-imagick
Step 4. Install MySQL database server.
1 apt-get install mysql-server
By default, MySQL is not hardened. You can secure MySQL using the mysql_secure_installation script. you should read and below each steps carefully which will set root password, remove anonymous users, disallow remote root login, and remove the test database and access to secure MySQL.
1 mysql_secure_installation
Step 5. Create a new MySQL database for OwnCloud using the following commands.
12
#mysql -u root -pEnter password:
29
345678
mysql> CREATE USER 'ownclouduser'@'localhost' IDENTIFIED BY 'YOURPASSWORD';mysql> CREATE DATABASE ownclouddb;mysql> GRANT ALL ON ownclouddb.* TO 'ownclouduser'@'localhost';mysql> FLUSH PRIVILEGES;mysql> exit
Step 6. Installing Owncloud 8.
First we will need to download the latest stable release of OwnCloud on your server (at the time version 8.0.0).
12
wget https://download.owncloud.org/community/owncloud-8.0.0.tar.bz2tar -xvf owncloud-8.0.0.tar.bz2 -C /var/www/html/
Set the directory permissions:
1 chown www-data:www-data -R /var/www/html/owncloud/Step 7. Configuring Apache for OwnCloud.
While configuring Apache web server, it is recommended that you to enable .htaccess to get a enhanced security features, by default .htaccess is disabled in Apache server. To enable it, open your virtual host file and make AllowOverride is set to All.For example, here i used external config file instead of modifying main file.
1234567891011
### nano /etc/apache2/sites-available/owncloud.conf <IfModule mod_alias.c>Alias /owncloud /var/www/html/owncloud</IfModule><Directory “/var/www/html/owncloud”>Options Indexes FollowSymLinksAllowOverride AllOrder allow,denyallow from all</Directory>
30
Remember to restart all services related to Apache server.
1 service apache2 restartStep 8. Access OwnCloud application.
Navigate to http://your-domain.com/ and follow the easy instructions. Enter username and password for the administrator user account, click on the ‘Advanced options’ hyperlink and enter the data directory (or leave the default setting), then enter database username, database password, database name, host (localhost) and click ‘Finish setup’.
VPS Manage Service OfferIf you don’t have time to do all of this stuff, or if this is not your area of expertise, we offer a service to do “VPS Manage Service Offer”, starting from $10 (Paypal payment). Please contact us to get a best deal!
Home » Linux » How To Install LAMP on Ubuntu 15.04
31
How To Install LAMP on Ubuntu 15.04 r00t July 12, 2015
For those of you who didn’t know, LAMP represents a full featured stack containing the most popular web server known as Apache, the most popular database server MySQL and the most popular open-source web programming language known as PHP. All components are free and open-source software, and the combination is suitable for building dynamic web pages.
This article assumes you have at least basic knowledge of linux, know how to use the shell, and most importantly, you host your site on your own VPS. The installation is quite simple. I will show you through the step by step installation LAMP (Linux Apache, MySQL and PHP) on Ubuntu 15.04 server.
Step 1. First of all make sure that all packages are up to date.
12
apt-get updateapt-get upgrade
Step 2. Installing Apache on Ubuntu 15.04.
We will be installing Apache with apt-get, which is the default package manager for ubuntu:
1 apt-get install apache2
You can verify that Apache is really running by opening your favorite web browser and entering the URL http://your-server’s-address, if it is installed, then you will see this:
32
Apache Default Page
Step 3. Installing MySQL.
To install MySQL in Ubuntu 15.04 run the following command:
1 apt-get install mysql-server mysql-client
Once complete, you can verify MySQL is installed by running the below command:
1 systemctl status mysql
By default, MySQL is not hardened. You can secure MySQL using the mysql_secure_installation script. you should read and below each steps carefully which will set root password, remove anonymous users, disallow remote root login, and remove the test database and access to secure MySQL:
1 mysql_secure_installation
33
To log into MySQL, use the following command (note that it’s the same command you would use to log into a MySQL database):
1 mysql -u root -p
Step 4. Installing PHP.
To install PHP in Ubuntu 15.04 simply run the following command:
1 apt-get -y install php5 php5-mysql libapache2-mod-php5
Your server should restart Apache automatically after the installation of both MySQL and PHP. If it doesn’t, execute this command:
1 service apache2 restart
To test PHP, create a test file named info.php with he content below. Save the file, then browse to it to see if PHP is working:
1 nano /var/www/html/info.php
123
<?phpphpinfo();?>
Try to access it at http://your_server_ip/info.php . If the PHP info page is rendered in your browser then everything looks good and you are ready to proceed further.
34
PHP version and Information
Congratulation’s! You have successfully installed LAMP stack. Thanks for using this tutorial for installing LAMP (Linux Apache, MySQL and PHP) on Ubuntu 15.04 system. For additional help or useful information, we recommend you to check the official Apache, MySQL and PHP web site.
VPS Manage Service OfferIf you don’t have time to do all of this stuff, or if this is not your area of expertise, we offer a service to do “VPS Manage Service Offer”, starting from $10 (Paypal payment). Please contact us to get a best deal!
Home » Linux » How To Install DHCP Server on Ubuntu 14.04
How To Install DHCP Server on Ubuntu 14.04 r00t June 4, 2015
For those of you who didn’t know, The Dynamic Host Configuration Protocol (DHCP) is a standardized network protocol used on Internet Protocol (IP) networks for dynamically distributing network configuration parameters, such as IP addresses for interfaces and services. With DHCP, computers request IP addresses and networking parameters automatically from a DHCP server, reducing the need for a network administrator or a user to configure these settings manually.
35
This article assumes you have at least basic knowledge of linux, know how to use the shell, and most importantly, you host your site on your own VPS. The installation is quite simple. I will show you through the step by step installation DHCP Server on Ubuntu 14.04.
Step 1. First of all make sure that all packages are up to date.
12
apt-get updateapt-get upgrade
Step 2. Install DHCP server.
To install DHCP server on Ubuntu 14.04 LTS, enter the following command:
1 sudo apt-get install isc-dhcp-server -y
Step 3. Configuration DHCP server.
The DHCP server is not difficult to configure. First, we have to assign on what interfaces should the DHCP server (dhcpd) serve DHCP requests.
123
### nano /etc/default/isc-dhcp-server......INTERFACES="eth0"
Editing file /etc/dhcp/dhcpd.conf:
1 nano /etc/dhcp/dhcpd.conf
Add the below code after making changes as per your network values:
36
12345678910111213141516171819
# option definitions common to all supported networks...default-lease-time 600;max-lease-time 7200;# If this DHCP server is the official DHCP server for the local# network, the authoritative directive should be uncommented.authoritative;# Use this to send dhcp log messages to a different log file (you also# have to hack syslog.conf to complete the redirection).log-facility local7; subnet 192.168.1.0 netmask 255.255.255.0 { #network range 192.168.1.50 192.168.1.100; # Range option domain-name-servers 192.168.1.2, 8.8.8.8; #Pri DNS , Sec DNS option domain-name "lintut.com"; #Domain name option routers 192.168.1.1; #Gateway option broadcast-address 192.168.1.255; #Broadcast default-lease-time 600; max-lease-time 7200;}
Finally you have to restart the dhcp service by using the following command:
1 sudo service isc-dhcp-server restart
You can check if your dhcp server is working properly bt running the following command:
1 sudo netstat -uap
Congratulation’s! You have successfully installed DHCP Server. Thanks for using this tutorial for installing DHCP Server on Ubuntu 14.04 system.
VPS Manage Service OfferIf you don’t have time to do all of this stuff, or if this is not your area of expertise, we offer a service to do “VPS Manage Service Offer”, starting from $10 (Paypal payment). Please contact us to get a best deal!
37


